MeasureSchool Presents
The Ultimate Guide to Form Tracking with GTM

MeasureSchool Presents
Welcome to MeasureSchool! Class is in session.
Forms are at the heart of your online business funnel. They are the medium through which potential clients contact you, subscribe to your content, and make purchases.
So of course, it’s only logical to make form tracking a high priority for your website analytics.
There are all kinds of fancy features like tracking individual form fields and creating hidden UTM fields—but the most basic and important trackable is form submissions themselves.
Form submissions tell you a story about your website visitors and potential customers. Who is interested in your services? Where in the world are they? What else did they do before submitting your form?
This is the story behind your audience, which helps you target your marketing more effectively and increase conversions.
Tracking is an art—there’s no singular perfect method for all use cases. That’s why in this eBook, I'll show you three different techniques to track a form submission.
With the techniques from this guide in your back pocket, you should be able to set up your own tracking for almost any kind of form.
We've got a lot to cover, so let's dive in!
Julian Juenemann
Julian Juenemann started and grew venture-backed startups with his unique 'data first' approach to online marketing. He then founded Measureschool.com to help marketers like him learn the data-driven way of digital marketing.
Want to take your digital marketing skills to the next level? The Measureschool mission is to teach you the data-driven way of digital marketing.
With tools like Google Analytics, it’s easier than ever to measure your approach and action accordingly. The resulting data is the secret to scalable business success of many online businesses. And we want to teach it to you!
At Measureschool we want to help you to collect better data, utilize digital measurement in your decision making, and help you stay up to date on the trends of new tools.
I hope you enjoy our material and join us on the path of data-driven marketing.
Why three different techniques?
For starters, there are always multiple techniques to get the data that you want. Don’t be discouraged if your first approach doesn’t work! If you are flexible, you can learn new applications and workarounds with each tool.
By presenting you with three approaches, we hope to get your mental gears turning so that you’re well-equipped to engineer your own tracking solutions. Keep testing and tinkering—you’ll find a way to get the most important data to your tool in the most efficient way possible.
This holds especially true for forms because they come in so many shapes and sizes. Your website may have a unique combination of plugins, presets, and custom forms, each with their own quirks.
Sometimes the triggers or techniques that I show in my individual tutorials won’t work for a specific form. When this happens, you can still succeed if you stay flexible and use your knowledge about these different tracking techniques.
In other words, having a few different techniques at your disposal leaves you better equipped to handle a variety of tracking situations.
Your flexibility with tracking depends on your diagnostic ability. With forms, this means determining what type of form you have and what elements make the most sense to use as triggers.
There are three triggers that we will look for in this tutorial: a redirection to success page; a form converting to a submission success message; and a new visible element.
We’ll start our form diagnostic and tracking process with the web page for the form you want to track, Google Tag Manager, and Google Analytics all open in three separate tabs.
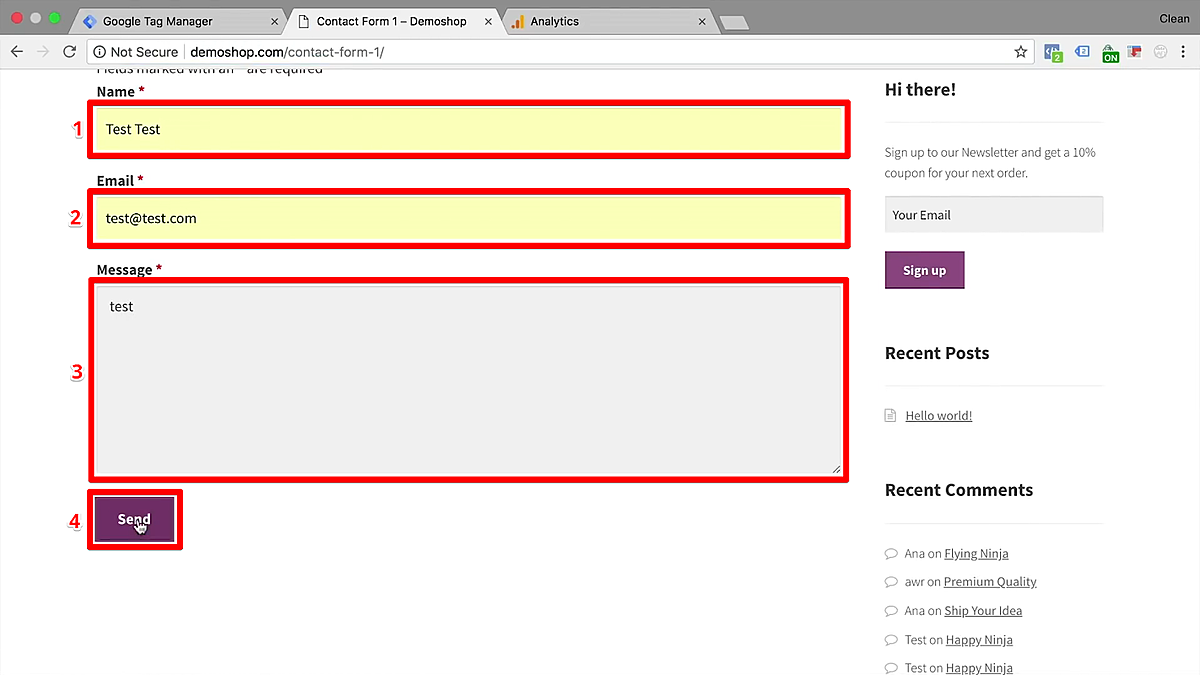
In your form, fill out some test information. Submit your form and see what happens (you can do this in GTM preview mode if you’d like).
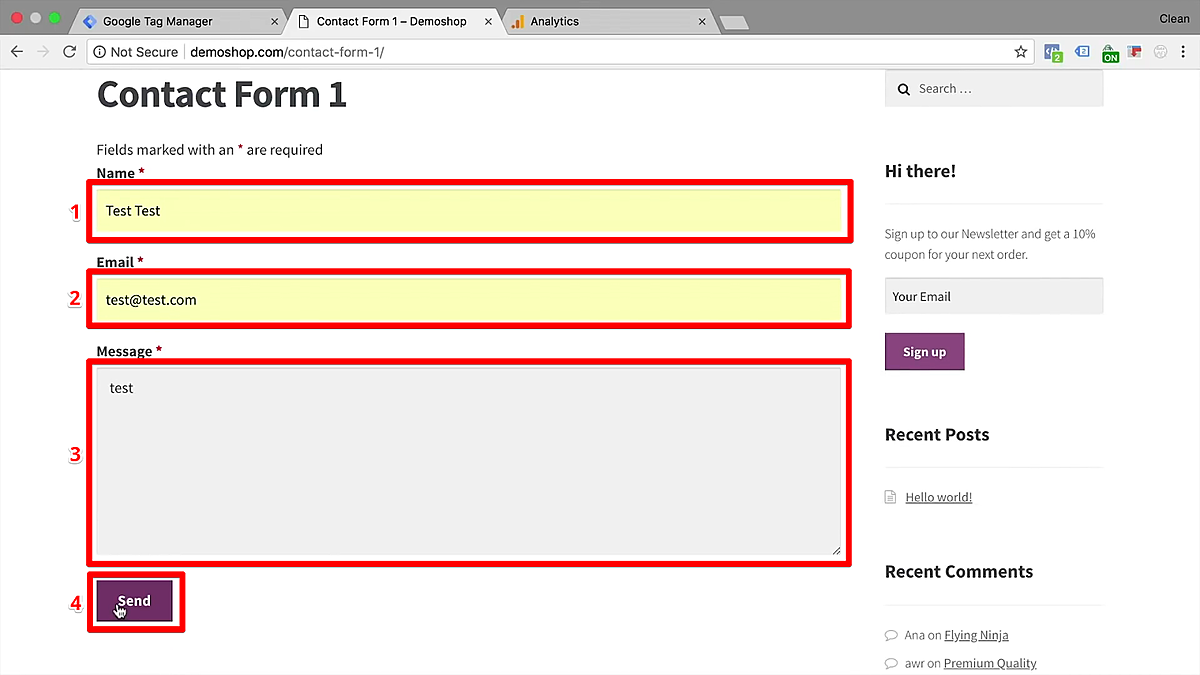
In the case of some forms, you will be redirected to a success page with a unique URL in the address bar.
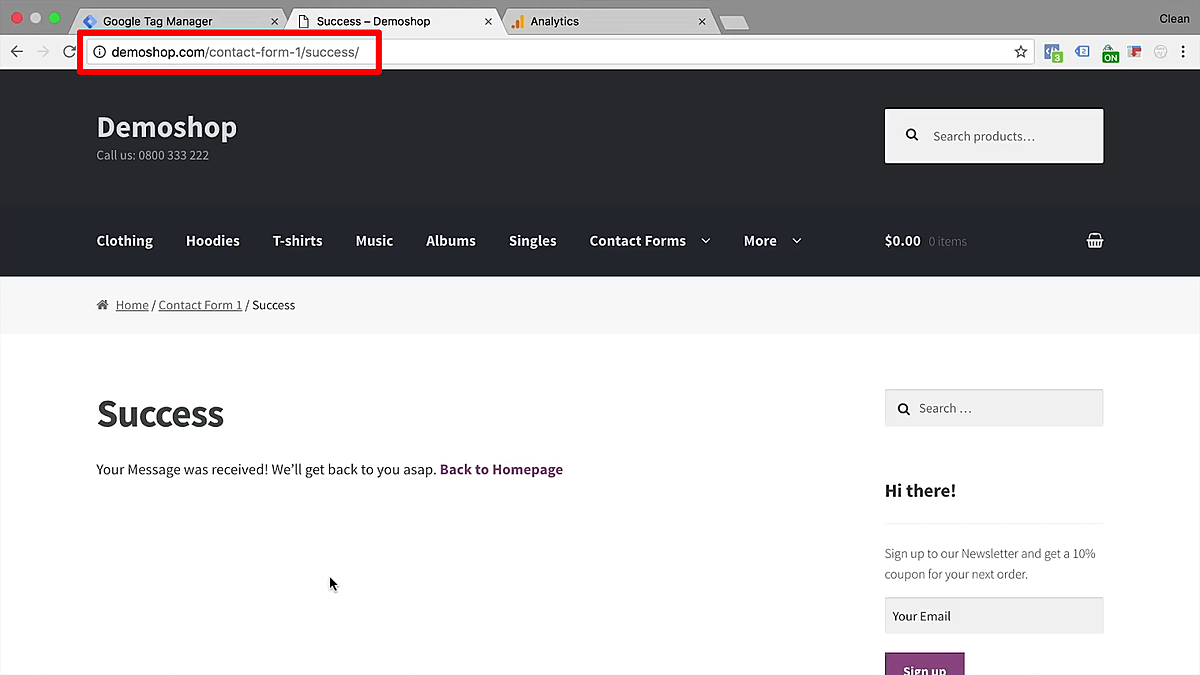
Keep track of these interactions on your site. If there is a clear success page here and the URL changes, you can track form submissions using ordinary pageviews on Google Analytics without much extra effort.
You should use the first form tracking method of this tutorial: Tracking Form Submissions with a URL Success Page.
But there are other potential outcomes. If your form doesn’t lead to a new URL when a user submits it, tracking can get a little more tricky.
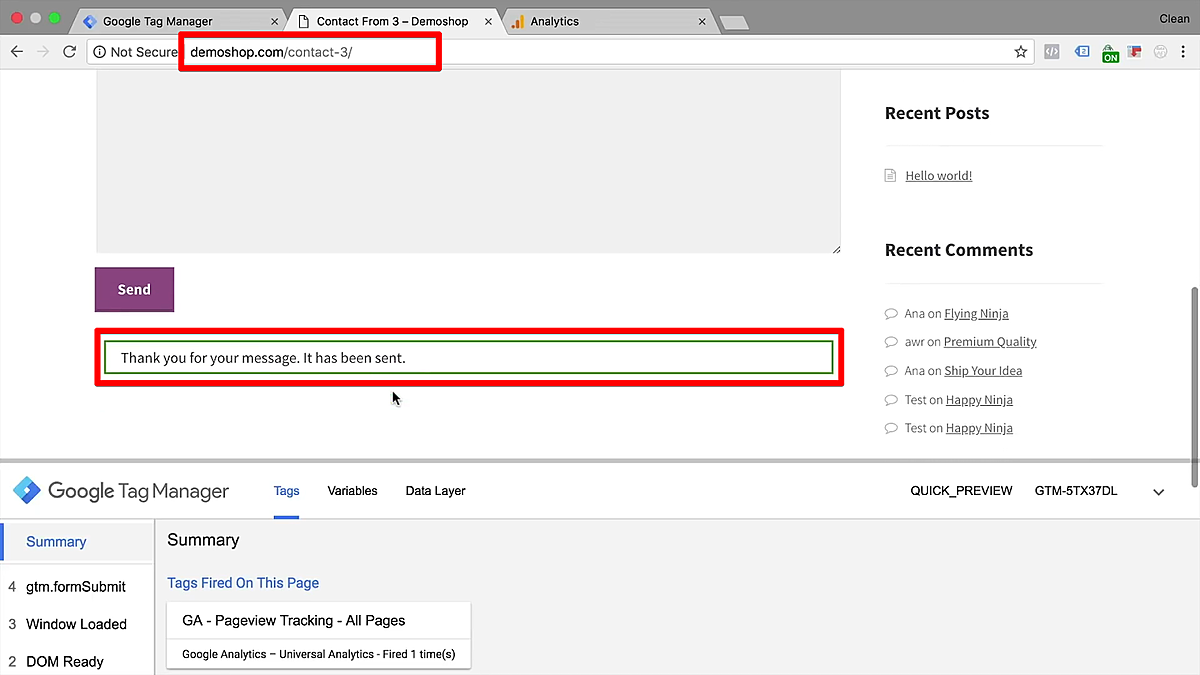
A second possibility is that you will appear to be redirected to a success page, but the URL hasn’t changed. Instead, a success message has replaced the form on the same page.

If this is how your contract form behaves, you’ll need to try a different tracking approach because there’s no new pageview to track. In this case, you should use the second method in this tutorial: Form Tracking with a Form Submission Trigger.
There is a third possibility that we will cover in this guide. For some forms, a submission will just show the user a success message down at the bottom of the form. There's no new URL, and besides the addition of this element, the page hasn’t changed after submitting the form.
If your form submission looks like this, you might have a couple of options. Again, you can’t track success based on the URL, but you might be able use the Google Tag Manager forms submission from the second method.
However, I want to show you another method to track this that will give you more flexibility, especially with a variety of other use cases. For example, you might not want to use the form submission trigger if it has some problem, or if you don’t even see the event inside of Google Tag Manager.
In this case, you’ll want to try the third method covered in this guide: Form Tracking with an Element Visibility Trigger.
So you’ve got a form that redirects you to a new page upon submitting. Lucky you! This is the quickest and easiest form tracking method.
There are just two main steps to this method: creating a Goal in Google Analytics, and then testing your Goal to make sure your implementation is effective.
Our first step is to create a Goal in Google Analytics to identify the form submission as an important step in your funnel. If you already have Google Analytics deployed on your website, then you’ll get a bit of data just from the pageview for the success page in your Google Analytics account.
From here, you can classify this pageview as a Goal Conversion so that every time somebody goes to this page, Google Analytics will record it as a conversion.
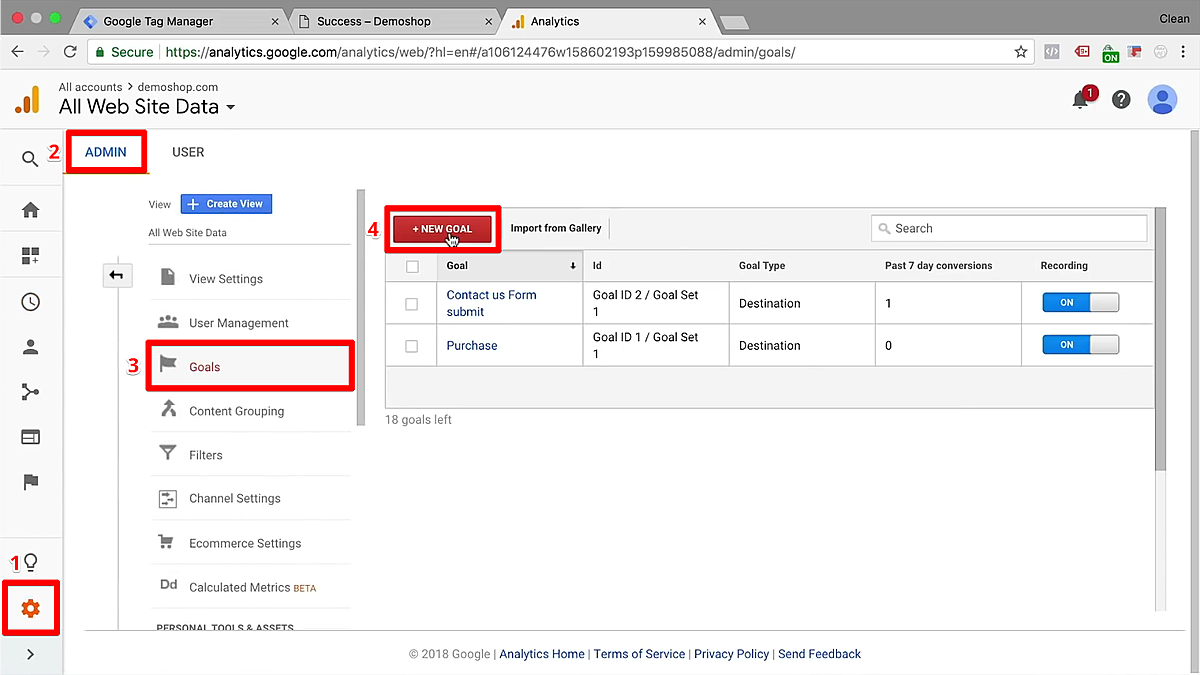
Go over to your settings, marked by the gear icon, and make sure you are looking under the Admin header. Under the Goals heading, click the button that says + New Goal.
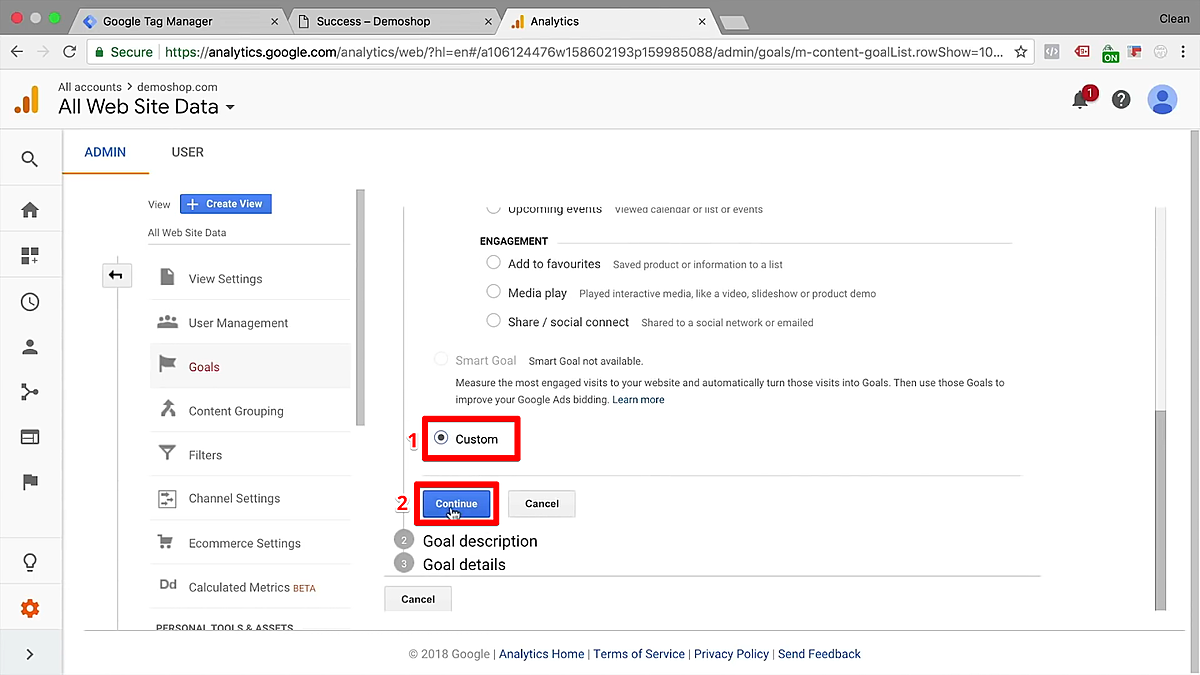
You’ll see different template options here. I usually go with the custom template. Pick what works for you and click Continue.
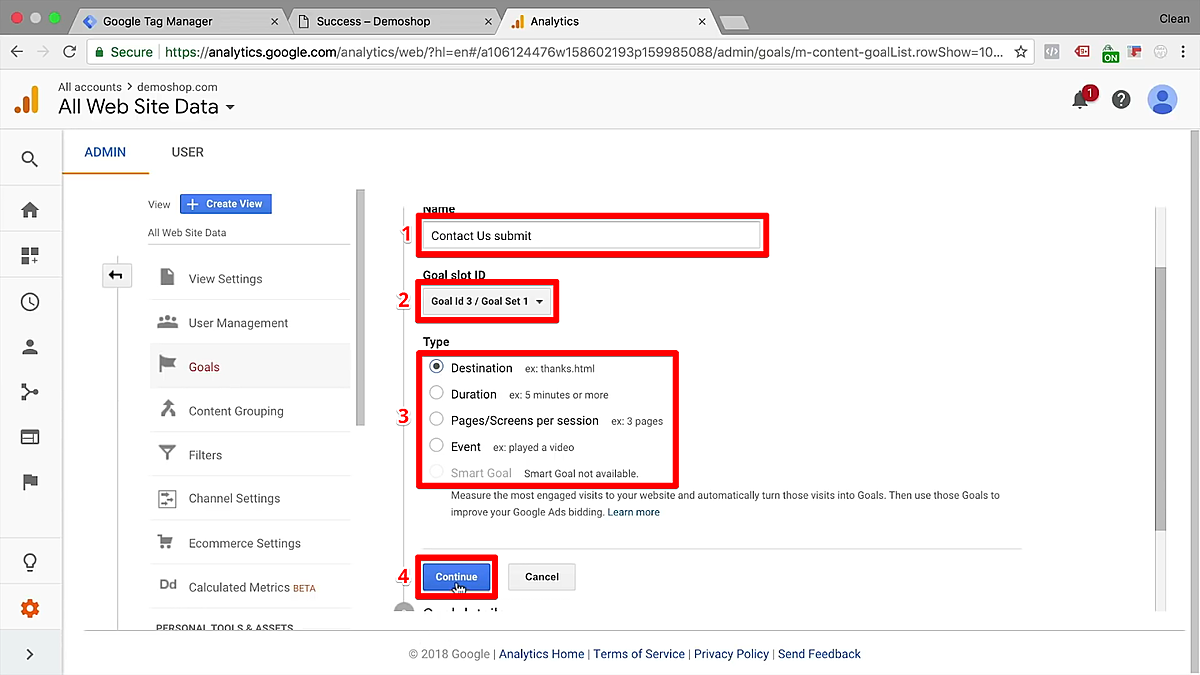
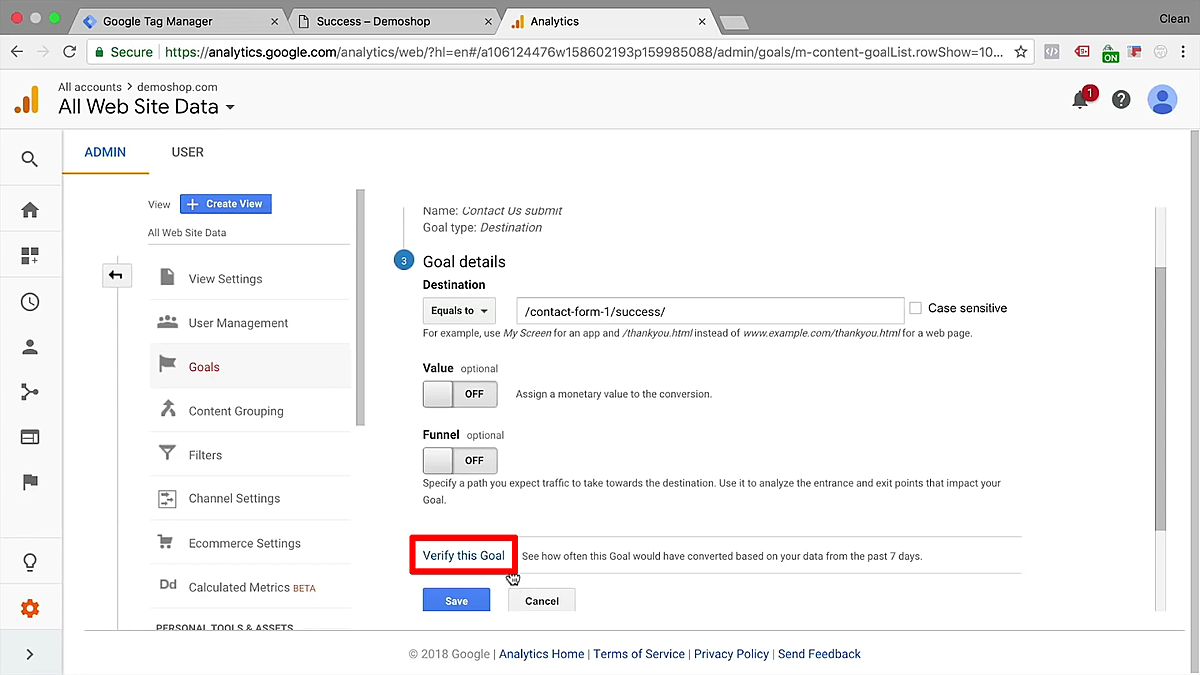
Under the Goal Description, give your Goal an appropriate name, such as “Contact Us submit.” Next, choose a Goal slot ID and the type of Goal that you want to input. In this case, you have a pageview that you want to classify, so select the Destination Goal here. Continue to the next section.
Next, you want to connect this Goal directly to the URL for the success page. Select the Equals to option, then fill the field with the page path that comes after your domain.
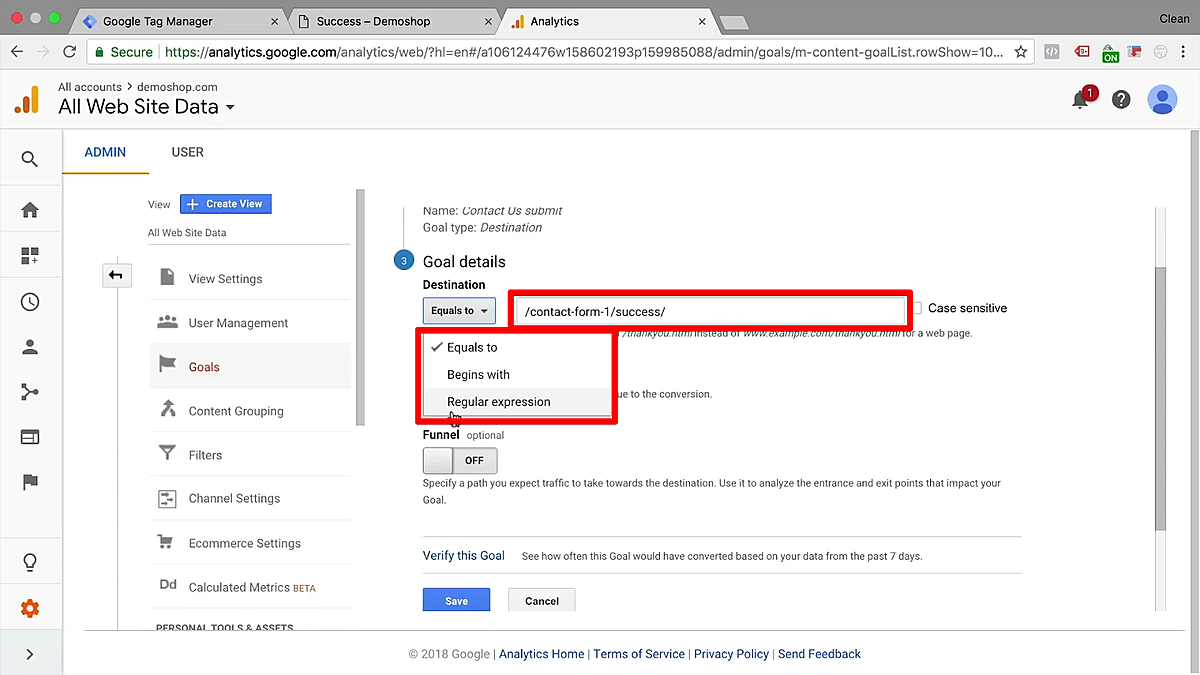
If you want to get a little fancy, you can also choose the Regular expression option. It’s very powerful, but requires some familiarity with RegEx to do effectively. For the sake of simplicity, I’m using Equals to here since it works well for this purpose.
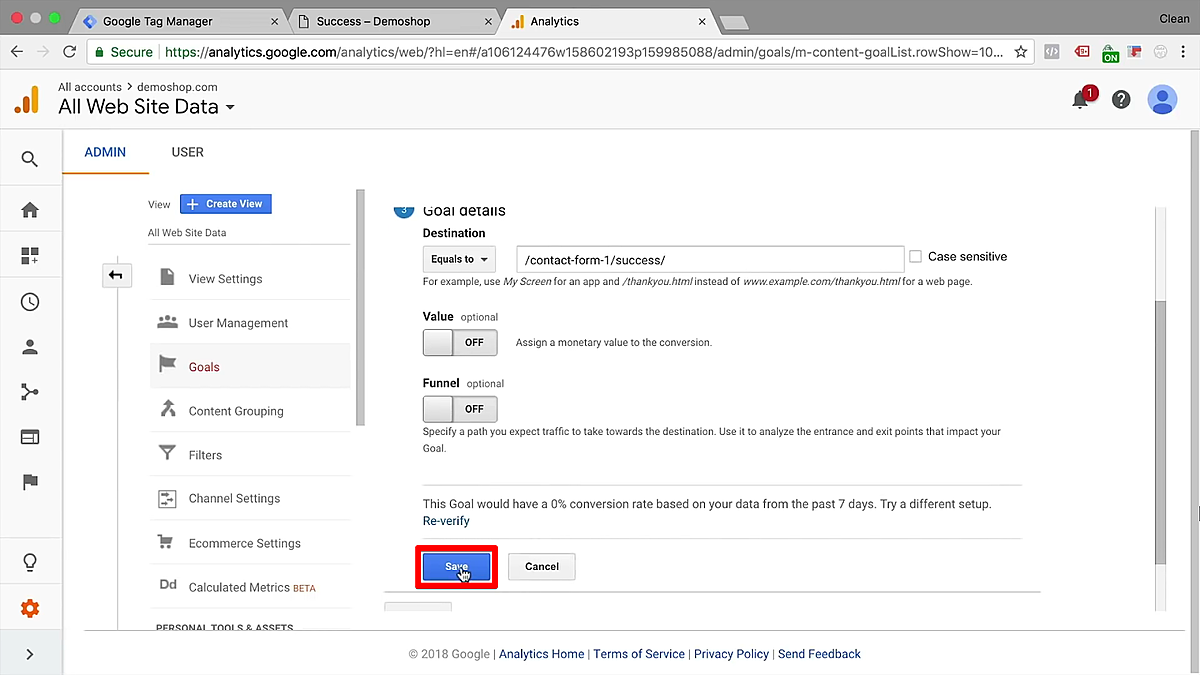
To test your new Goal, start by clicking Verify this Goal under your Goal details. If your website doesn’t have much data yet, you might see a 0% conversion rate. This is normal for a site with minimal data! But if your site has been collecting data for a little while, then hopefully you should see some conversions. This is a good indicator that your Goal is correctly configured.
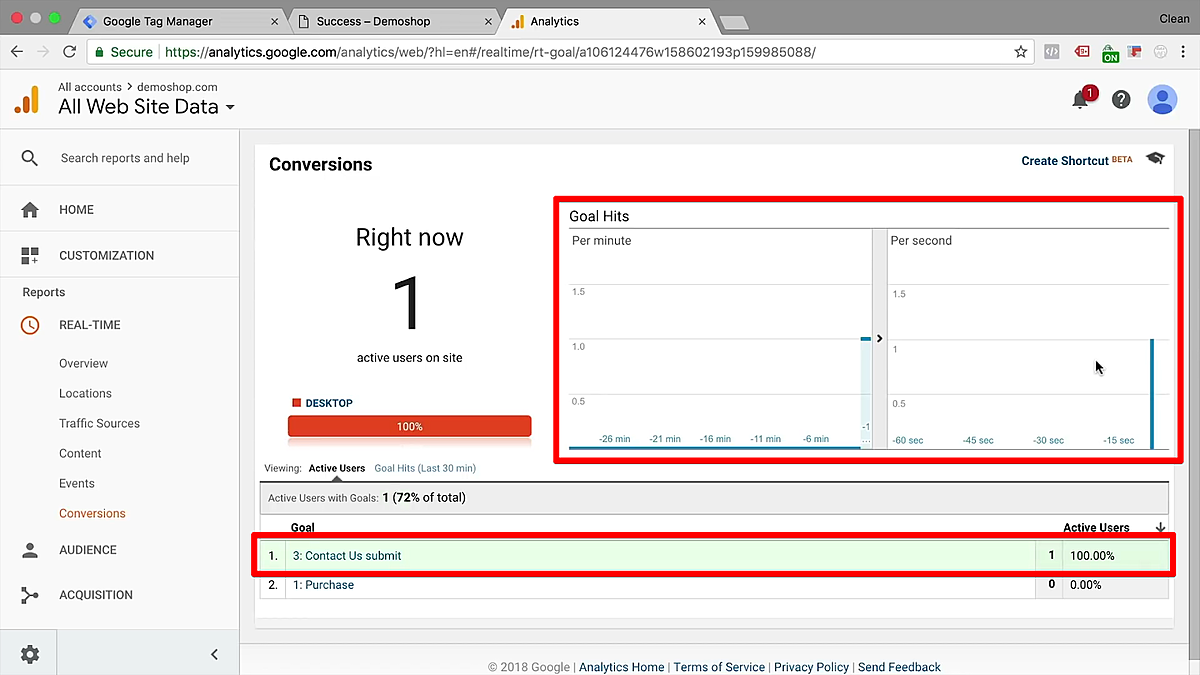
Another way to test your new Goal is in real time on your site. Save your Goal, and let’s look at some other testing options.
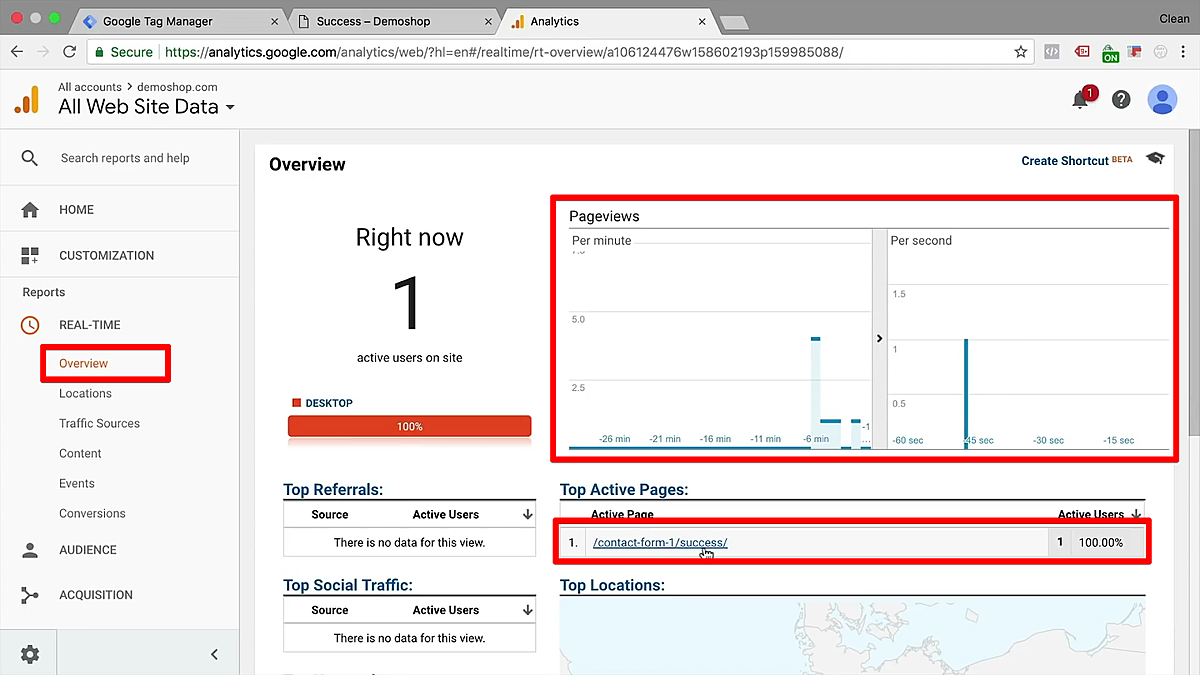
Open your Realtime report and click on the Conversions heading. (Note: if you’re using Google Analytics 4, “realtime” is a little bit slow since GA4 sends data in batches!)
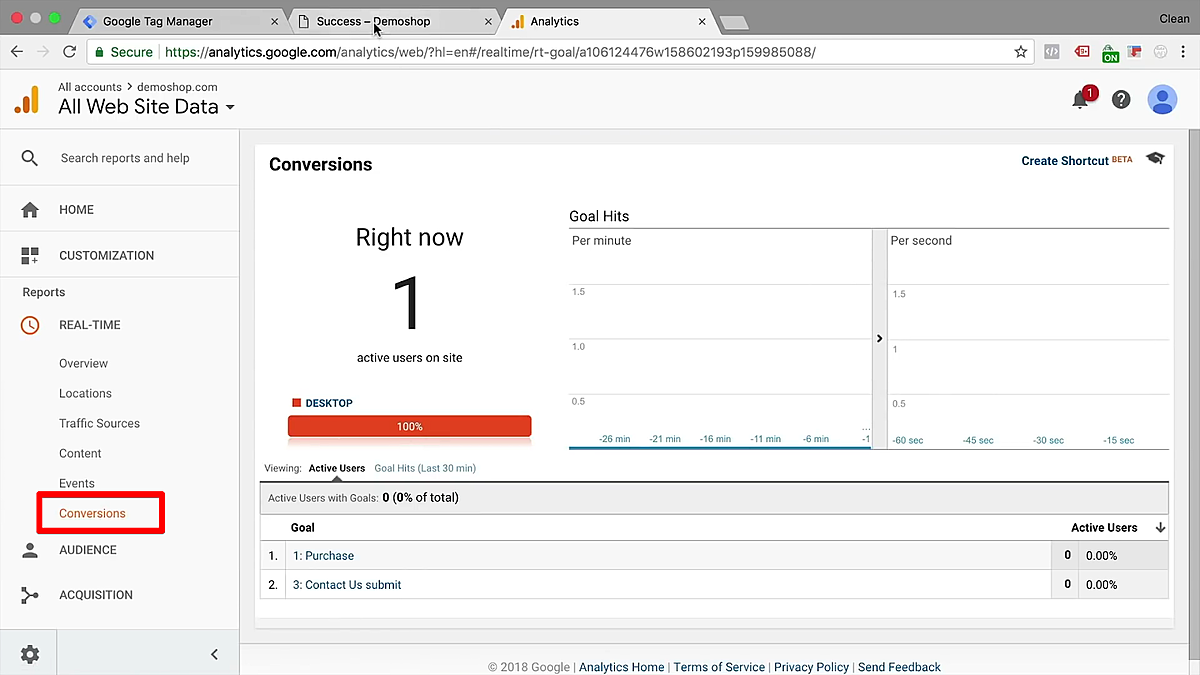
Now that you have this open, go back to your form on a different tab. Try to trigger another conversion here by testing your form submission, and see what happens on your Google Analytics conversion data.
If everything is working, you’ll see your Goal appear in your realtime conversions report. You’ll also be able to view that and a full report later on as a Goal conversion.
As you can see, form tracking doesn’t have to be complicated at all! If you have a success page right after the form is submitted, then a pageview is all it takes to let you know that a user has taken the action that you wanted them to take.
Although not all form submissions can be tracked with a pageview, many forms are designed to be easily trackable via a form submission trigger recognized by Google Tag Manager. This is thanks to some handy variables in a Data Layer that gets pushed upon the form’s submission.
If your form seems to magically change into a success message after clicking the “submit” button, then it’s likely that Google Tag Manager will recognize this with a Form Submission trigger.
First, we'll set up GTM by creating a trigger, enabling some variables, and building and testing a Tag. Then, just like with the first method, we'll create a Goal in Google Analytics and test our implementation.
Before we set up any Goals in Google Analytics, we’ll need to do some quick configurations in Google Tag Manager. These short, easy steps include creating a trigger, turning on some variables, inspecting the Data Layer, and creating and testing our Tag.
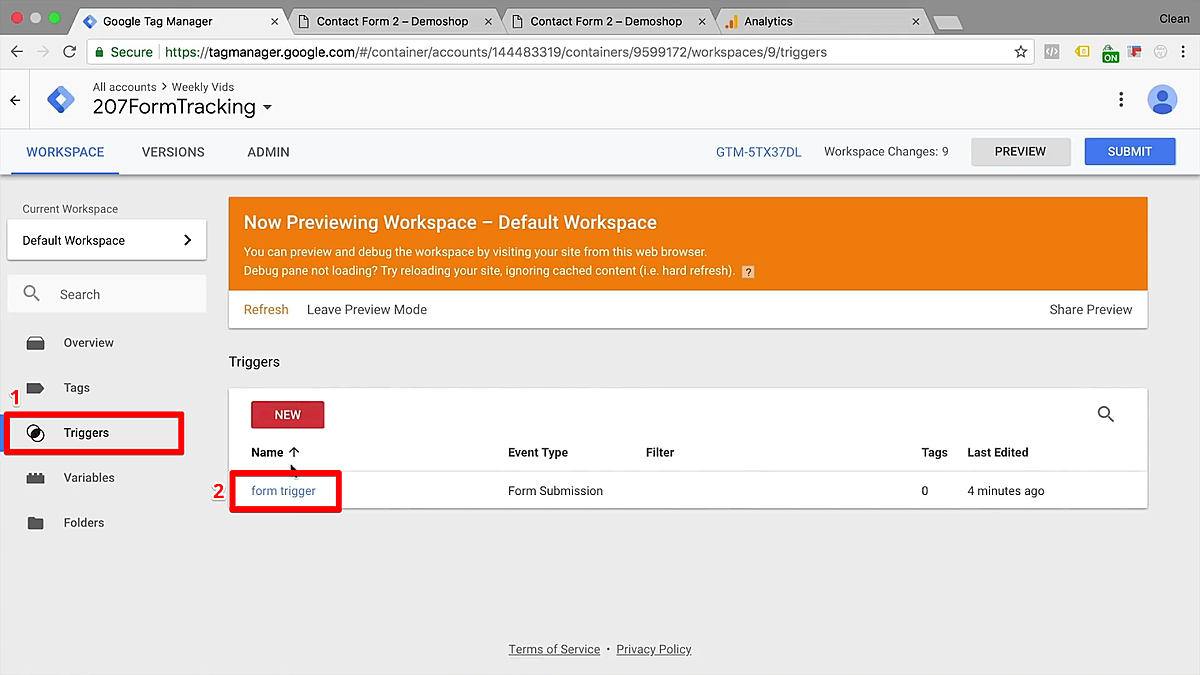
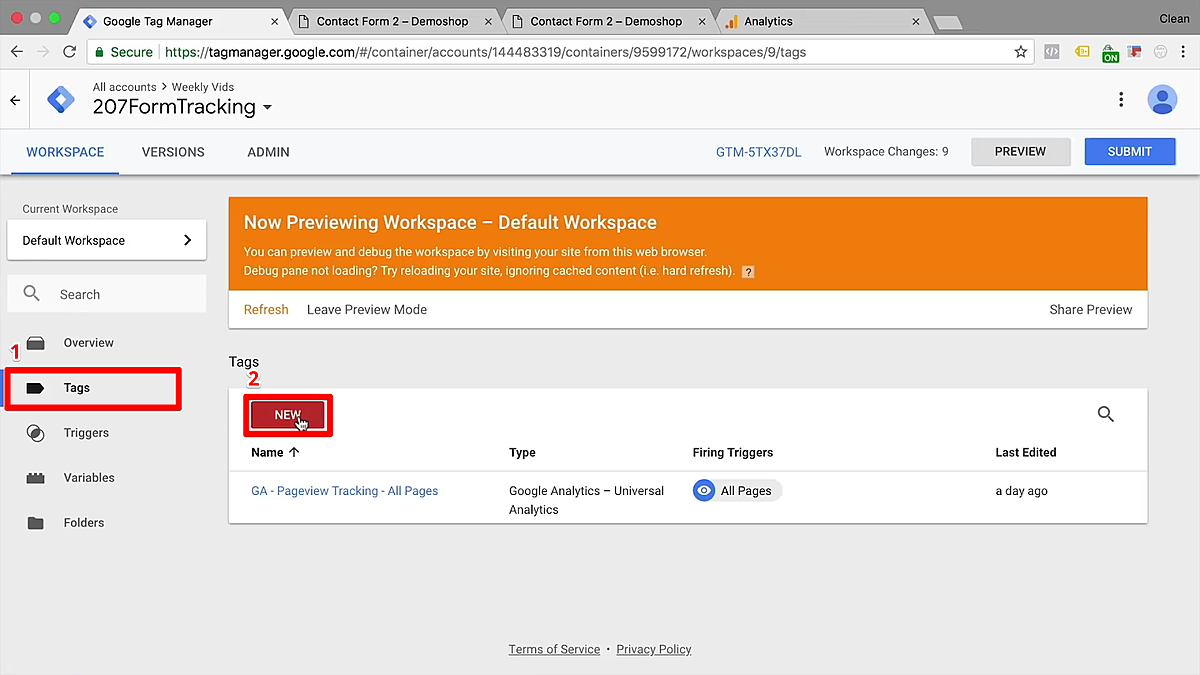
We’ll start in your Google Tag Manager account. Click the Triggers heading, then click New to create a new trigger.
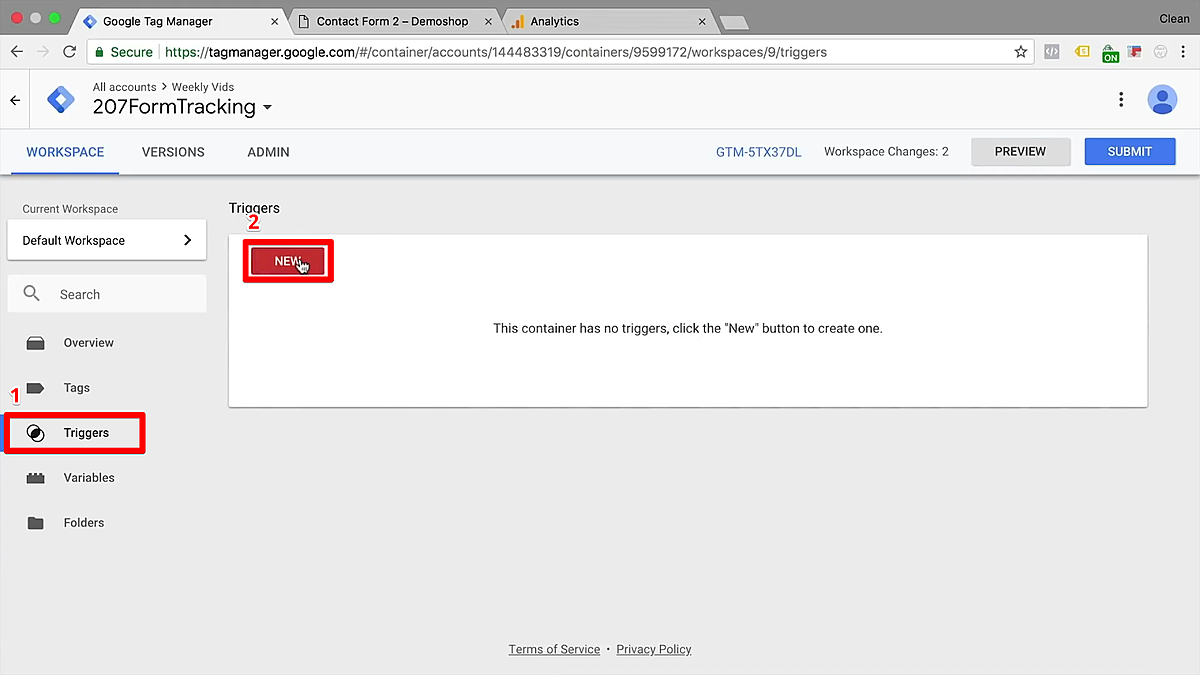
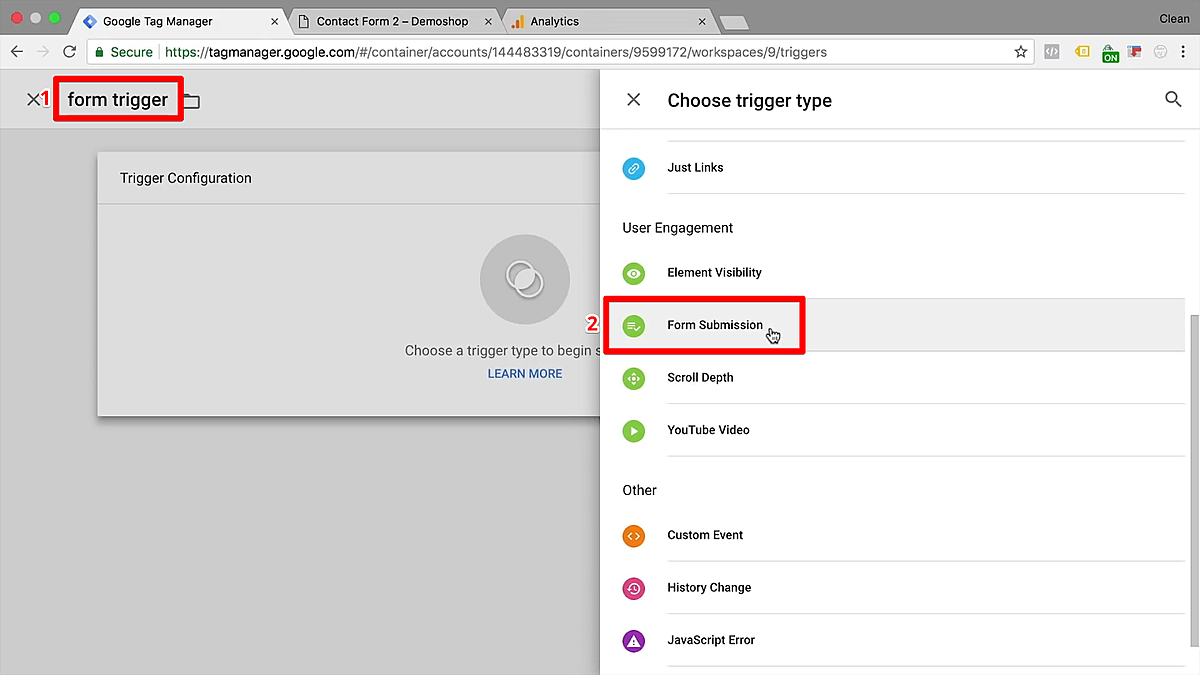
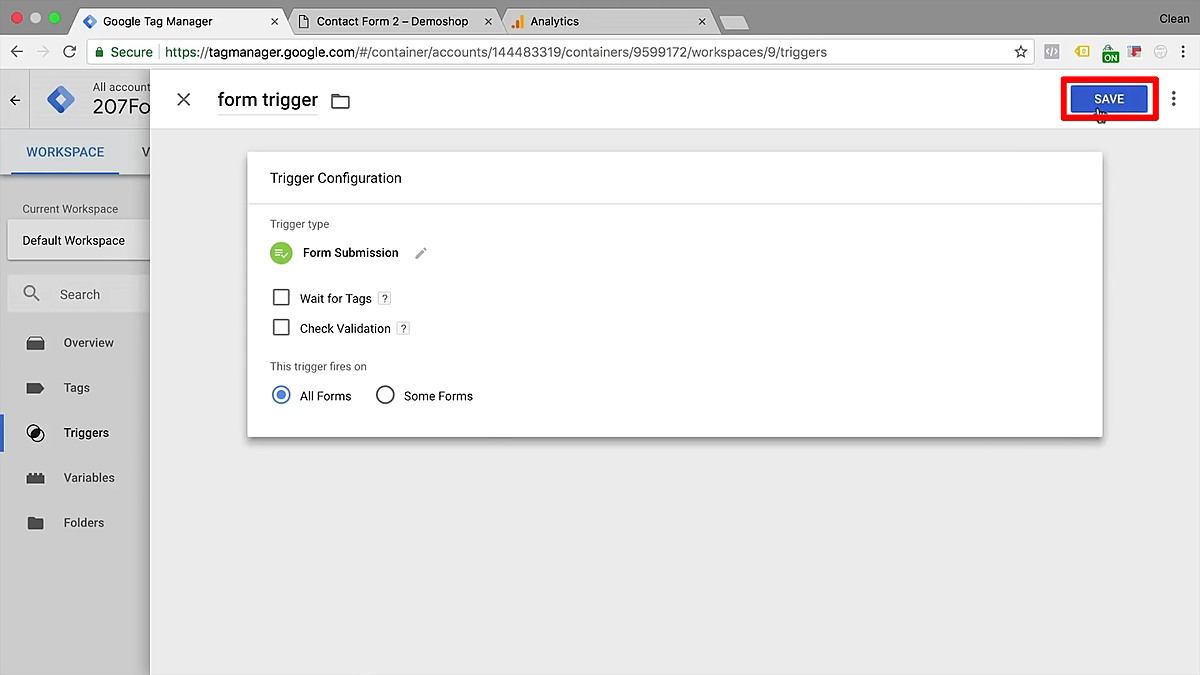
Name your trigger so that you’ll be able to identify it easily among your other triggers. Next, click in the Trigger Configuration box and scroll down until you find the type called Form Submission. Click on this.
For now, leave all your options unchecked. We’ll come back to these later after we do some Tag testing. Just to try it out, go ahead and click the Save button.
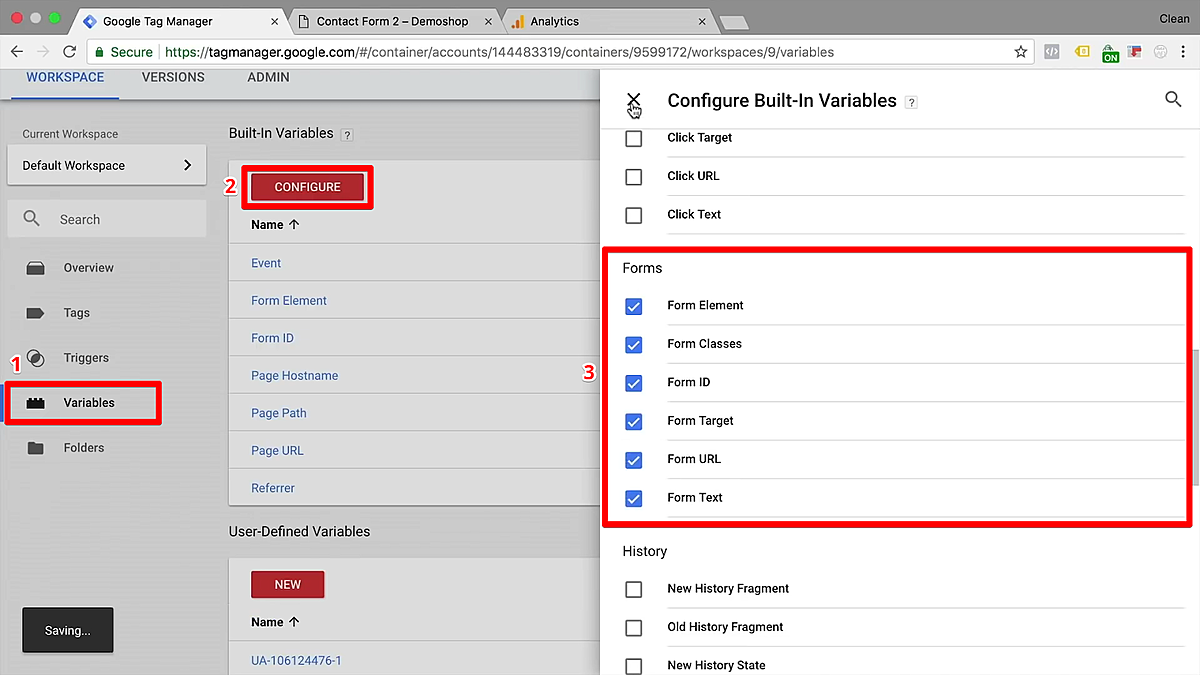
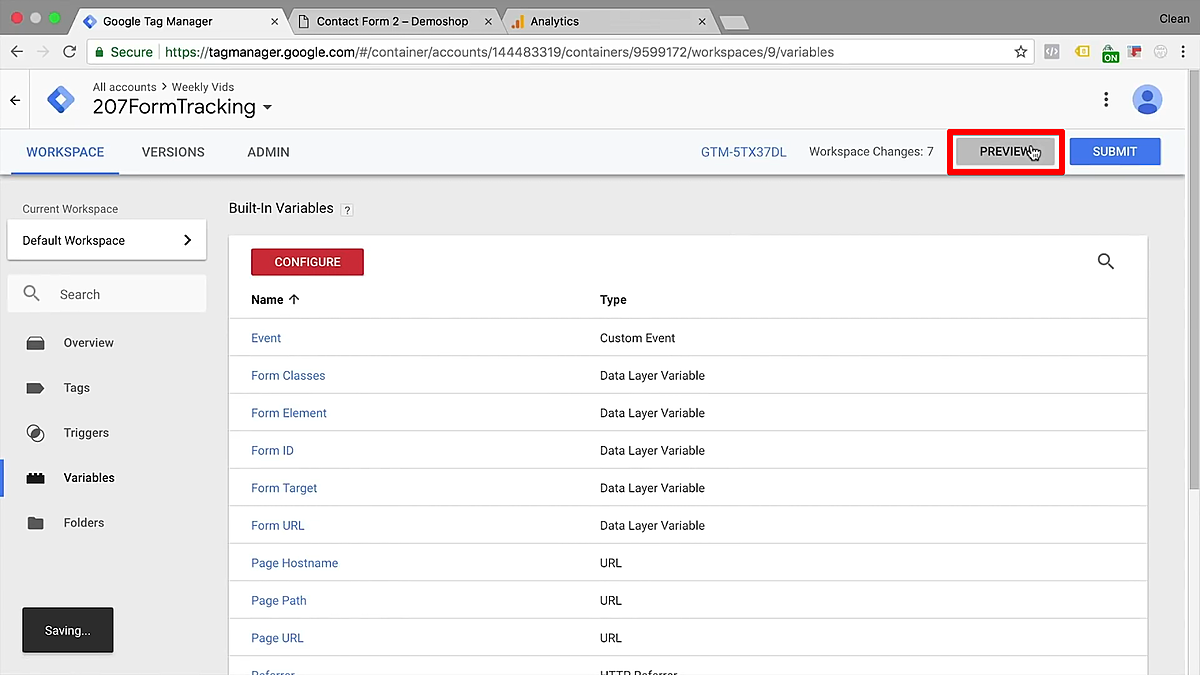
Next, we’ll turn on some variables that help us identify our form. Under the heading Variables, click the Configure button. Scroll down until you find all the variables related to Forms. Check each of the boxes to activate them. We'll turn on all of the form-related built-in variables: Form Element, Form Classes, Form ID, Form Target, Form URL, and Form Text.
With those activated, you can move on to preview and debug mode. Close the popup to return to the GTM page and click on Preview.
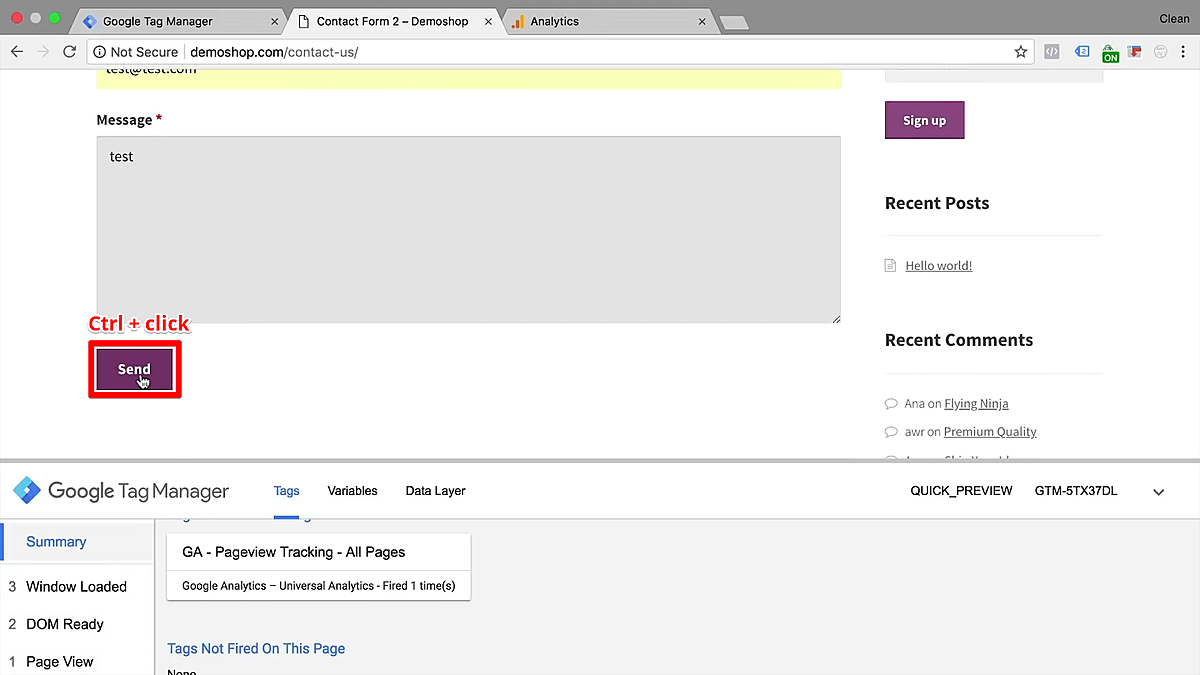
Next, we’ll retrieve some form variables so that we’ll have an easier time tracking specific forms. (This is especially important if you have more than one form on your website!)
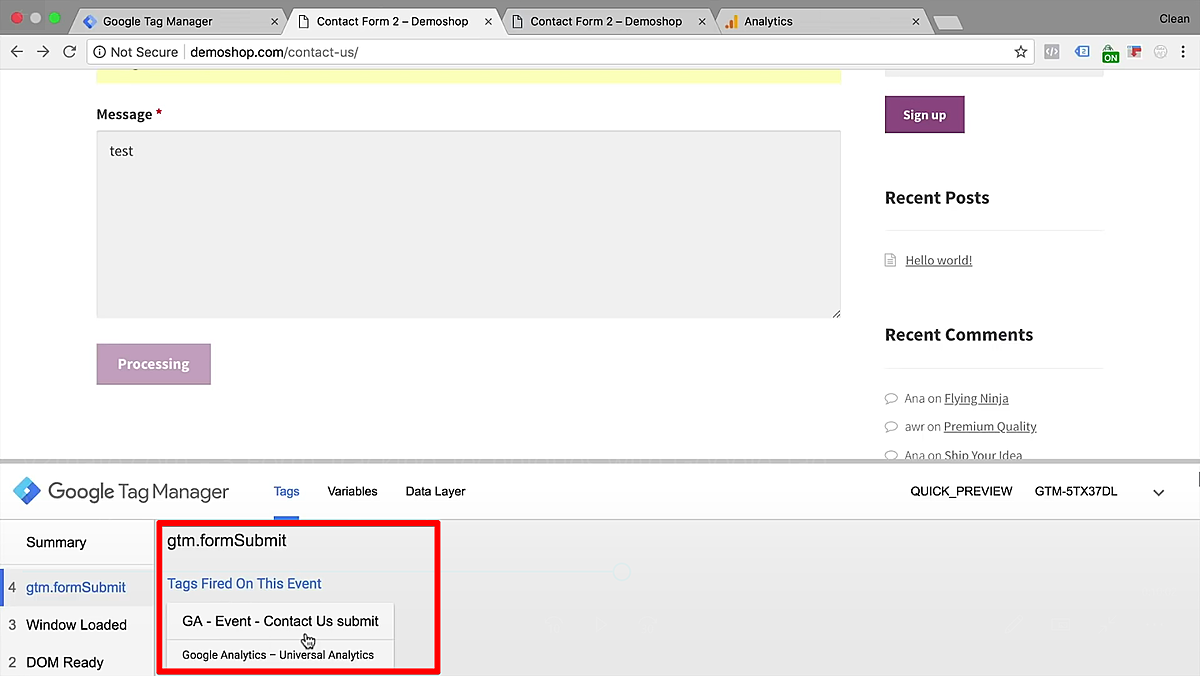
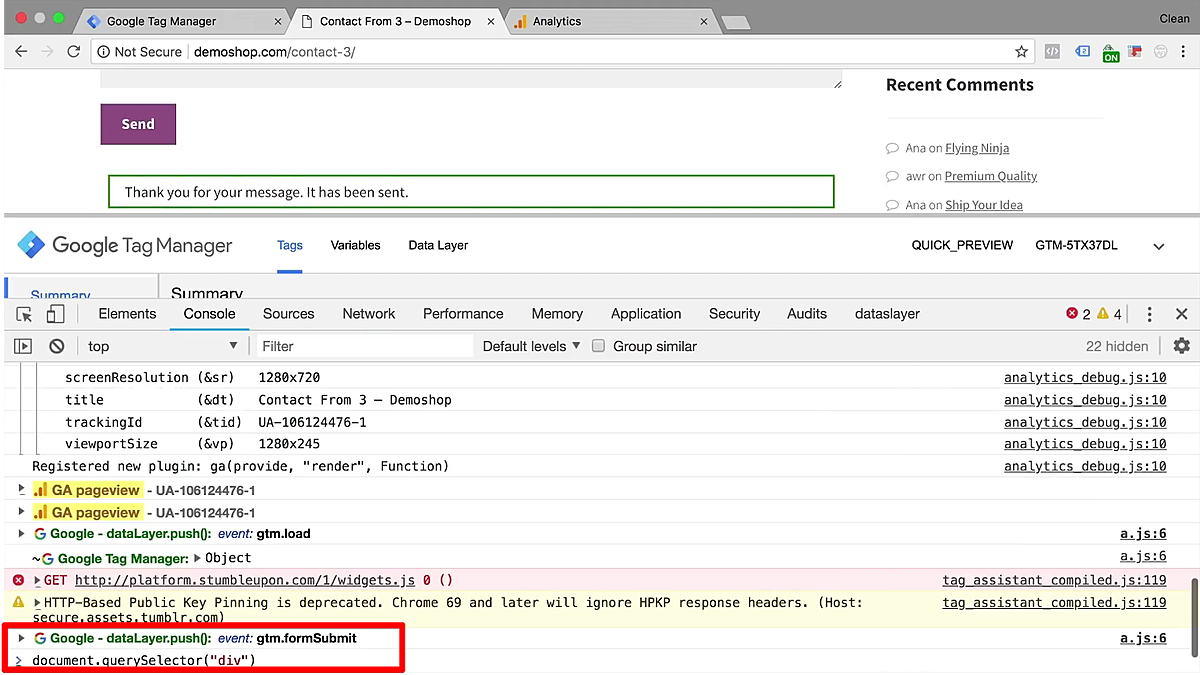
Return to your form page and submit the form with some test data. Keep an eye on your debugger tab to make sure that your trigger appears in the events menu.
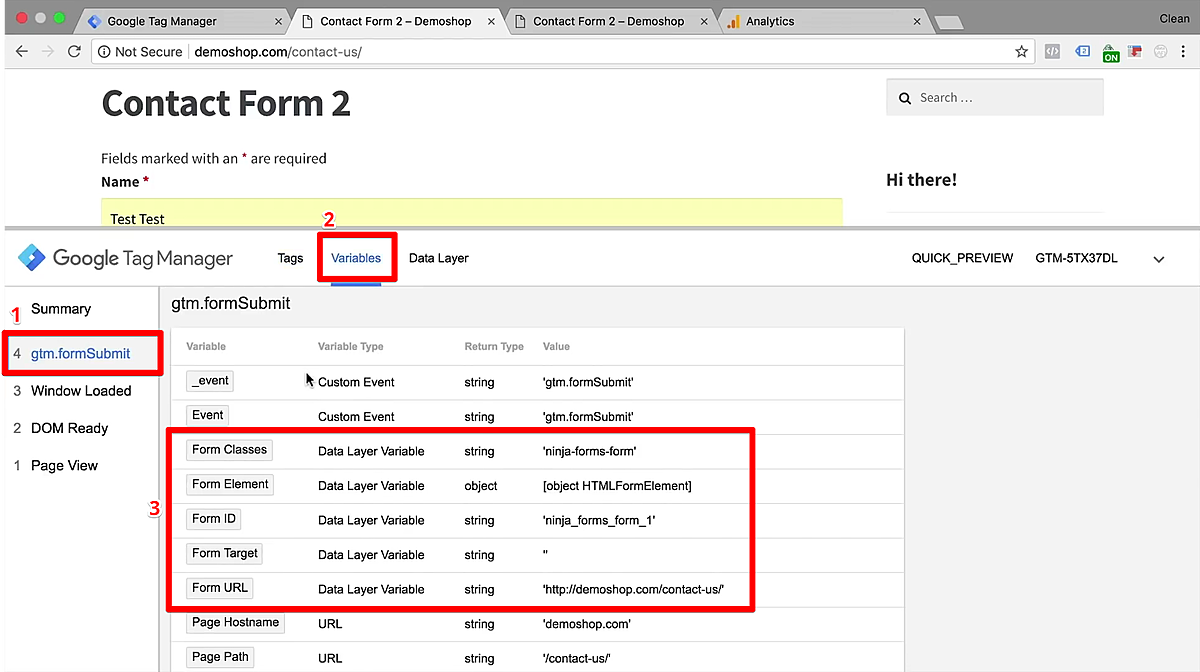
Your trigger will mostly likely appear with the name gtm.formSubmit. Click on it, then click on the Variables header in your debugger to inspect what variables have been recorded. You can use the variables that Google Tag Manager picks up to build a trigger and fire a Tag.
Now, it’s important to remember that the trigger should be unique to this specific form. This is so that your trigger doesn’t fire a Tag when another form is filled out. Since your different forms each fulfill different functions, you want to track them separately with unique triggers.
To demonstrate this, I will fill out another form in the sidebar on the same page. I can fill out the field and submit the form to see which variables change or stay the same.
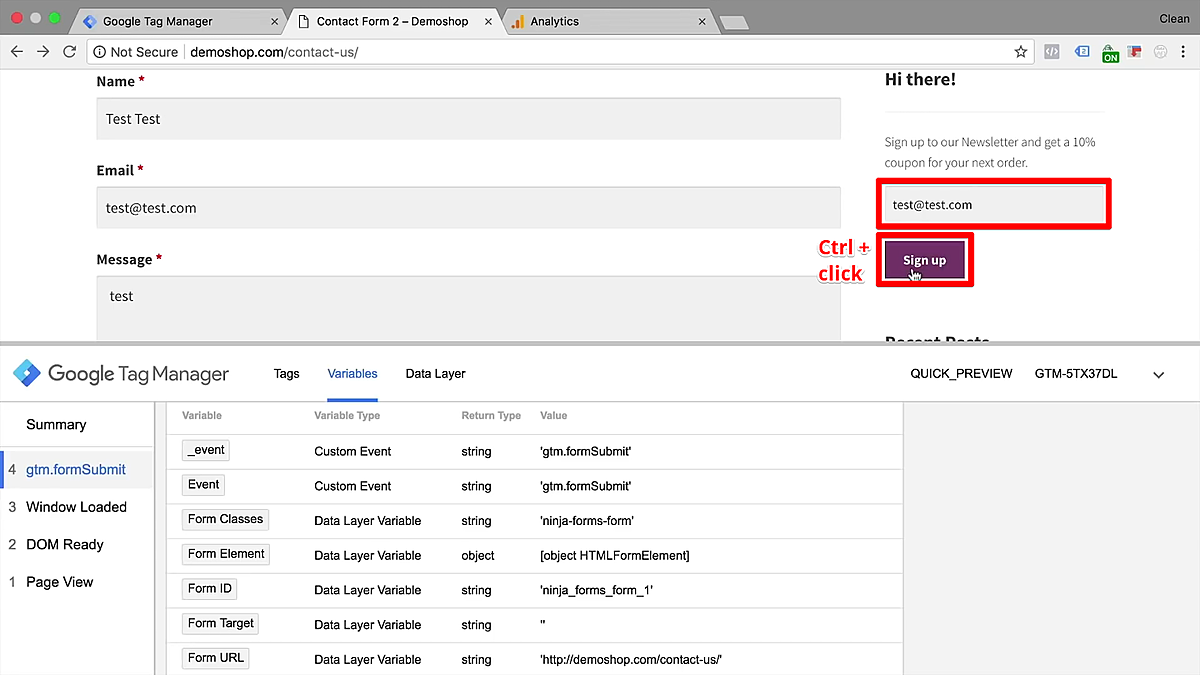
Check out your GTM debugger console. You’ll see two form submission events whose variables differ slightly. You can compare these variables to ensure that the trigger only fires on the form you want to track. Here, the Form ID is the only unique variable between these forms.
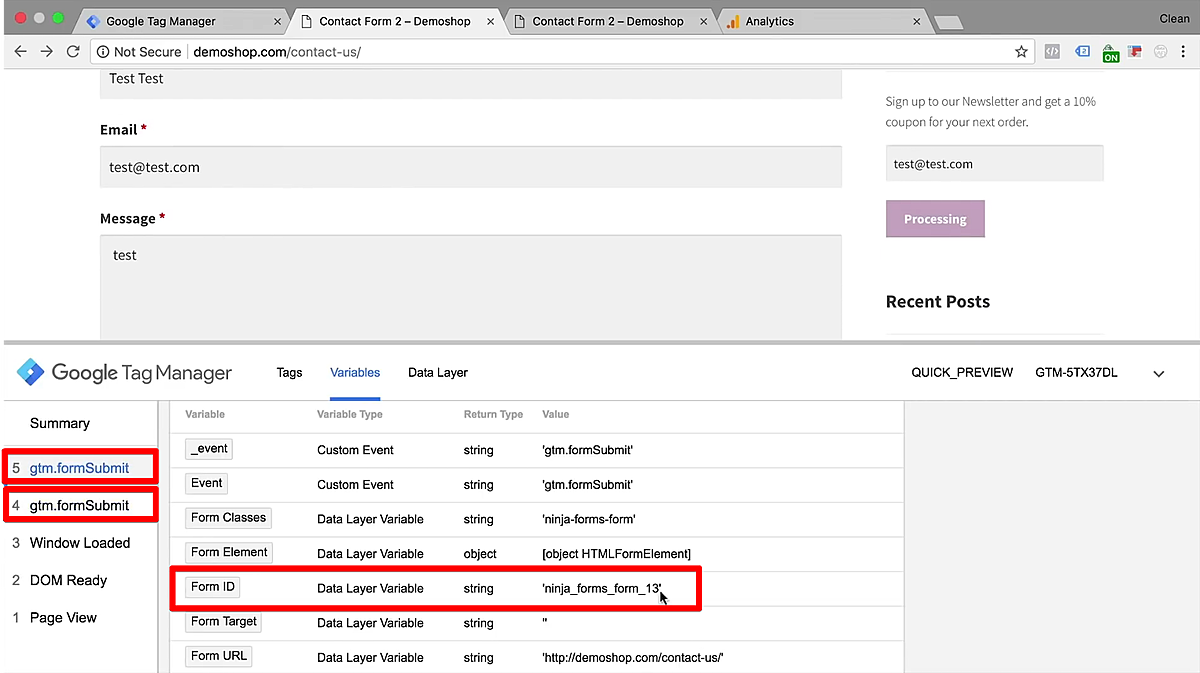
If there’s a Form ID available in your form, it’s probably the most reliable variable that is unique to your form. You can use this and other variables to more narrowly define your trigger filter for this particular event.
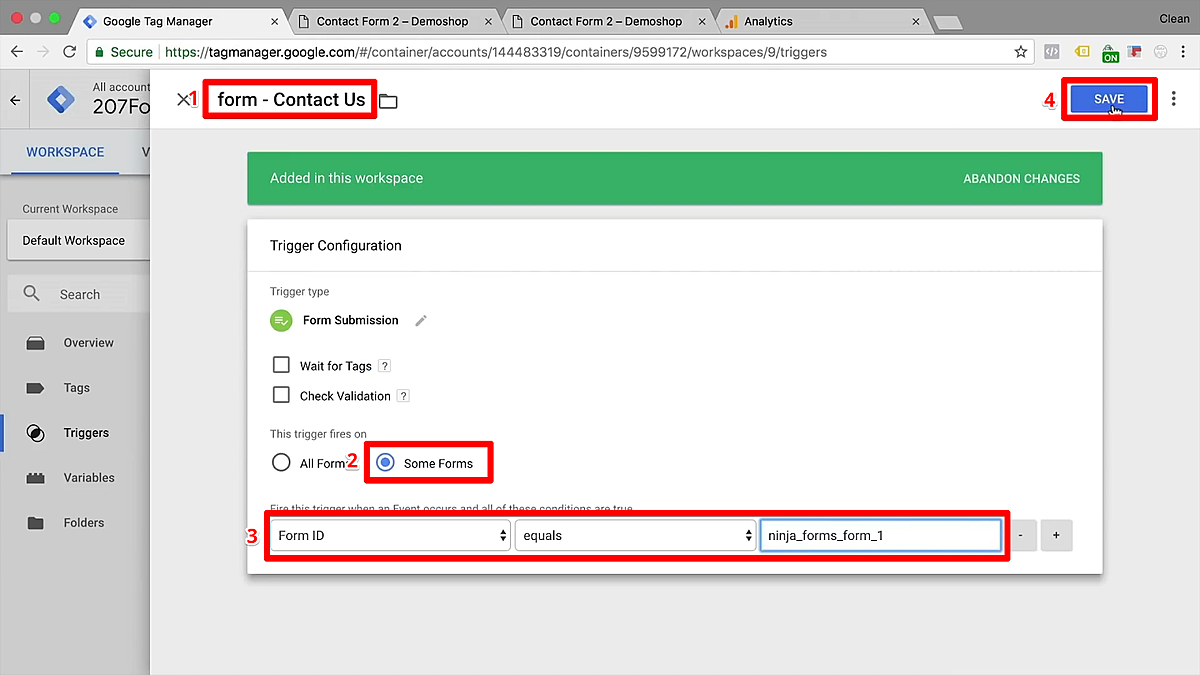
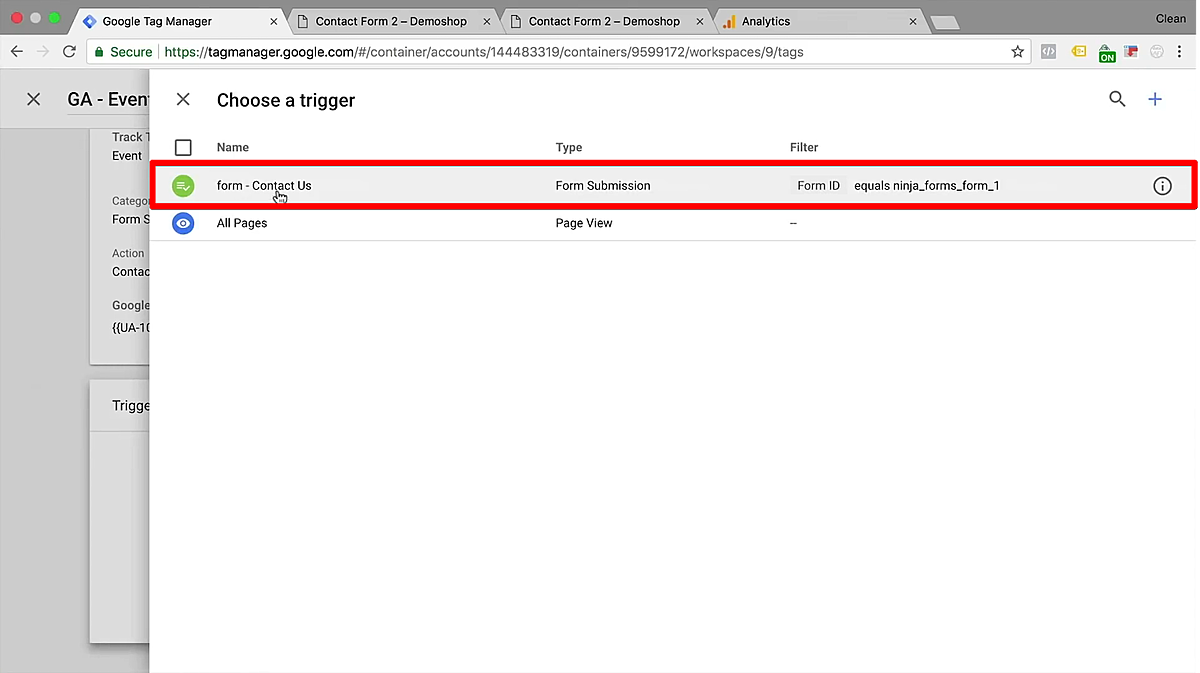
To do this, return to Google Tag Manager. Select your form trigger to edit it into a specific trigger that only fires on your contact form.
First, rename your trigger so that you can associate it with one specific form. Next, we’ll install a filter by clicking the radio button for Some Forms.
Then, choose the variable that you want to use for this trigger In this case, it would be the Form ID. There are different matching options—in this case, we should use equals. Finally, enter the Form ID variable that is specific to the form you want to track.
Remember to save your changes!
With a fully customized trigger for a specific form, we can create a Tag to track submission for that form.
In Google Tag Manager, select the Tags heading and click the New button.
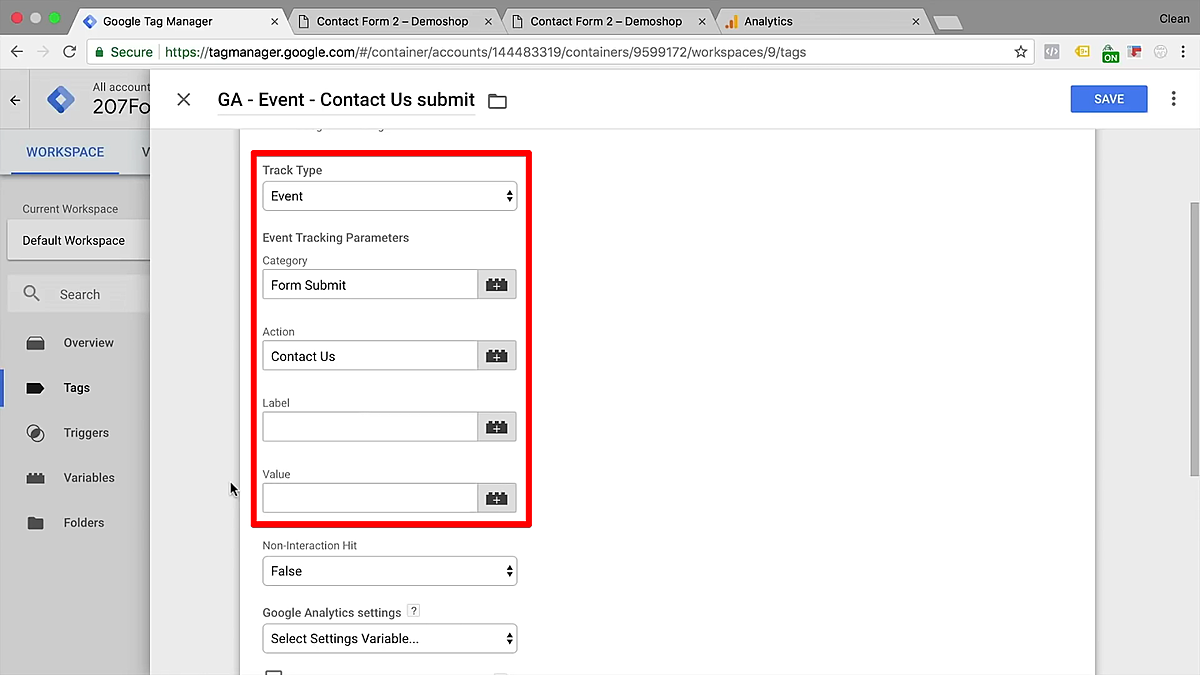
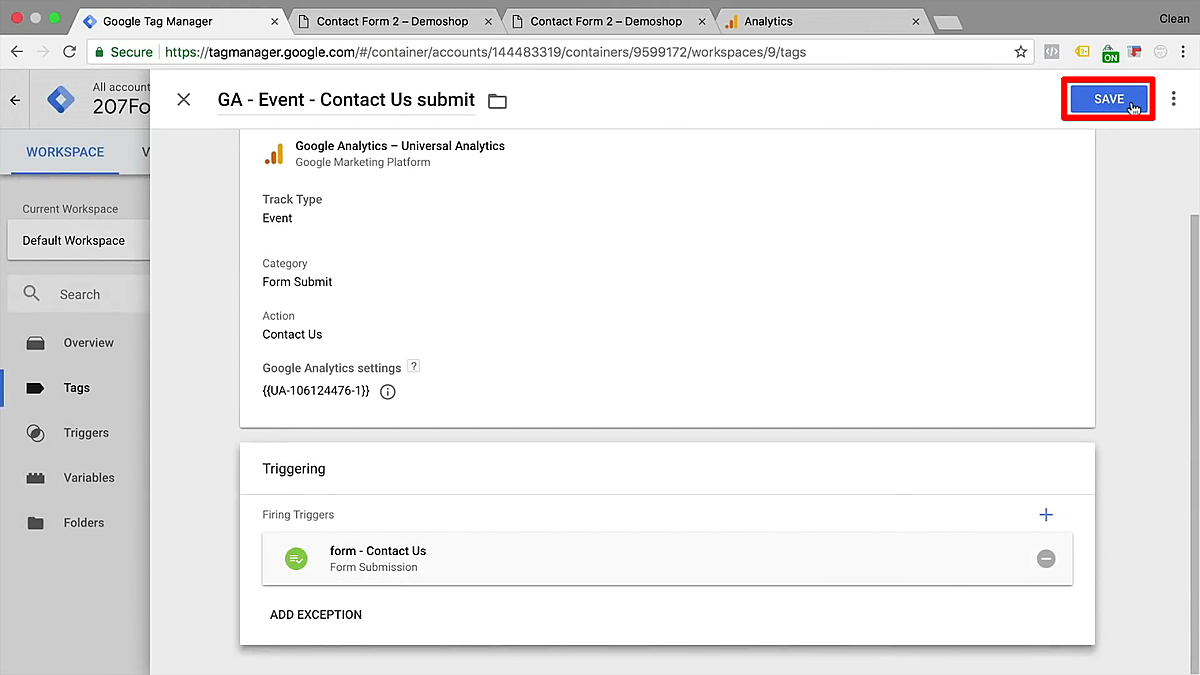
If you are using Universal Analytics, select Event from the Track Type dropdown, and fill out the Category and Action fields according to the type of event and the function.
For my form, Form Submit and Contact Us are good descriptors. You should definitely fill in the Categories and Action fields, but you can leave the Label and the Value fields free if you like.
If you are using Google Analytics 4, select your configuration Tag. Give your event a name (naming it after the form you’re tracking is a good idea), then create custom parameters for the event.
You can use the same parameters as the Universal Analytics Tag, or you can devise your own. Whatever you choose, make sure to use parameters that help you identify this form submission among other events (including other form submissions).
Select your Google Analytics settings variable in order to link your tag to your Universal Analytics account (this is covered by your configuration Tag if you are using GA4). Click in the Triggering box to select a trigger, which you already defined earlier
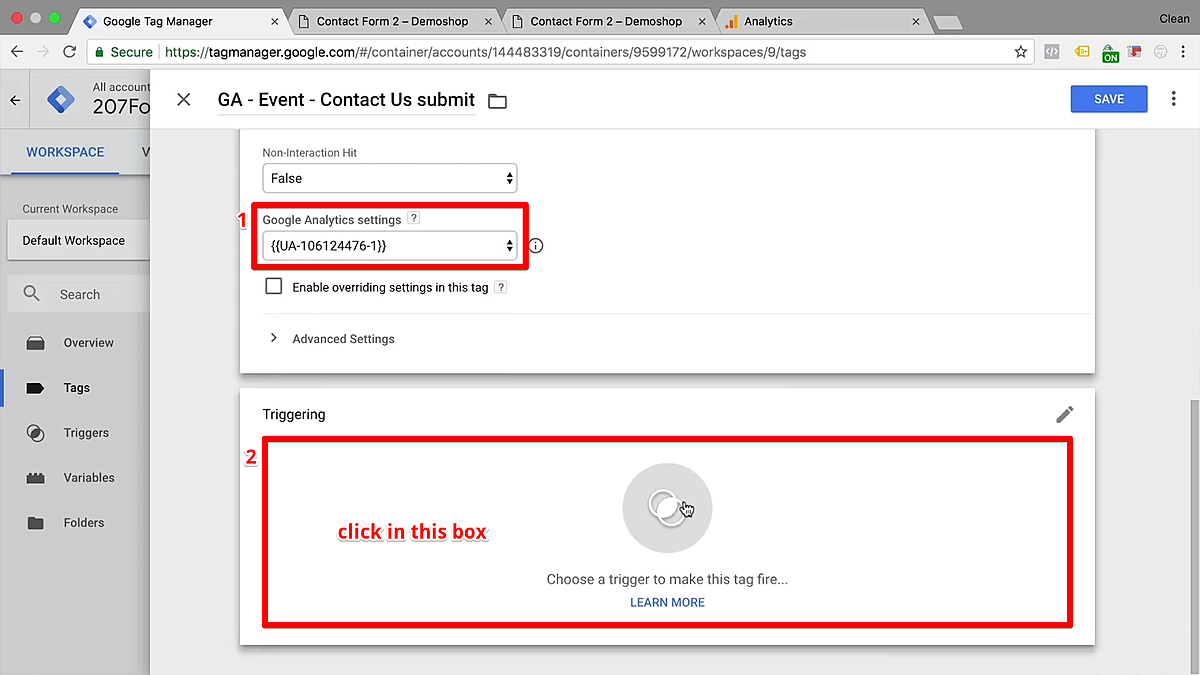
For either Universal Analytics of GA4, simply select the trigger that you configured earlier. No extra edits needed.
This should give you a functioning tag. Don’t forget to save!
Before we finish up our setup, we have to make sure that our Tag is working correctly by testing it in Google Tag Manager’s preview mode.
Refresh your container, then click Preview in your GTM interface. Fill out your form with some test data and submit it. If everything is working, you should see your Tag appear in your GTM debugger.
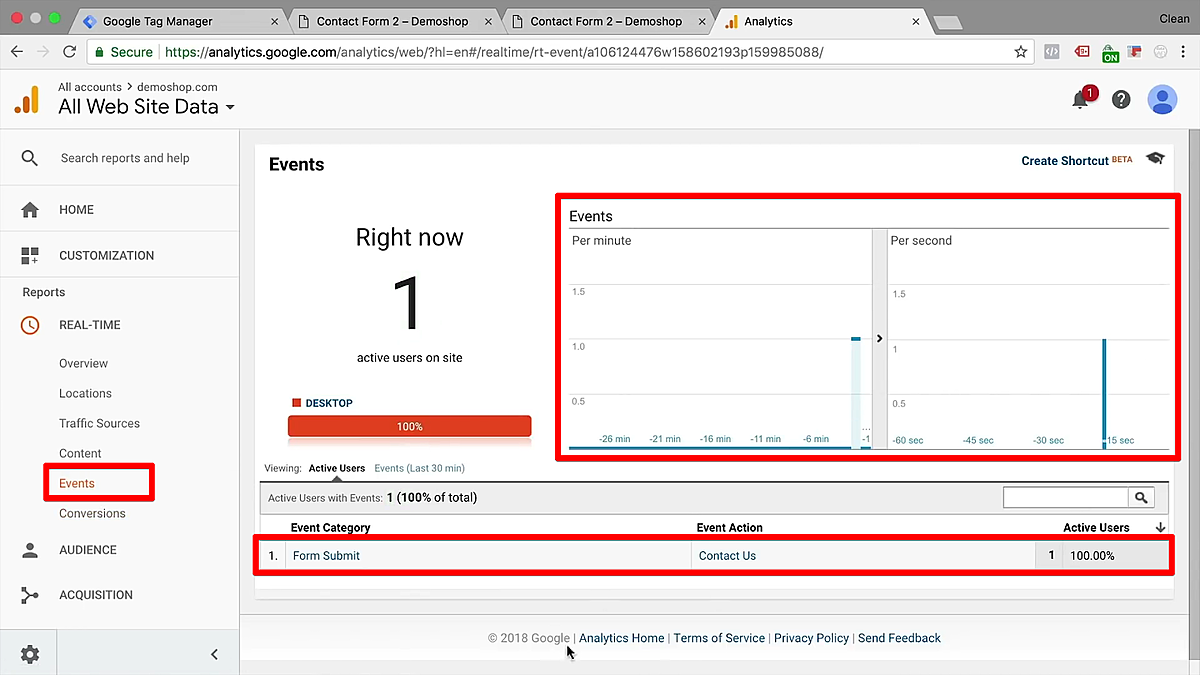
You should also see your form submission in your Google Analytics real-time reports. If you see your event, you’ll know that Google Analytics has received and recorded your data.
If you want to create a Goal out of this event in Google Analytics, head over to your admin section, marked by the gear icon. Create a new Goal and name it accordingly.
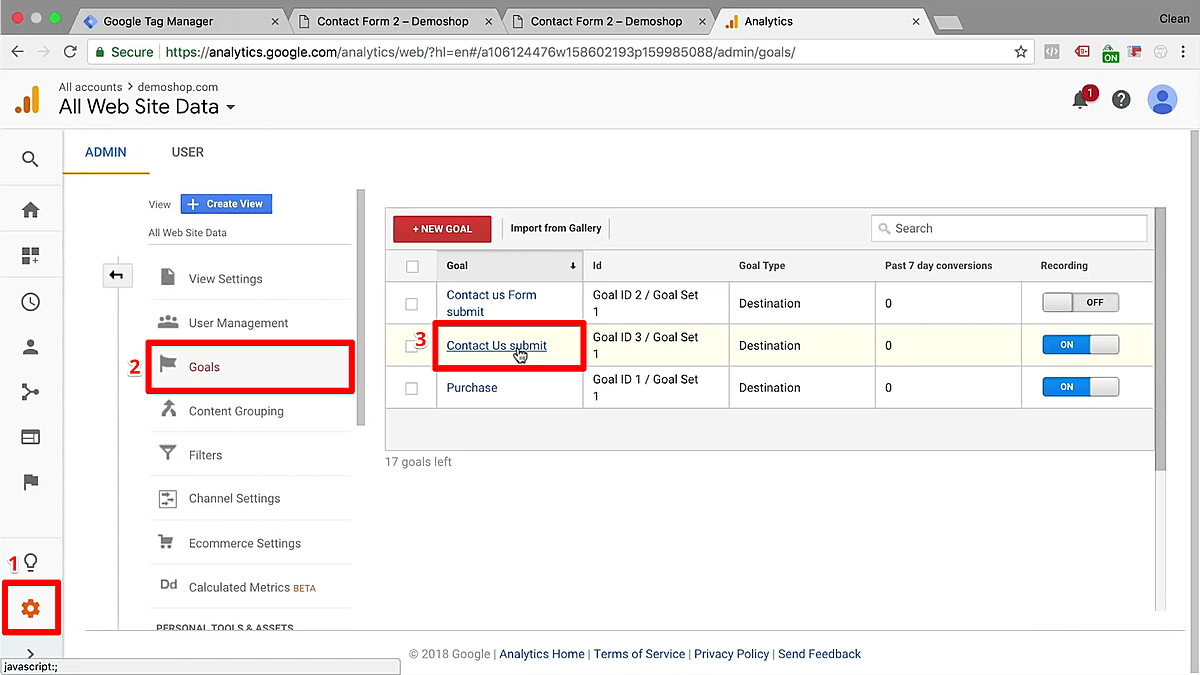
Since this contact form has an interaction rather than a new URL (pageview) when successfully submitted, set the type to Event. Continue to the next section.
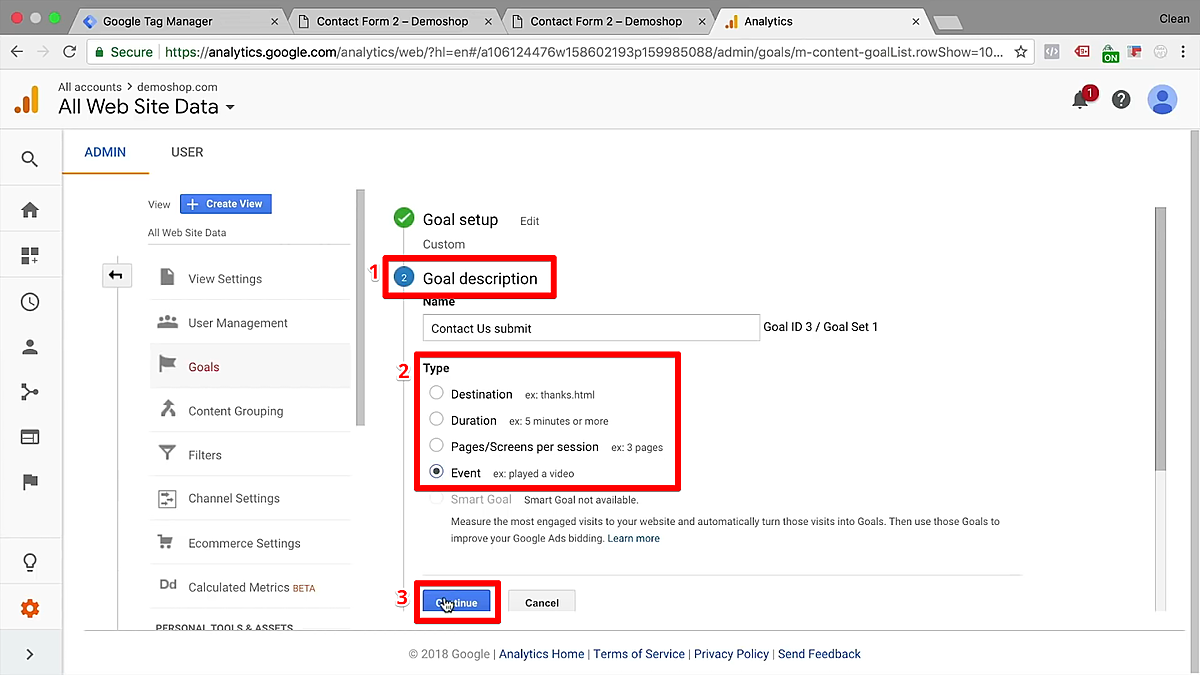
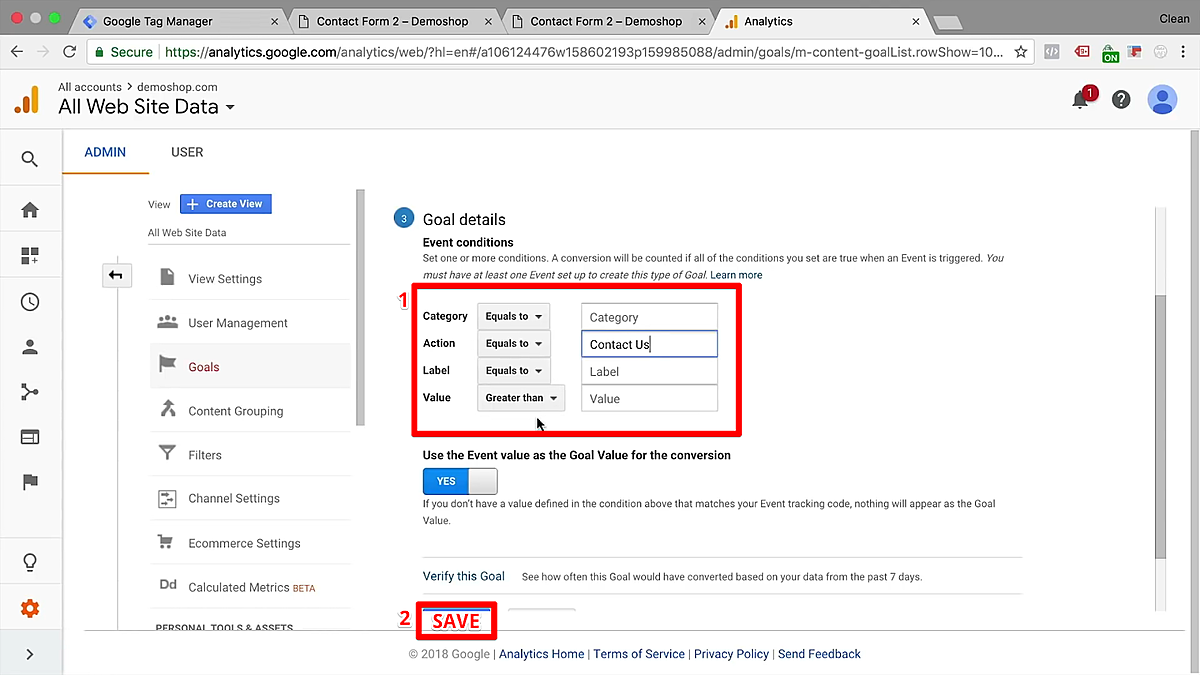
Here, you can enter the category. You don’t have to actually fill out every field. Just one completed field will work, but it must model whatever data gets sent over to Google Analytics in the Event Tag that you just created.
So in this case, the descriptors we used earlier were Form Submit and Contact Us. Therefore, we should copy at least one of those into the corresponding field, such as Contact Us in the Action field.
Note that if you have any other Tags with an Action called “Contact Us,” this Goal will also be affected by those Tags. If you need to be more specific, you may want to use more conditions.
Save this to update your configurations.
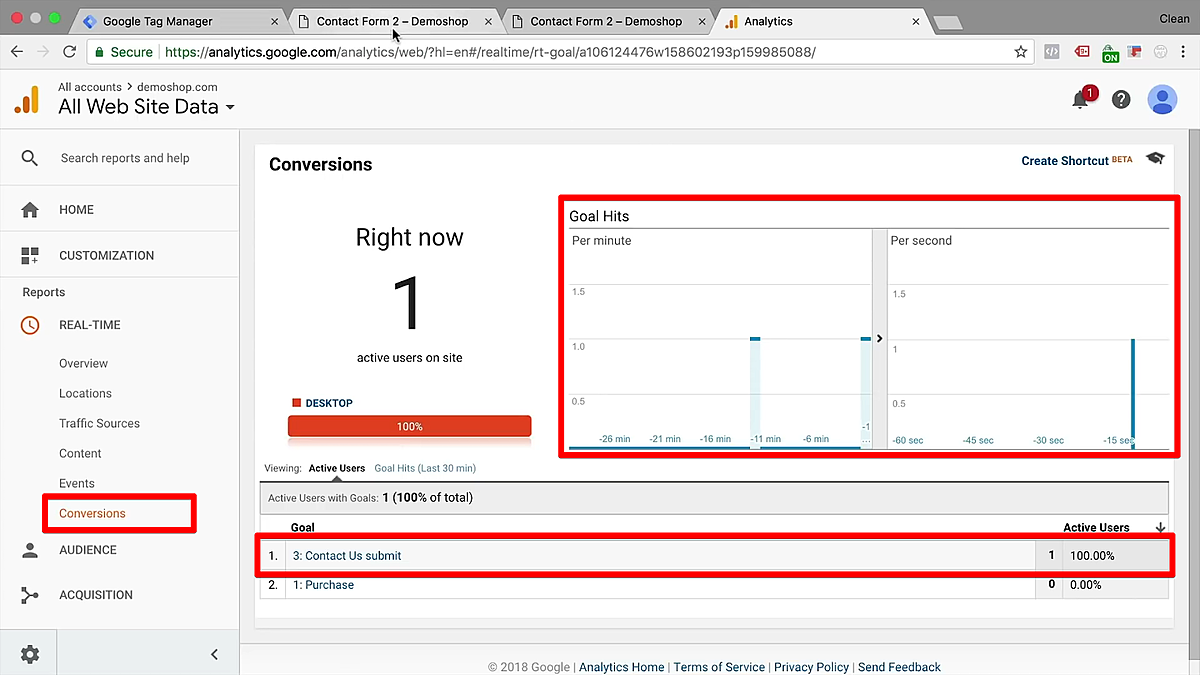
If you go back to your form page and submit the form, you should see a new Goal conversion happening on your Google Analytics Real-time report under the subheading Conversions.
So this is the second way to track forms with Google Tag Manager by using the form submit trigger.
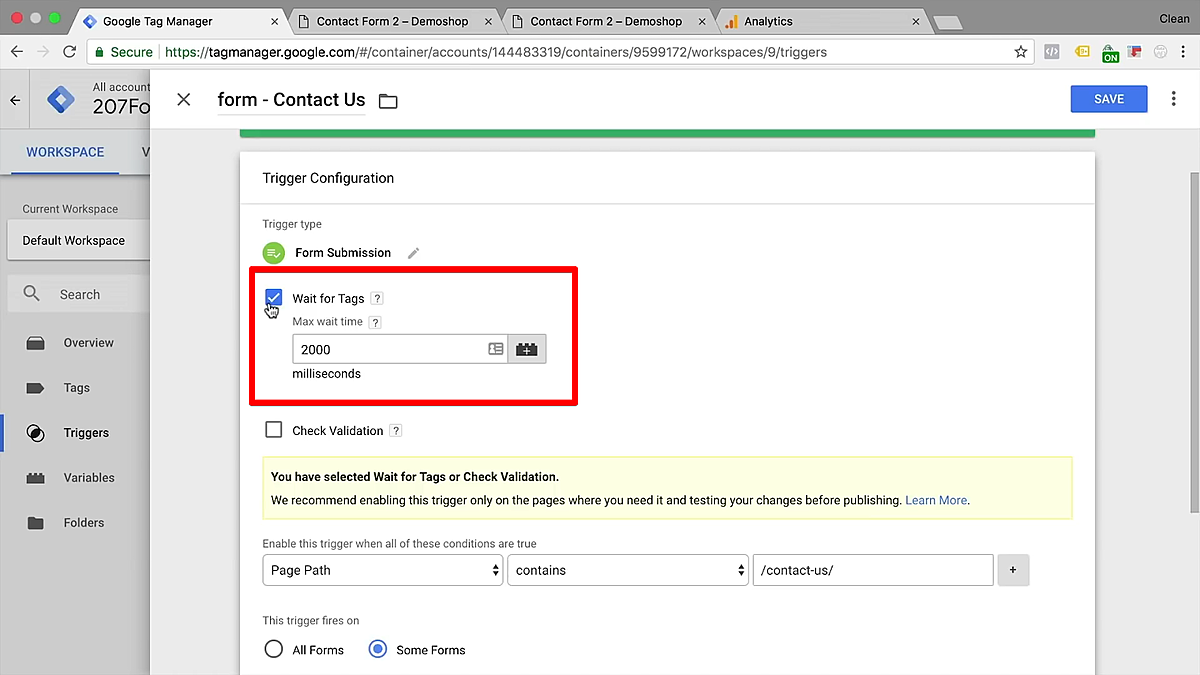
Now, you might be wondering about these options that I’ve skipped over earlier in the trigger section: Wait for Tags and Check Validation. My experience with these checkboxes is that you need to test them before implementing them. These are not settings you should just be ticking by default. So if your form is successfully being tracked as a conversion, I would recommend trying these out.
The Check Validation feature prevents your trigger from firing if the form isn’t submitted correctly. If a user enters something wrong, such as an invalid email address, the form will usually give them an error. When this happens, the form won’t be submitted and you don’t want to fire your Tags.
This function prevents this from happening, but it doesn’t always work for every form depending on how its script is built. Therefore, I would test this out with your form rather than turn it on by default. If this solves your problem, keep it checked! But if it breaks your trigger, then I would turn this off.
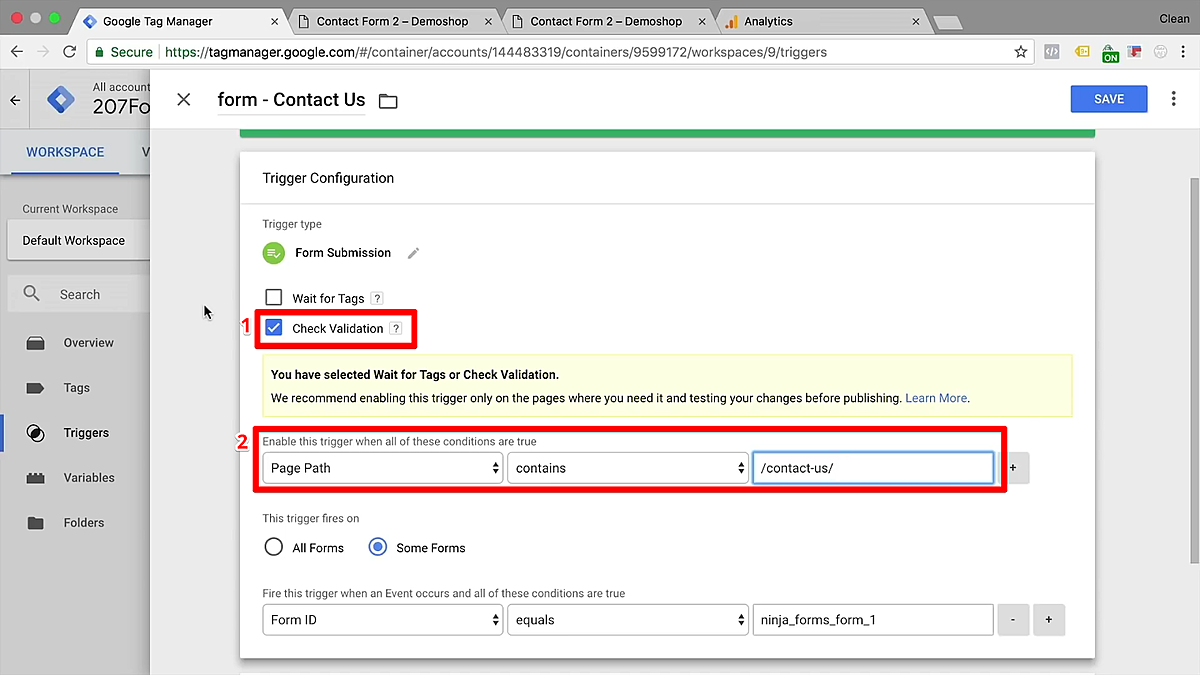
When you check the box for Check Validation, you will get more fields to work with. Here, you can use your page path variable or page URL variable as a filter to tell Google Tag Manager when it should track this form submission.
For example, maybe you don’t want it to pay attention to all pages. If you only want to track your form on the “Contact Us” page, you can specify that by selecting Page Path contains and entering the URL segment for your page. This is important because triggers like form submissions may not fire if another script interrupts it.
Wait for Tags is a function that makes sure your event and all your Tags have fired before the user gets redirected on to the next page. Usually, I think this is a good option to take. But again, because this won’t work well for all forms depending on how they are built. Like the Check Validation option, I would thoroughly test this feature before deploying it on a live Version.


You’re just moments away from the training, support, and resources you need to use data to drive lasting change in your company.
If a form submission generates a success message but doesn’t otherwise change the page, an element visibility trigger is probably the best way to track form submissions.
Note that this method can also be used for many other types of forms (including those described in methods 2 and 3 of this guide) with a few minor adjustments. Thus, this is the method that provides the most flexibility for form tracking.
The steps are simple: inspect the element you want to track, create a trigger and Tag, create a Goal in Google Analytics, and test your implementation.
If you're newer to Google Tag Manager, this section begs the question: what is the Element Visibility trigger?
In short, the Element Visibility trigger allows you to choose any element on your page (a piece of text, an image, a button, etc.) and fire the trigger when a user can see that element on their browser.
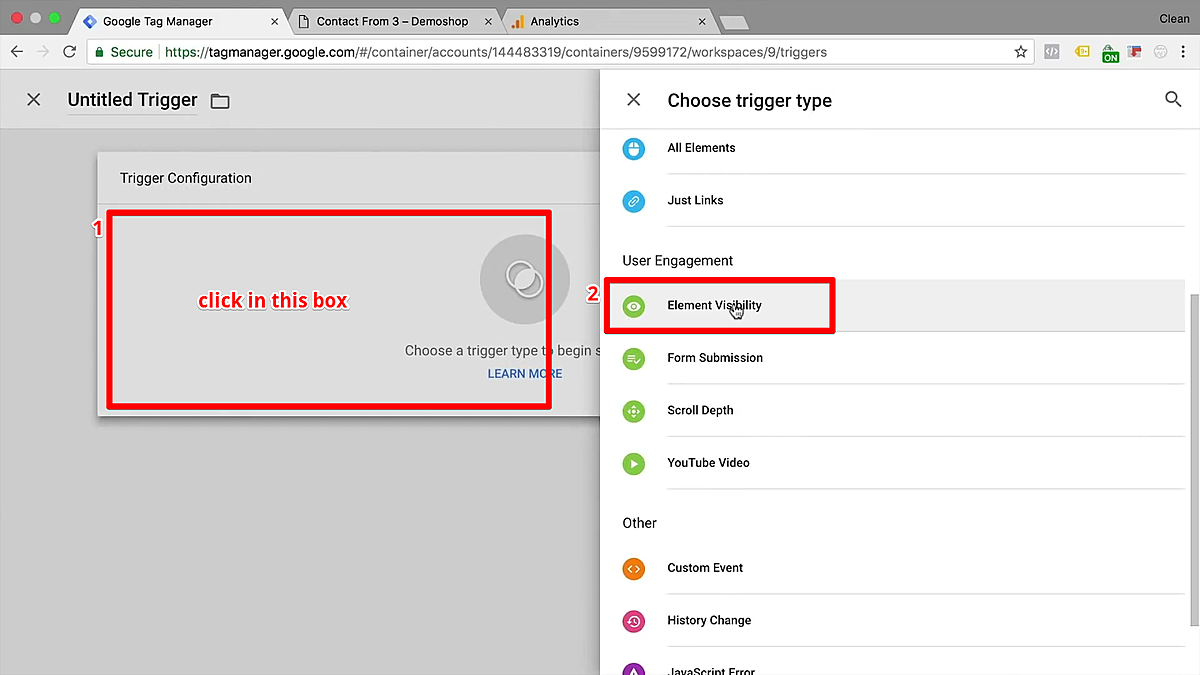
Let’s take a look at this in Google Tag Manager. Go to the Triggers heading and click on the New button.

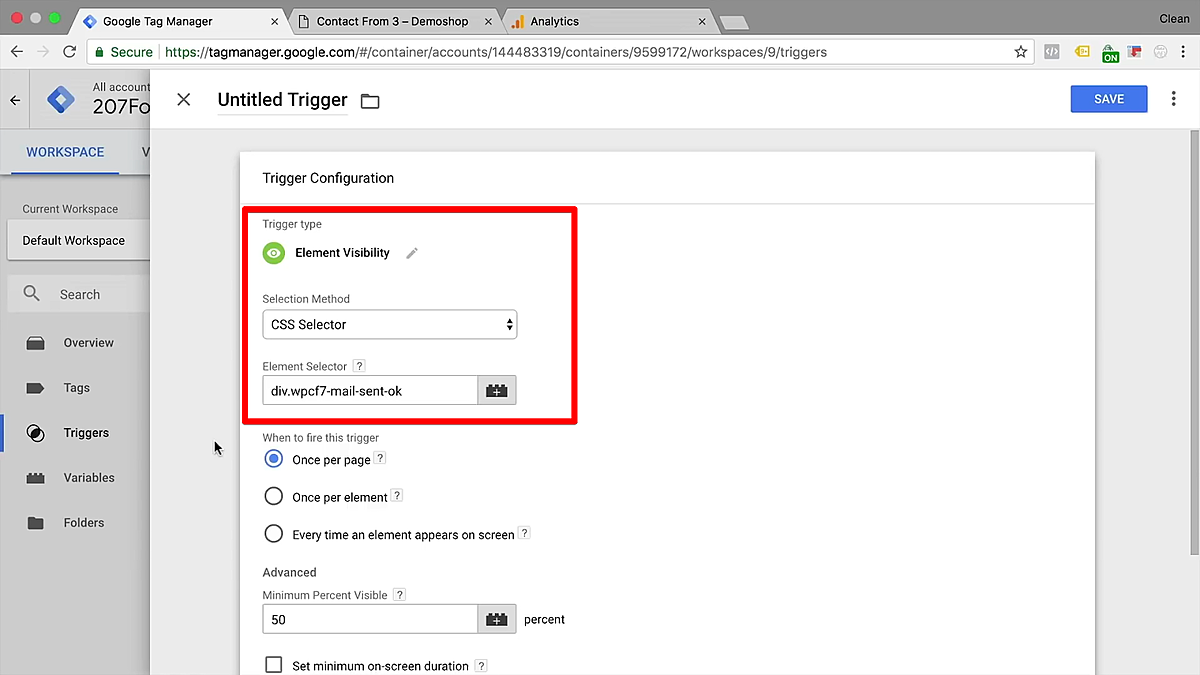
Click in the box to select a trigger configuration. This time, we want to select the Element Visibility trigger. As its name implies, the element visibility trigger will fire if something is visible on the screen to the user. It does this by inspecting and observing the document object model (DOM) to see if there are any changes.
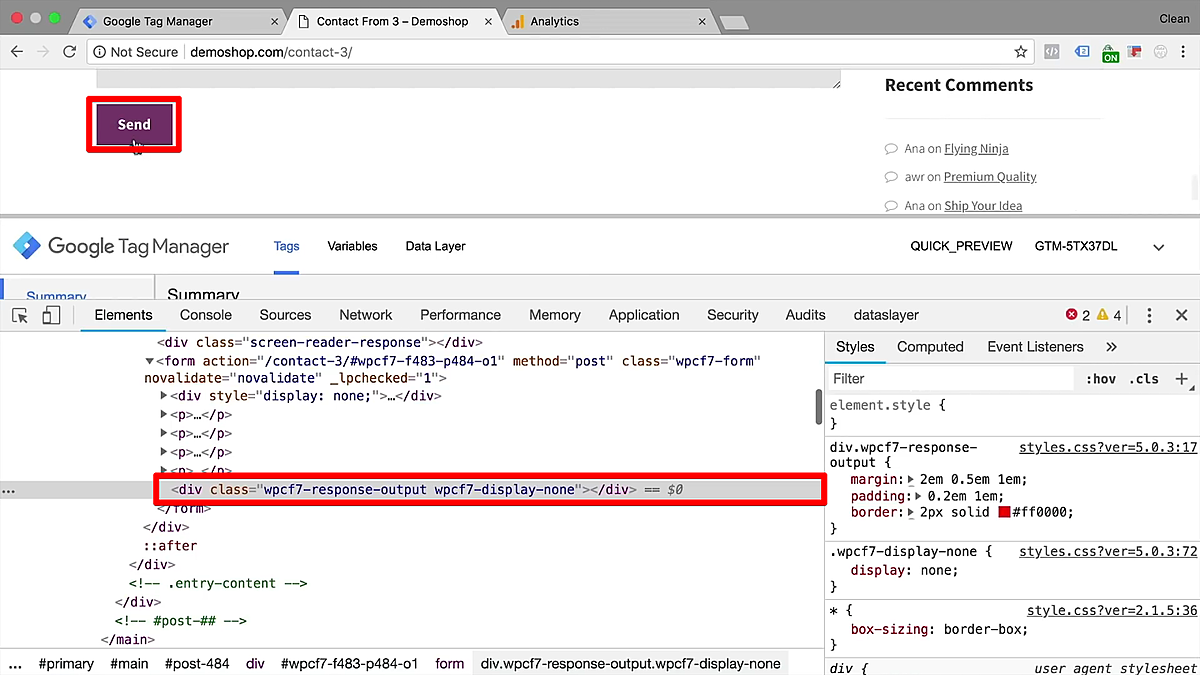
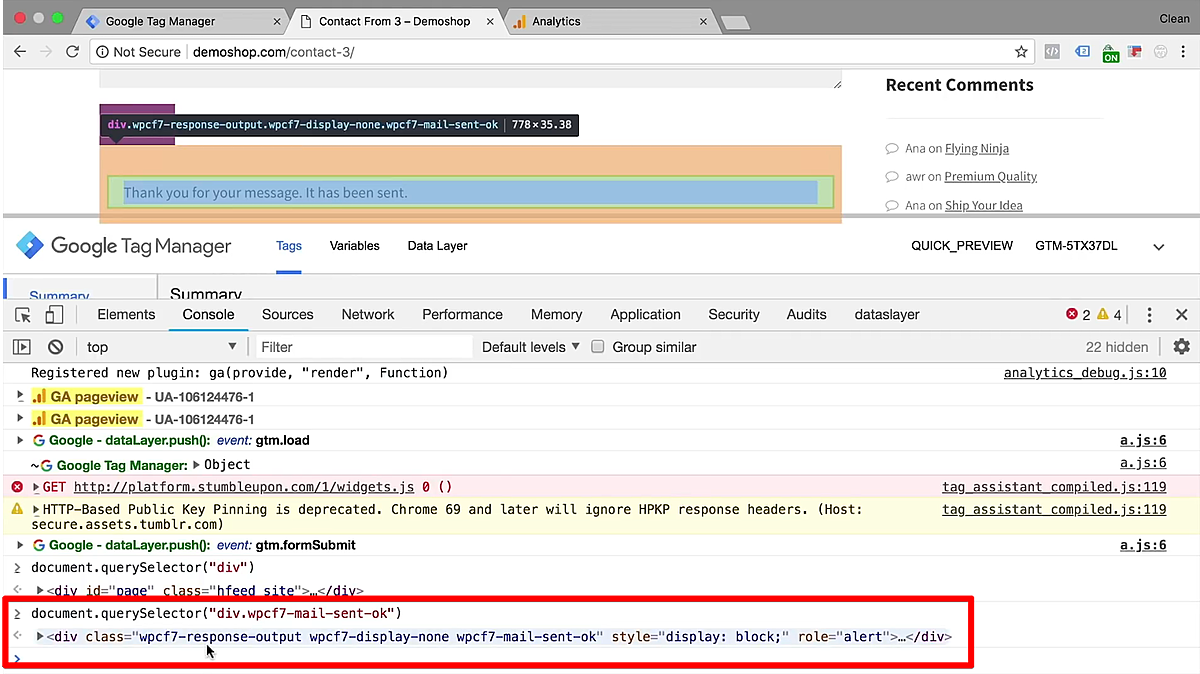
So how does this trigger inspect the DOM for changes? Let's quickly demonstrate this. If I right-click on the success message, I can go into our developer tools by clicking on Inspect.
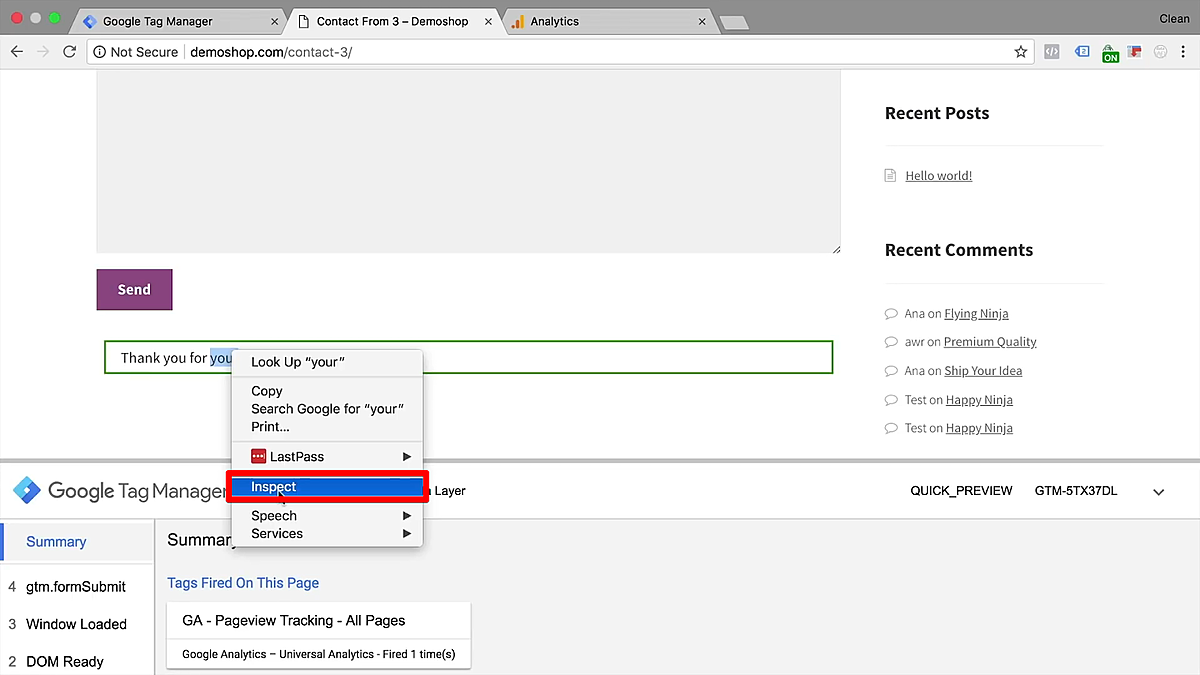
This view is in Chrome Developer Tools, and here we can see the representation of the document object model. Here, we can choose one of the elements that is changing during the page load. We can see that there is a div class called “wpcf7-mail-sent-ok,” which is one of the nodes that gets inserted when a submission has happened successfully.
Copy this node.
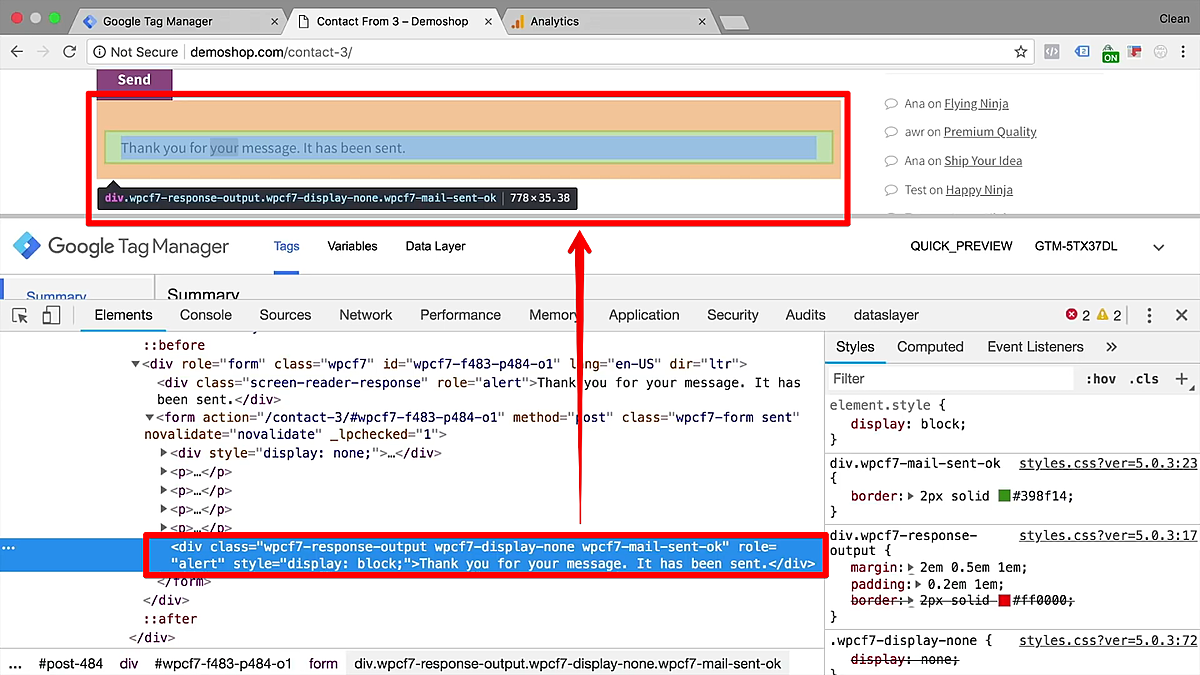
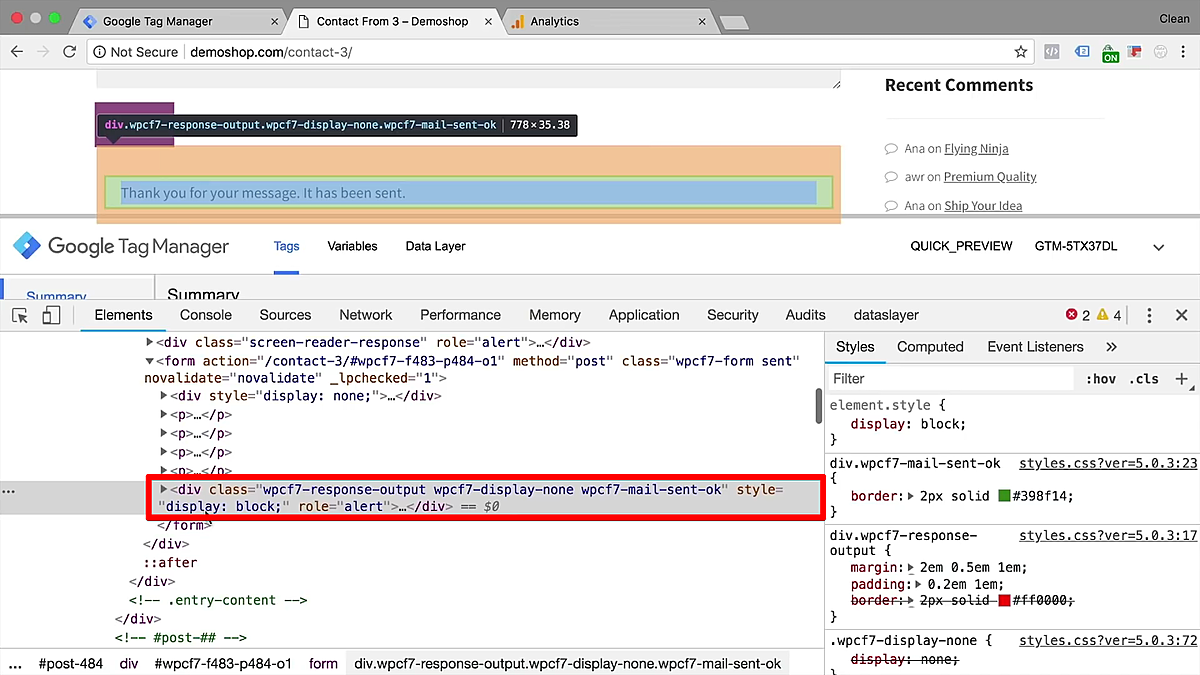
If I reload the page and we look at that same node here, you’ll notice that this success class looks different. This is because it actually gets changed once we fill out this form.
If I submit the form and pay attention to this div class, we see that there was a different style appended. There’s also a new class appended to this: “wpcf7-mail-sent-ok.”
To have effective element visibility triggers, you need make sure that your tag fires when the element changes. It really helps to have a bit of CSS knowledge, because we will use it to tell Google Tag Manager which element it should be observing.
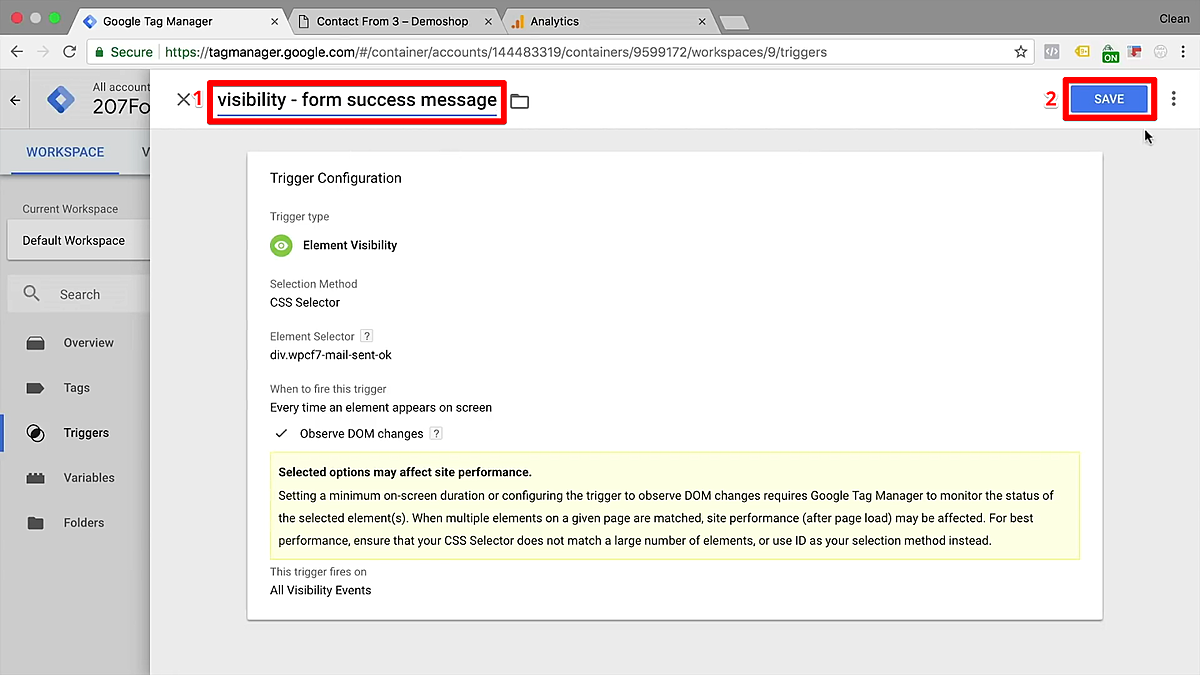
If you don’t know CSS, just follow along closely with the tutorial and you should still be able to create the trigger. In the trigger configuration on Google Tag Manager, you are given the option to use either the ID or the CSS selector. Since the div node we found earlier doesn’t have an ID, you will need to use the CSS selector.
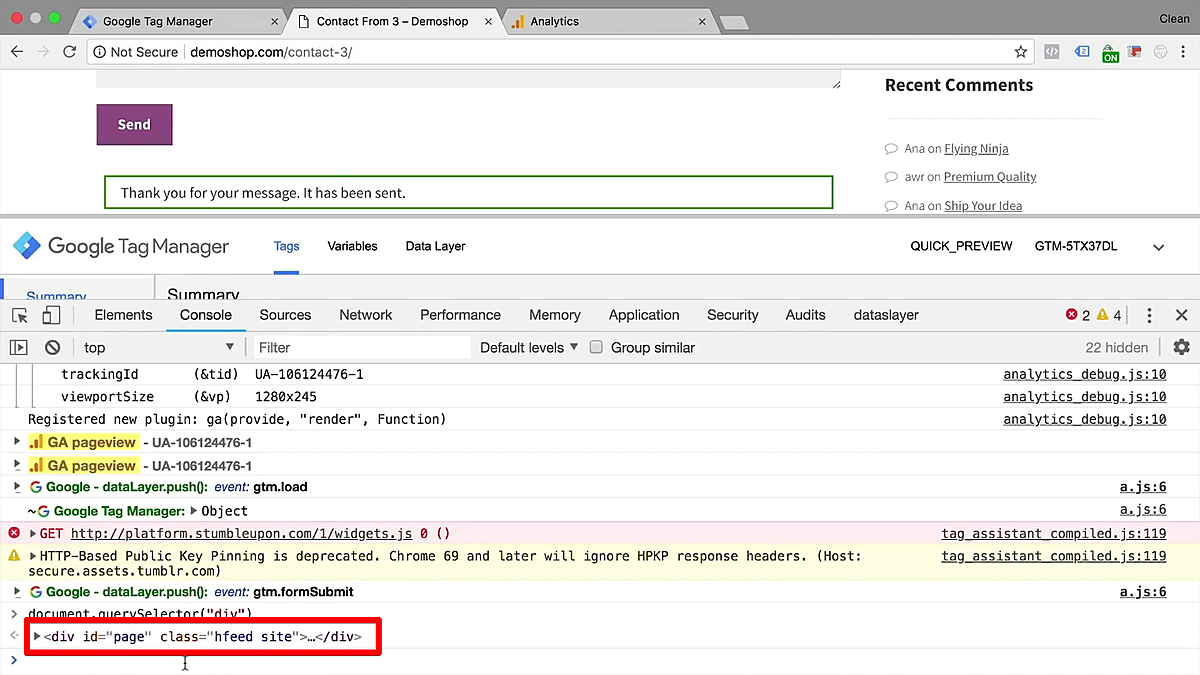
What do you enter into the CSS selector field? This is something we can test in our JavaScript console. To access the console, select the Console header in your developer tool. In the command field at the bottom of the console, type document.querySelector followed by parentheses around a pair of double-quotes. Between the quotes, you can enter any CSS selector and try this all out. Now, in this case, we had a div node, so we can look for the CSS by typing “div” in the quotes. Therefore, the whole text in the command field should read document.querySelector(“div”).
To test this, hit the enter key. When you do this, you’ll get the first div that’s on the page. Here, that was the div class hfeed site. As it turns out, that’s not the div that we wanted to select. We wanted to select the one that changed earlier when we submitted the form: the class wpcf7-mail-sent-ok.
To select for more specific classes, you’ll have to use dot notation. This time, add a dot and then the class that you want. In this case, your command field should read document.querySelector(“div.wpcf7-mail-sent-ok”).
Press enter, and then hover your mouse over it. The success element on your form page should light up in response when you do, which tells you that this is an element that GTM can observe. This is the right CSS selector to use in your GTM trigger configuration.
Copy this whole node and paste it under Element Selector.
The trigger configuration has a few options for trigger frequency. In the case of this particular form, users can fill it out and submit it multiple times without navigating away from the page. Because of this, you should select the option Every time the element appears on screen.
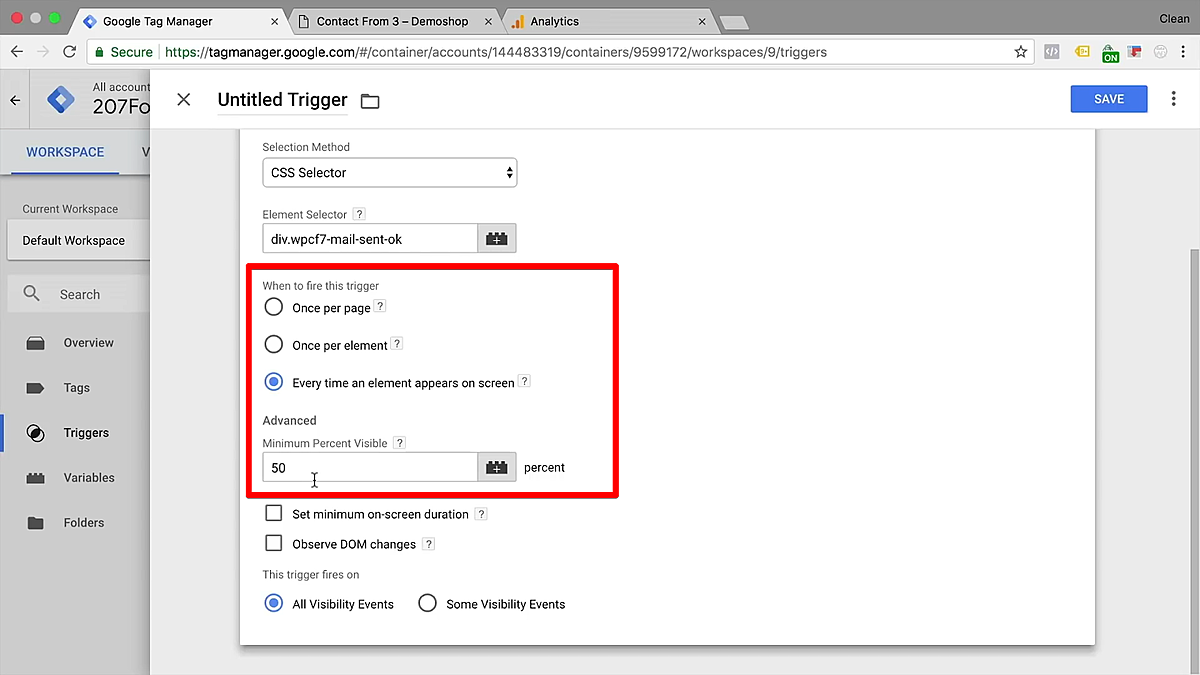
The visibility field asks how much of the element needs to be visible for the trigger to fire. If it’s at the edge of the screen, it’s not visible to the user, but you still want to trigger the Tag. 50% is fine in that case.
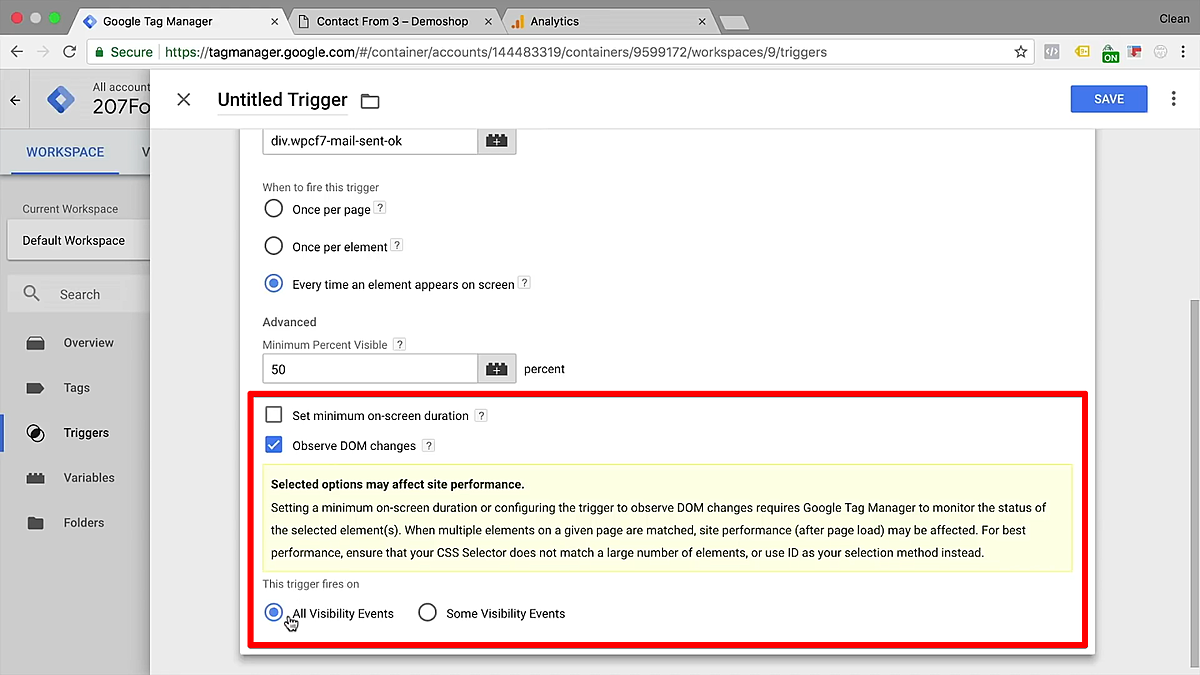
You’ll also need to select the Observe DOM changes option. A little warning box will appear because it can slightly affect site performance, but realistically, it shouldn’t affect too much of the page load time.
For the last option, select the All Visibility Events button.
Remember to give your trigger an appropriate name that will make sense when you look at your Tags later. Save and refresh the page.
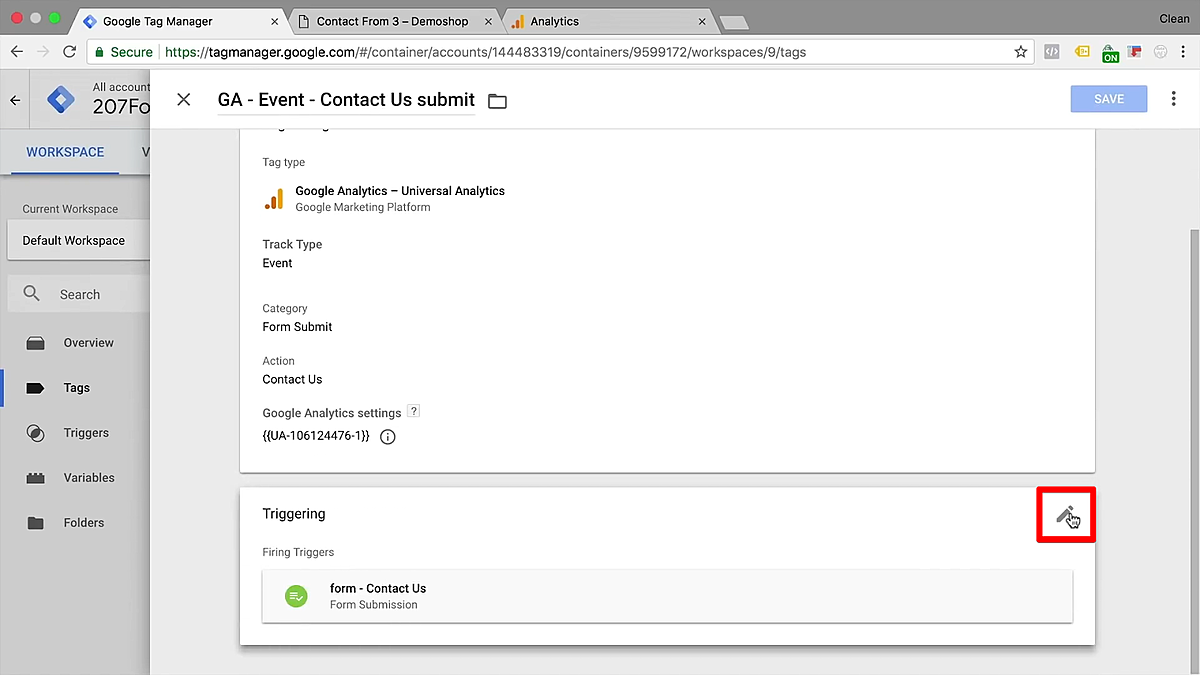
If you followed along with our second method, click your Event Tag to reuse it and simply switch out the trigger. (Otherwise, create a new Tag, select the Google Analytics Tag Type, and select the Event Track Type. Be sure to assign any necessary parameters.)
We can do this down here by clicking the edit button, marked by the pencil icon
Get rid of the old trigger by clicking the minus-shaped delete button.
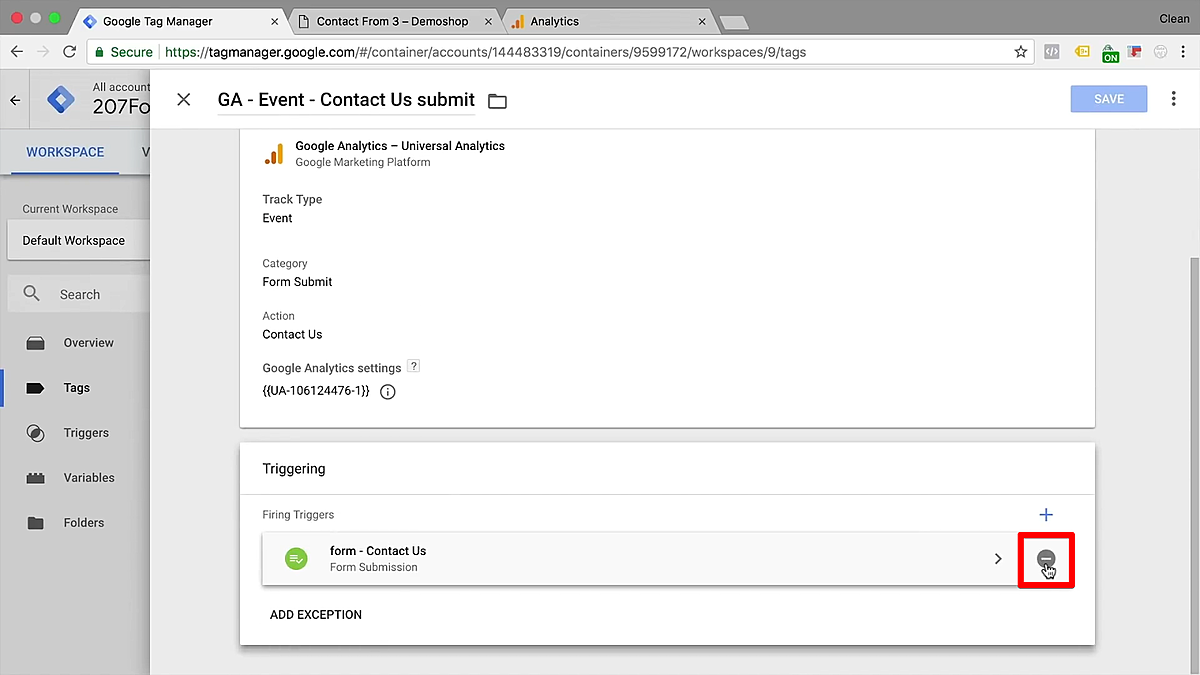
Then click in the Triggering box and click the new visibility element trigger to add it to your event Tag.
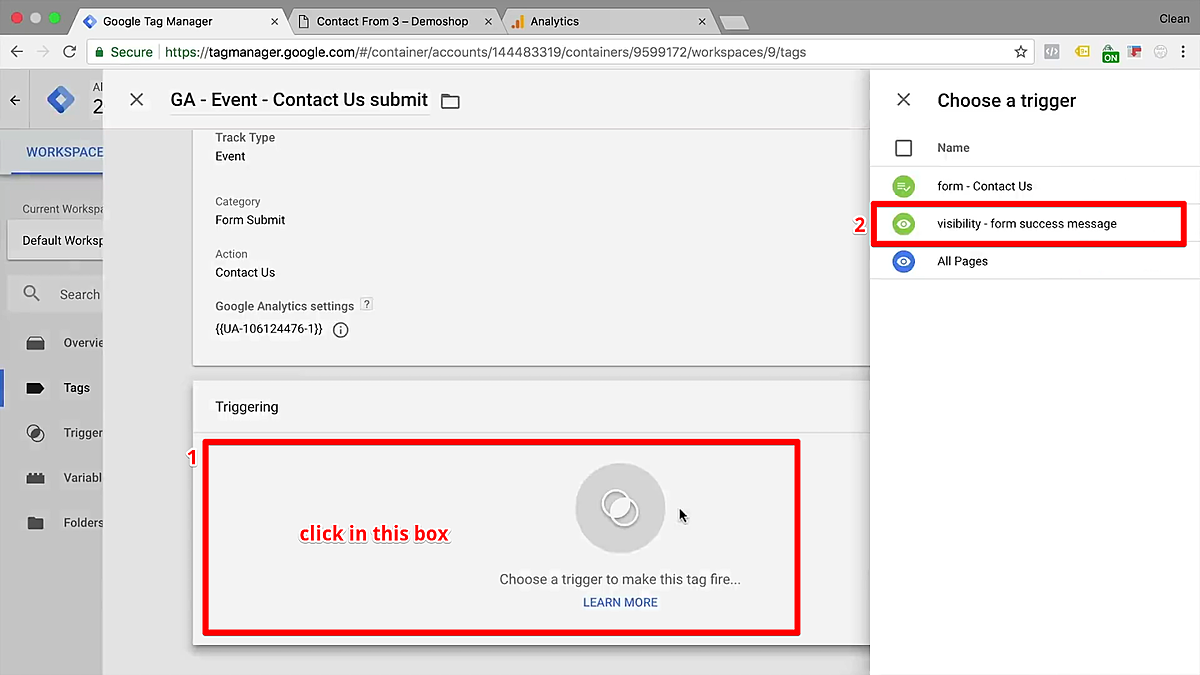
Remember to save on your way out!

Next, we'll create a Goal in Google Analytics so that we can track it as a part of our funnel. If you followed along with our other methods in this guide, then this should feel very familiar.
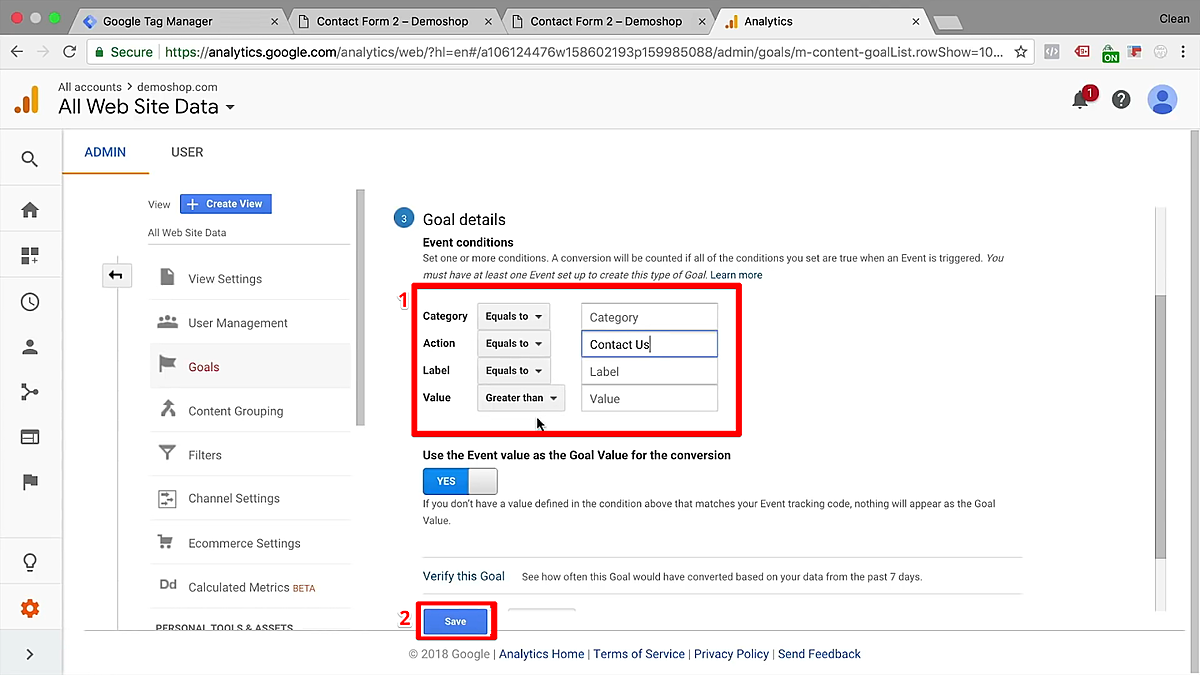
To create a Goal out of this event in Google Analytics, head over to your admin section, marked by the gear icon. Create a new Goal and name it accordingly.
Since this contact form has an interaction rather than a new URL (pageview) when successfully submitted, set the type to Event. Continue to the next section.
Here, you can enter the category. Remember that you don’t have to actually fill out every field, but it must model whatever data gets sent over to Google Analytics in the Event Tag that you just created.
So in this case, the descriptors we used earlier were Form Submit and Contact Us. Therefore, we should copy at least one of those into the corresponding field, such as Contact Us in the Action field.
Save this to update your configurations.
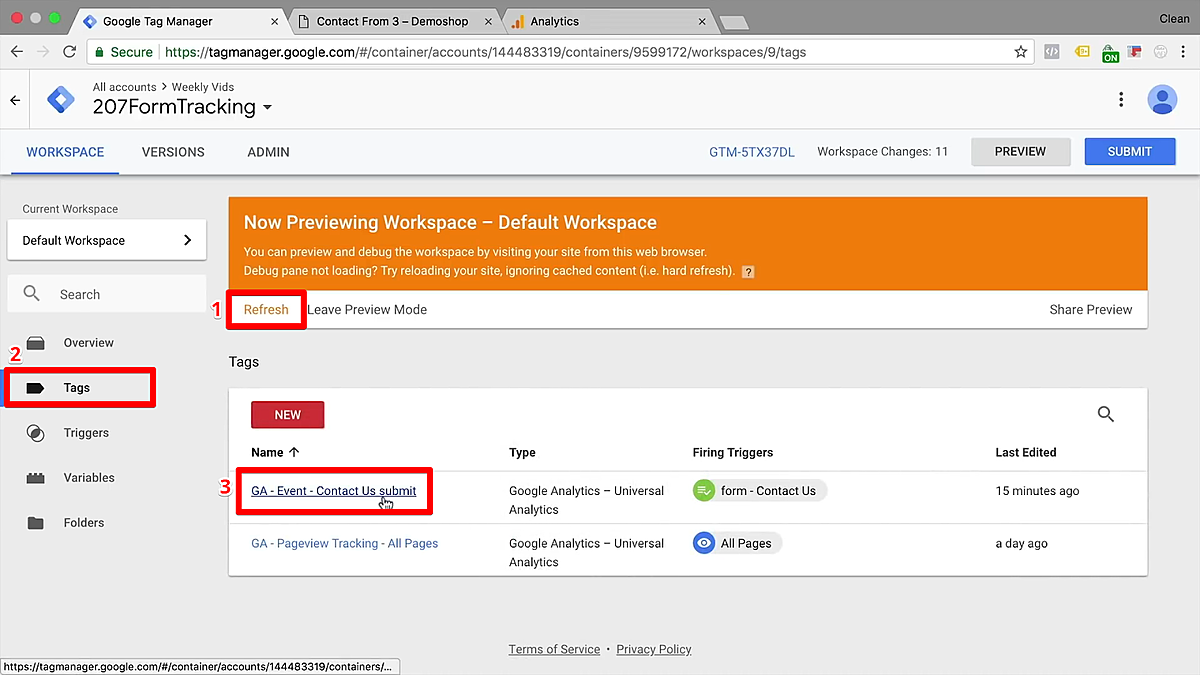
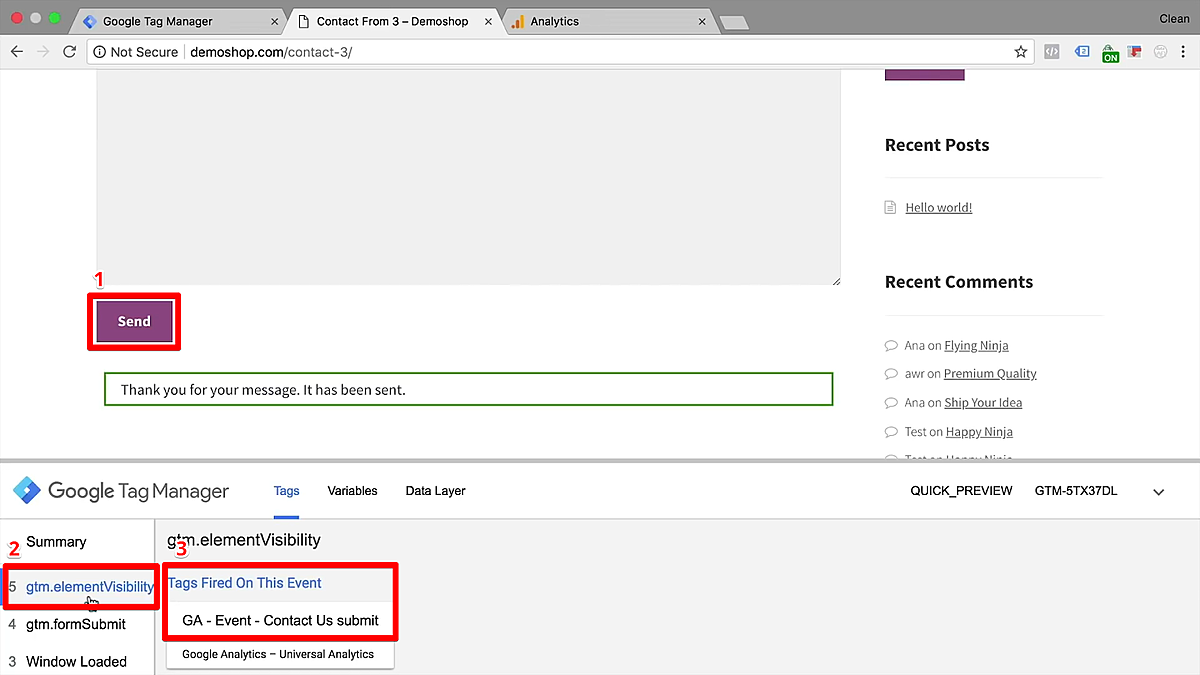
To test your new trigger, refresh Google Tag Manager, refresh your form page, and close the developer tools box.
Fill out and submit your form one more time. Once you’ve submitted it, you’ll see your element visibility tag appear in Google Tag Manager's preview console.
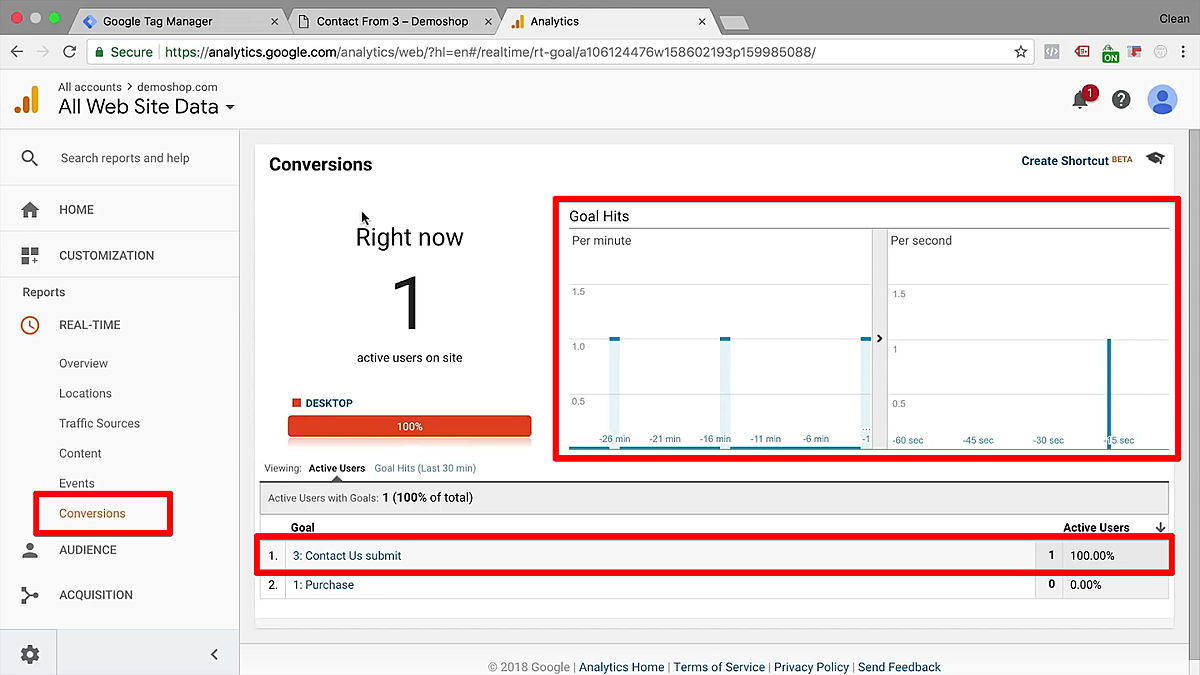
You will also need to check your Goal in Google Analytics to make sure that the Tag is properly connected to your Google Analytics account. In your Real-time reports, you should see your Goal as an event under the subheading Conversions.
That’s it! This is the third method of installing form tracking with the help of Google Tag Manager and using the element visibility trigger.
So there you have it! This is how you can track forms with the help of Google Tag Manager and Google Analytics. These are just three tracking techniques of many possible methods, but these three should cover most tracking cases.
Each method uses two simple steps: creating a Goal in Google Analytics and testing your implementation for efficacy. If you're using a Form Submission trigger or an Element Visibility trigger, it's basically just the added step of a Google Tag Manager configuration.
Using these tracking techniques, you should have everything you need to start gathering information about how users interact with forms on your site. Since forms are an important goal in your business funnel (and sometimes even a conversion), keep this guide handy!
Once you're familiar with the basics of this process, you'll be a pro tracker for forms and beyond—you really can track anything!
Want to learn more about form tracking and other GTM tracking techniques? Then we would recommend the GTM courses like our Google Tag Manager Essentials Training inside the MeasureMasters Membership. Get full access to all the training you need to take your tracking, data, and analysis to the next level!
Happy tracking!
But wait...
"One of the courses added a skill set to my resume that got me my job."
Stuart Scotten, Business Analyst

"MeasureMasters has expanded our service offerings and provided additional revenue for us and clients."
Darren Carter MD, Agency Owner

"The MeasureMasters community is my secret weapon."
Irit Frank, Buzzz Communication

You’re just moments away from the training, support, and resources you need to use data to drive lasting change in your company.