How to install Linux on a Macintosh computer
So, you've got one of those shiny Macbook Pro retinas?
..But you are a Linux fiend, and now you want to rid yourself of the poor mans' Unix that Apple call Mac OS X? This tutorial is for you!
This is an advanced tutorial which works at the command line and can cause irreparable damage to your data. If you are a novice, it is not recommended that you undertake this tutorial. If you do proceed, make sure you have backed everything up with TimeMachine or such like tools. I must also acknowledge the awesome work of Jessie Frazelle, her blog entitled 'Linux or Death' was the inspiration for this article, and much of it is shamelessly cribbed from there, simply because it worked, unlike any other blog on the subject we found on the interwebs!
This tutorial has been tested on a late 2013 Macbook Pro 15", however it should work with any EFI based Mac (more on that in a bit). EFI based Mac's started around 2008 (you can check the list of the Apple EFI systems here). This should include Macbook Pros, Macbook Air, iMac etc...
I am also working on the basis that you want to keep Mac OS X on your hard drive and that you wish to dual-boot it at any time. You should have plenty of free space on your disk drive (the more the better), so either delete some cruft or move some of your old data onto a separate external archive hard drive (because I know you got one or ten of them lying around!).
Finally, we used Mac OS X 10.11.1, 'El Capitan', which is the latest OS X at the time of the release. El Capitan introduced a 'security feature' called 'SIP' (System Integrity Protection) which you will additionally have to overcome if you are using El Capitan or newer. More on that in a bit. We will be installing Ubuntu, specifically Ubuntu GNOME 15.10, but this should apply to any Linux distro more or less, although your mileage may vary with Video stuff particularly.
The tutorial you are about to read has six main sections. These are:
- Installing the EFI boot manager
- Downloading and converting your Linux distro of choice
- Partitioning your hard drive
- Installing Linux
- Finishing up and nice to have items.
Installing the EFI boot manager
EFI stands for Extensible Firmware Interface and is now pretty much commonplace in Macs and PCs across the industry. It replaced the trusty old BIOS system that PCs had used since the 1980s. Installing Linux on a BIOS based machine was trivial, but now with Apple's take on EFI on their customised hardware, it can be a little challenging. No worries, this is the Ultimate Linux Newbie Guide. We got this!
Disabling SIP
Before we go ahead and install rEFInd, we will need to take care of that pesky SIP (System Integrity Protection) rubbish. There are a couple of ways to do this, but we found the easiest way to do so, is pop your system into recovery mode and issue a command from the terminal there. There is a bit more information on this process over here.
To enter recovery mode on your Mac, shut your machine down completely. Give the machine around 30 seconds and then switch back on. Now quickly hold down the Command and R key at the same time until at least you hear the Apple 'chime' sound. Shortly you will enter recovery mode. I recommend plugging in an Ethernet cable to do this, however it is possible to do with WiFi.
Once you are in the Recovery tool, enter the Utilities menu up on the top bar, and click on Terminal.
Issue the following command:
csrutil disable
That's it! Restart your computer and you are done. If you ever want to re-enable the SIP functionality (why?), then you can transpose disable with enable using the same steps.
Now you should head back to the terminal. We are ready to install refind!
Download rEFInd
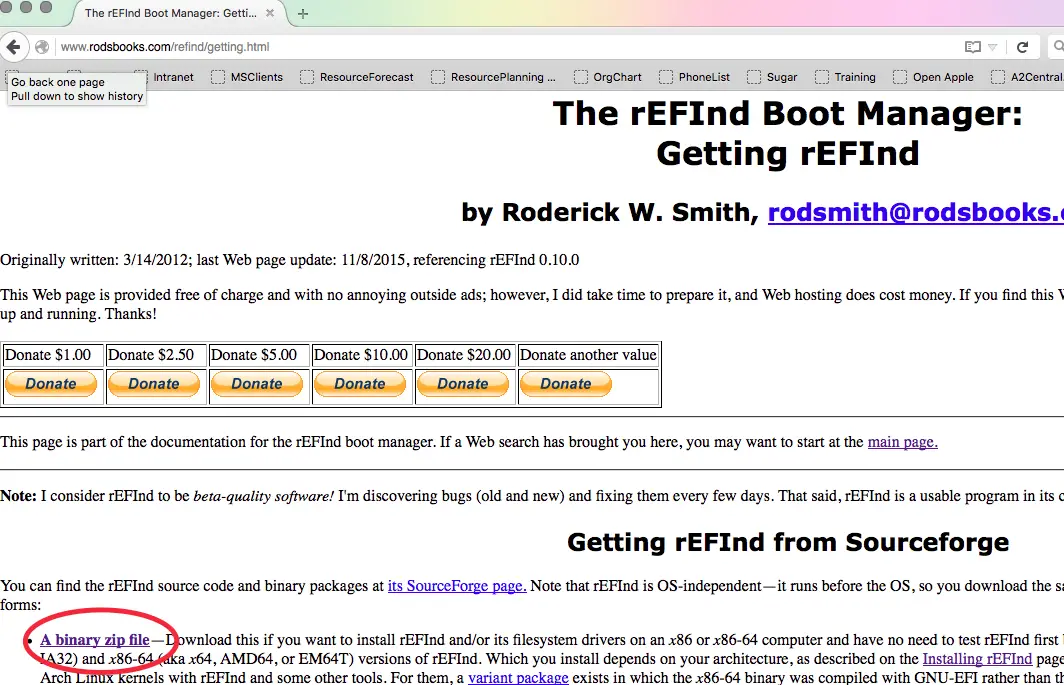 The red circle indicates where to download rEFInd
rEFInd is a boot-loader for EFI based machines. Think of it like bootcamp, or GRUB for GRUB :) You'll want to download rEFInd from the rEFInd website:
Now, if you take a look around the rEFInd website, you'll see it looks like the guy that wrote it believes in punishing everyone that wants to use it. It took us about 20 minutes just to find the frigging download link! So the ULNG has taken the time to go through all the pertinent steps to make it shit tons easier for you!
The version of rEFInd that we used is 0.10.0, and we used the zip archive version. Once you download the binary, you are going to need to start the rest of your work from the Terminal, so open up the Terminal from the Utilities folder on your mac and head over to your Downloads folder where you saved rEFInd to.
If the zip archive is not already unzipped, unzip it using the unzip command and head into the newly created refind-bin-0.10.0 folder:
$unzip refind-bin-0.10.0.zip
$cd refind-bin-0.10.0
We now want to install rEFInd, and we should install all the EFI drivers just in case we need them at any time. rEFInd 0.10.0 offers a substantially more improved installer than previous versions. Which is nice :)
$sudo ./refind-install --alldrivers
Now it's time to edit the EFI config file, but you will need to mount that hidden EFI partition first. Thankfully, rEFInd has a little tool you can use to mount the partition:
$sudo mountesp
Edit /Volumes/ESP/EFI/refind/refind.conf. Like us, you may find the refind.conf file is in /Volumes/ESP/EFI/BOOT, instead of a folder called refind. This is probably because we fiddled around with rEFInd and it's predecessor, rEFIt before. Just because.
$vi refind.conf (or nano, if you are that way inclined. Just not emacs!).
locate the line that says scanfor and edit it to say:
scanfor internal
If no such line exists, add it into the file near the top.
Load the linux file system driver. Check for a line that starts fs0. If no such line exists, add it as below, otherwise edit it:
fs0: load ext4_x64.efi
fs0: map -r
Save the file and quit your editor. That's pretty much it for the rEFInd bit. That is the hardest part over and done with. If you want to be sure it worked, you should power off your machine and power on again. If you see a grey screen with the rEFInd logo, then it has worked. You should be able to chose the Mac OS X logo and hit return to start up OS X again.
Downloading and converting your Linux distro image of choice
Next, unless you haven't already downloaded the iso image of your choice, it's time to go grab it. For this particular demonstration, we are using Ubuntu 15.10, however most other distros should work. Using more hard-ass systems like Arch or Slackware, or even Debian, will be more challenging. This is challenging enough, so do what you will, but we will stick to the easier distros for now!
Make sure you download the x64 version of the distribution you choose, if there is an EFI boot version, choose that also.
 Next, you need to convert the iso file into an image file that Mac OS X recognizes so that you can stick it on a USB stick to boot from. Although you are back at the terminal for this, thankfully it's not that onerous a task.
cd (directory where you downloaded the distro to)
hdiutil convert -format UDRW -o <<filename you want.iso.img>> <<filename of the download.iso>>
(so, in other words, hdiutil convert -format UDRW -o ubuntu1510.iso.img ubuntu-gnome-15.10-desktop-amd64.iso would convert the latter file into ubuntu1510.iso.img, which would be in the RAW, or more specifically UDRW format).
Mac OS likes to rename the file with a .dmg extension, to avoid confusion over that, it's probably best that you rename it. A simple mv command will sort that one:
mv ubuntu1510.iso.img.dmg ubuntu1510.iso.img
(renames the file ubuntu1510.iso.img.dmg to ubuntu1510.iso.img).
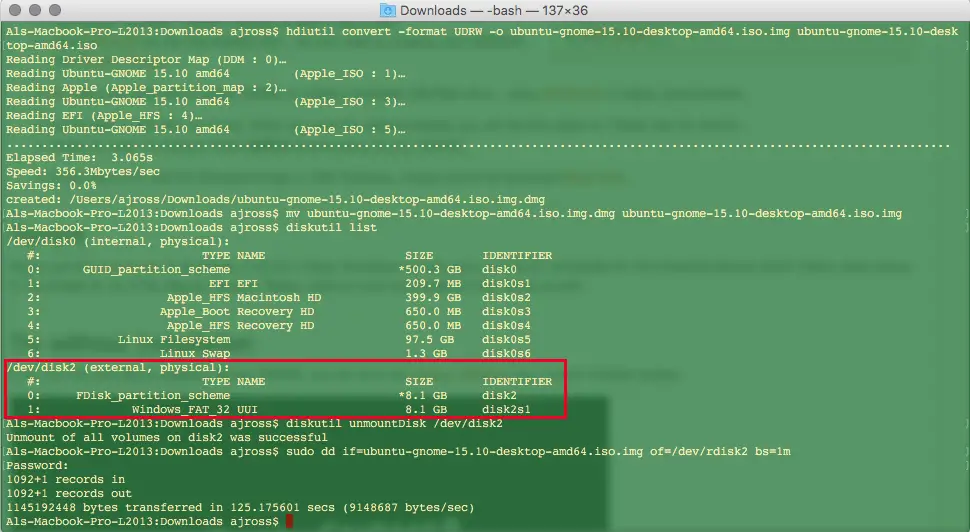
Next, quickly type in diskutil list in the terminal. It should list one disk drive (if you have any external drives connected, disconnect them for now). Take a note of your Mac OS disk. It should be called /dev/disk0. Look for tell tale signs in there like 'Macintosh HD'
Next, locate that USB stick of yours and whap it into the usb port. Please note that you want to have an empty USB stick, because this process will destroy any existing data on it.
Once you have the USB stick plugged in and all settled down, issue the following command:
diskutil list
You should see a list of disks like the one in the screenshot to the above. Note the red box around /dev/disk2. You can see that it has a Windows FAT32 partition, our usb stick is 8 GB big, you can see the size there is 8.1GB, which is clearly much smaller than the main hard drive, which is 500GB in size. Just make sure you identify which disk your usb stick is and take a note of that. The one we are using is /dev/disk2.
Now you need to unmount the usb disk, to do that issue the following command
diskutil unmountDisk /dev/disk2
Obviously if your USB stick is not disk2 then change it to suit. It should tell you that the unmount of all volumes on the disk were successful. Now all we have to do is copy the UDRW version of the iso image to your USB stick. For that, we will use trusty old dd :)
sudo dd if=ubuntu1510.iso.img of=/dev/rdisk2 bs=1m
The things you have to be aware of here:
- This is a fully destructive command. It will blow up any disk you point it to, that's why we made sure you got the note of that USB stick in diskutil list, above.
- if= is short for input file, meaning the input file is the name of the iso file you converted into the iso.img file. We are using the shortened filename here just for an example filename.
- of= is short for output file. The output file, is in fact a device. In this case, we are using (r)disk2; disk2 obviously is the drive we noted earlier, we use the r in front of it because that allows raw device access, so its marginally quicker.
- bs=1m means block size, 1 megabyte. You don't have to use this option, however it will significantly increase the speed of the transfer to your USB stick.
Mac OS is going to bitch and moan that you have a volume it can't read inserted. If it says Eject, click that, otherwise type diskutil eject /dev/disk2.
Partitioning your hard drive
This part chops your disk up in the way you want it. Back in the bad old days of Linux, you used to have to download a partition manager and use that to resize your disk. These days, that's mainly gone, but because of Journaled, Encrypted HFS+ partitions, that's not a good idea to let a Linux based partition manager loose with, unless you want to toast your Mac OS data.
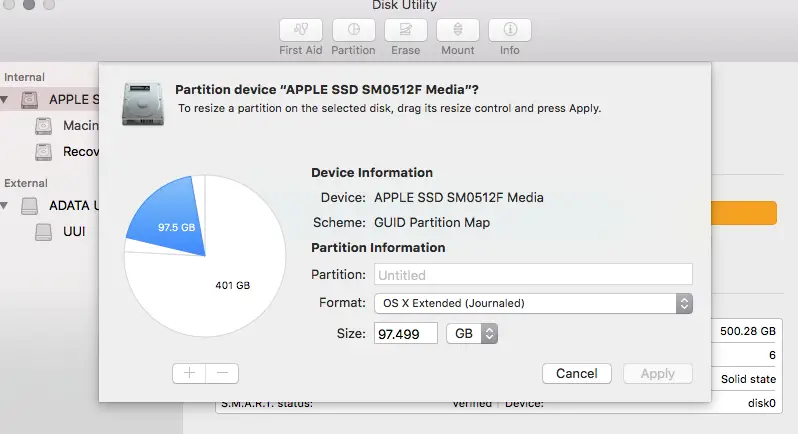 Using Disk Utility to resize your Mac OS X hard drive partition for Linux
Thankfully, this can easily be solved. In your Utilities apps folder, you'll find Disk Utility. If you like, quickly scan your hard drive for errors, just to make sure it's all toot sweet before we get down to business. Repair any errors you may have.
Once you are ready, you will see a list of internal drives on the left hand side. Your Disk Utility may look different if you are using an older version of OS X, but it still offers the ability to resize a volume.
On the hard drive that your Mac OS X partition exists on, click on the top drive, not any subsequent partitions listed below it. Click on the 'partition' button, and you'll see a pie chart like the one above (don't worry if it's not quite like that). You will see you can move the slider around the pie to resize your partition(s). Pull the size slider back for the Mac OS partition to release the free space on the disk. Make a blank partition until you have enough space for your new Linux system. As much space as you are willing to.
Apply the changes and let the resize operation complete. If you have an SSD, this should be relatively quick (a few minutes).
Installing Linux
Woo-hoo! This is the fun part! Now we get to install the operating system that your mac has been longing for!
Switch your mac off completely. Connect your Ethernet to Thunderbolt adapter and your USB drive we made earlier. If you don't have one of those thunderbolt adapters, life is going to be tricky for you, you are going to have to download the wireless drivers and install them manually to get things working. If you don't have one of the adapters, ask a friend for one, or buy one cheap from Ebay or such like. It will save your sanity.
Turn on your computer and hold down the option/alt key. You'll see a menu pop up which you can see your Macintosh HD as well as the USB stick (it's a yellow looking drive thing). It will be named EFI or something similar. Use the cursor keys to select that and hit return. PS: if you are having issues with your bluetooth keyboard at this point, make sure you revert to using your laptop's keyboard and mouse for the time being.
At the step where you have to choose the partition and you are using the Ubuntu style installer, select 'Something else' from the options around partitioning. Locate the empty partition you made and create 2 partitions out of it. Make a big partition and a small partition (roughly 8-16 GB in size). The big partition should be the remainder of the free space. The big partition should be ext4 in type, and should be formatted with the mount point of "/". The small partition should be formatted as swap.
Press next and let the good times roll. Everything else should be pretty normal.
Once the install has finished, restart the computer, no need to hold down alt/option this time. All going well, you should be seeing the rEFInd menu. Use the cursor key to select your Linux installation and hit that return key. Fingers crossed, your system will start up without much of a hitch!
Notably though, you probably won't have a few things that work out of the box. Most of these can be covered off on the next section.
Finishing up and nice to have items.
- Wifi.
Some lucky people will experience that their WiFi works straight out of the box. For most of us, we are going to need to install it. You can do this with:
sudo apt-get install firmware-linux-nonfree broadcom-sta-dkms
The broadcom wl, bcwl43 and fwcutter software should all be installed. Reboot to enable the puppy and all should be good when you select your wifi from your system's networking setup menu.
- Graphics.
The graphics display should generally work out of the box, however there may be 'interesting' graphical issues. Not all of these might be fixable, but give the NVidia drivers a try, and if you still don't have any luck, read the many forums until you get a solution that works for you.
sudo apt-get install nvidia-driver xserver-xorg-video-intel
Note if you are not using xorg, you'll need to make the appropriate changes here. Maybe best to stick with xorg for now!
- Screen backlight.
This is a /bit/ of a hack, but it works!
Check out Jessie's blog for the screen-backlight script. The screen backlight section is near the bottom of the blog article.
- Keyboard backlight.
Again, Jessie Frazelle to the rescue here. The section below the screen-backlight section has a keyboard backlight bit too!
- Mounting your MacOS X partition.
Okay cokey. Now here's the thing. Apple can be real pains in the asses some times. It is quite likely that you have what's called CoreStorage, if you have anything OS X 10.10 or newer. This provides an encrypted, journaled file system; even if you haven't installed FileVault2 (if you have, turn that off!).
To give full read/write access to your Mac OS X partition from Linux, you will need to revert it back to standard HFS+. To do this, you can pretty much enter one simple non-destructive command.
First up, at the terminal, issue the command diskutil cs list. You will see something like the below. If you know LVM in Linux, this is pretty much the same thing. Your main Mac OS X partition (Logical Volume) should be in Apple_HFS format.
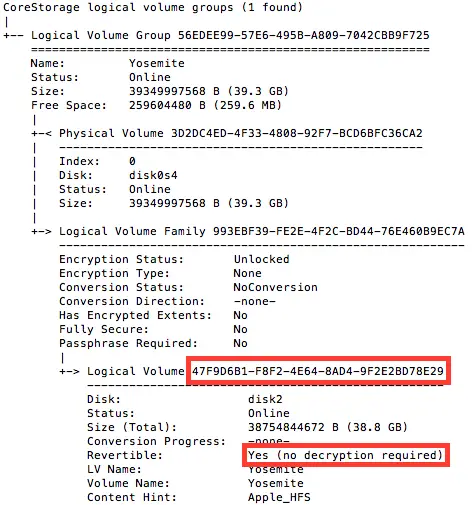 As long as the 'Revertible' flag is set to Yes, you are good to go. Simply enter the following command:
diskutil coreStorage revert
The long string of stuff is that big long alphanumeric string of text highlighted in the red box, you want to use copy and paste it to make sure you don't make a mistake!
The conversion took ages for us, however your mileage may vary, depending upon how much data is on your drive, and how fast your drive is. If you type diskutil cs list again, you'll see how much % of the conversion has been accomplished. Don't reboot your machine until that's over and done with, but after then, you can safely mount your OS X partition with full read/write access.
First, make sure that you have hfsprogs installed. Example installation command:
sudo apt-get install hfsprogsNext, mount or remount the HFS+ drive; commands need to be as follows:
sudo mount -t hfsplus -o force,rw /dev/sdXY /media/mntpointor
sudo mount -t hfsplus -o remount,force,rw /mount/point
Okay, that about wraps it up for this ditty, I hope it has worked for you. If it hasn't, or you have some feedback to offer, we would love to hear it! Drop it in the comments, y'all :)