How to put a Linux ISO onto a USB stick and make it bootable on a Mac
So, you've got a mac computer and you want to put the ISO you just downloaded onto it. If you've used tools like UNetBootin before, then you'll have found it a nice easy graphical way on a PC. Unfortunately, Mac users have to go through a few more hurdles to get an ISO image onto a USB stick in order to make it boot properly.
What are we trying to do here?
So, just to be clear, you have downloaded Linux (say Ubuntu) from the Ubuntu website. When you downloaded it you get a .iso file. This .iso file is a disk image. In the past, we'd 'burn' this image onto a blank CD or DVD. They weren't really intended to be put onto USB sticks. USB sticks were more meant to pop regular files onto, not disk images.
However, this is 2016, and people don't have CDRW drives any more, so let's find out how to do this on your beloved mac. If you want a full tutorial on how to install Linux on a Mac computer, check out our guide.
Step 1: Download the ISO
This may seem obvious - but just in case you haven't already downloaded your Linux distro, make sure you grab the right one for your machine (if it's a new Mac, it's going to be the 64-bit ISO image - the filename usually ends amd64.iso. If you are downloading Ubuntu, you can get it here: www.ubuntu.com/download/desktop
Step 2: Erase / Format / Initialise your USB Stick
It's time to pop your USB stick in your Mac. Regardless of whether you have a blank USB stick, or one with lots of files, you are going to need to completely erase the contents of it. It's commonly known as 'Formatting', but those Cupertino Cliques like to call it 'Initialise' instead :)
To initialise your USB stick, go to your Applications menu. In Utilities you'll find an Apple app called 'Disk Utility'. Launch that App, and you'll see something similar to the below screenshot:
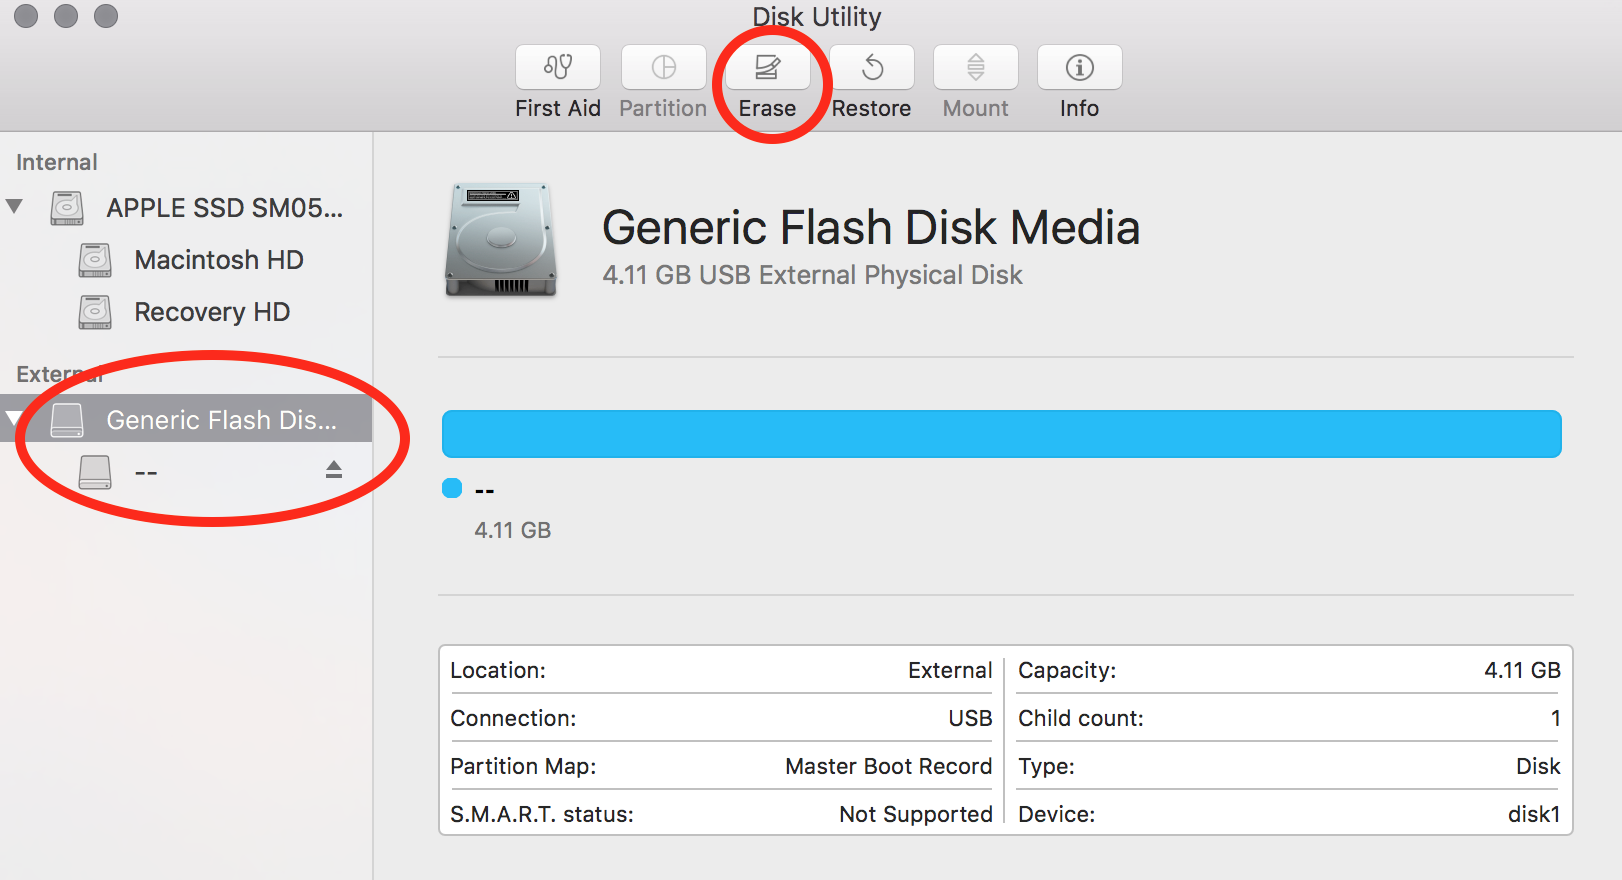 Mac Disk Utility
When you launch the app, find the USB stick icon. I've circled my one on the left hand side. Once you've found it, click on it (making sure you definitely have the right disk), and press Erase.
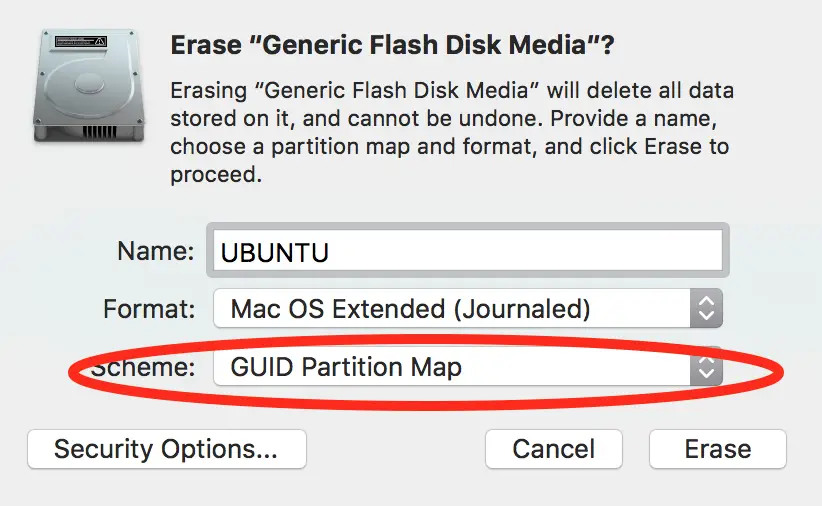 Erase (Initialise) the USB Stick
When you click Erase, you'll get a few options. Make sure you choose 'GUID Partition Map' from the Scheme dropdown. I also gave it a name of UBUNTU so it is easy to identify in the following steps, however this is not required.
Click on the Erase button.
Step 3: Identify the disk and unmount it
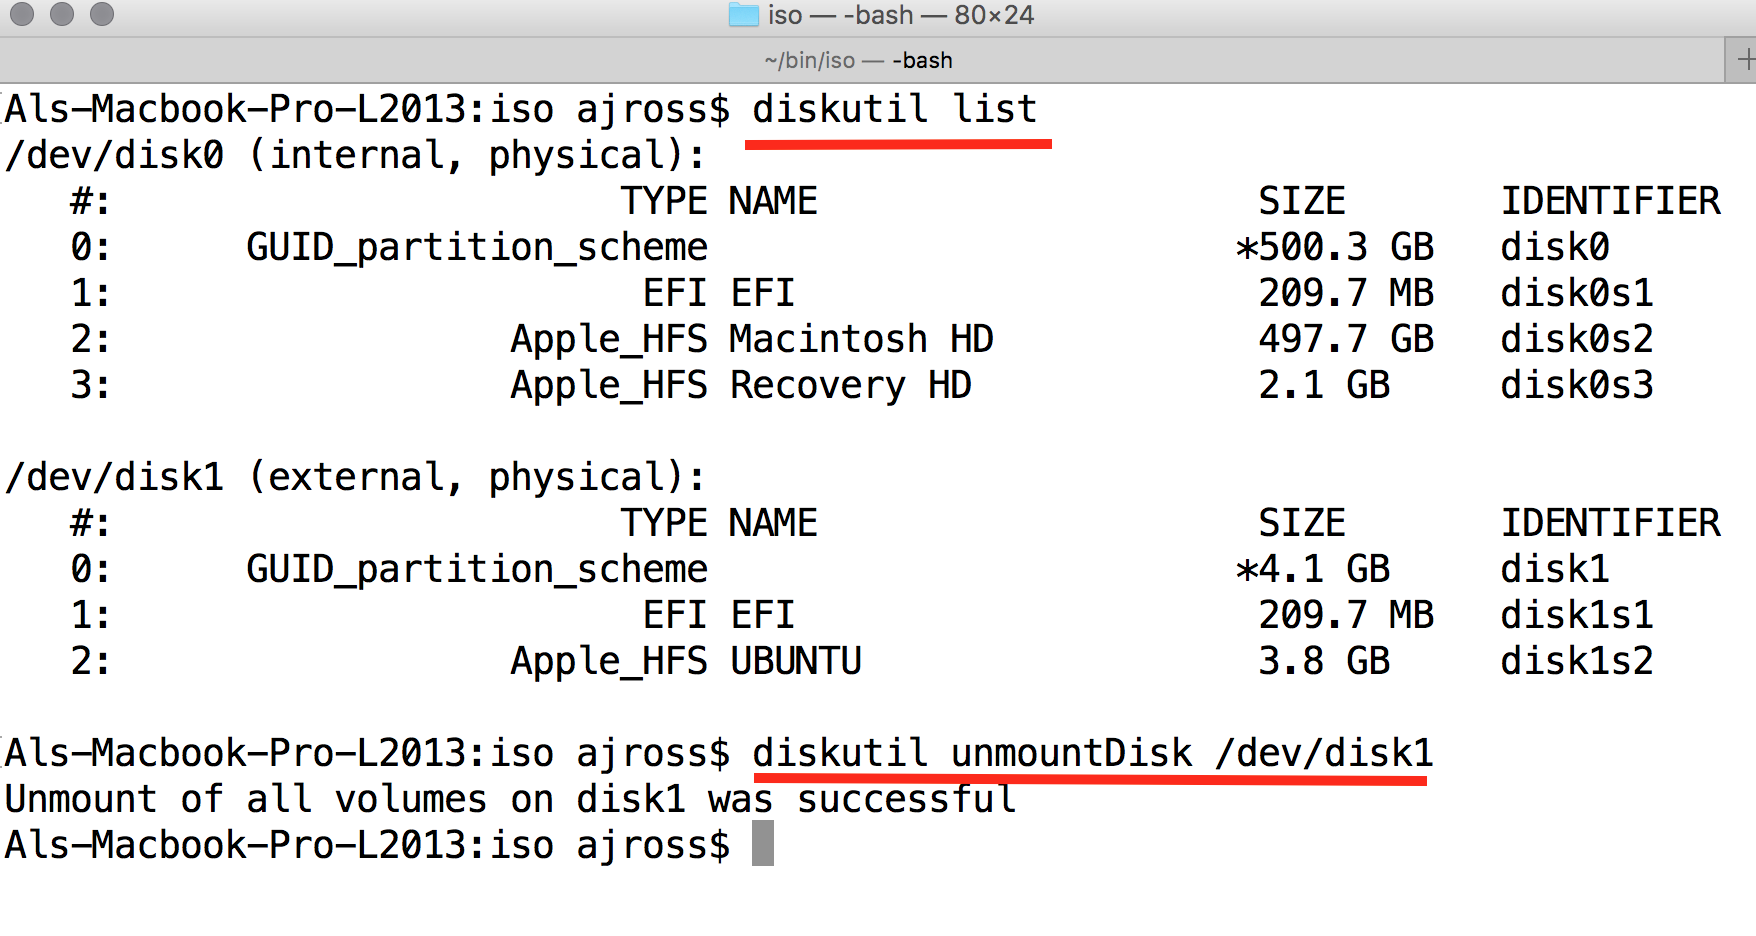 Use diskutil to list the available disks
Next up, open another inbuilt Utility on the Mac, this time it's called Terminal. Launch that and you'll get a blank text window.
Use the 'diskutil list' command as per the above screenshot (click the image to see it clearer).
IMPORTANT!
Take a note of what device name your newly initialised USB disk is. You can see in my screenshot that /dev/disk0 is the Mac's hard drive, disk1 is the USB stick in my case (note the name I gave it, UBUNTU). It is VERY important that you take note of the correct disk here. If you use the dd program (coming up shortly) on your Mac's hard drive, instead of the USB stick, your data will be toast! You have been warned!
Now that you have initialised the USB stick, unmount it. This is different from ejecting it, because we want to make the USB stick still visible to MacOS, we just want to stop it from being used by the OS.
To unmount the disk enter the following command:
diskutil unmountDisk /dev/diskX
Where diskX is the name you wrote down.
Step 4: Convert the image type to UDRW
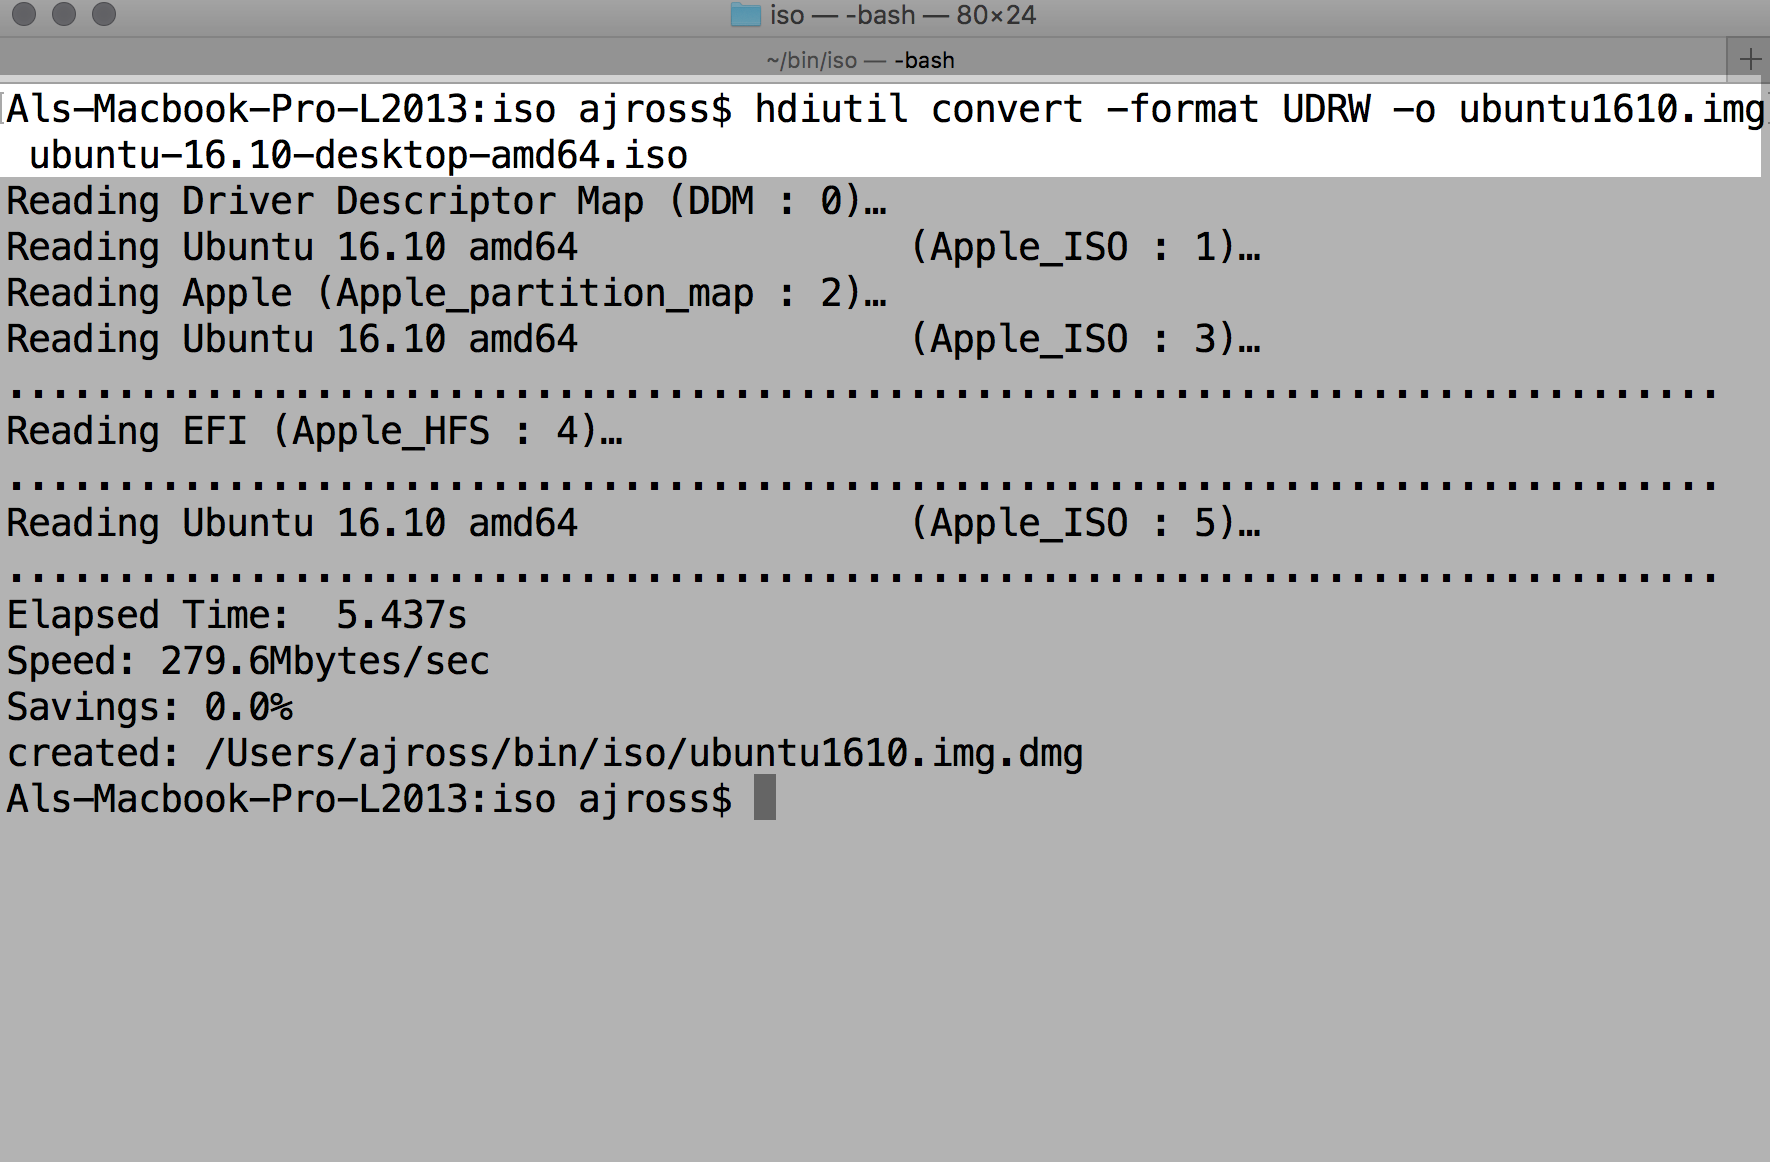 Convert the image to UDRW
Next you have to go into the folder which you downloaded the .iso file. If this is your Downloads folder you would type:
cd ~/Downloads
Note that it is case sensitive. You can use /home/yourusername instead of the ~
You can use the ls -l command to look at the files in the folder, just to make sure you are in the correct folder. In there, you should see the .iso file you downloaded in Step 1.
In order for the image to be writeable to the USB stick, you need to convert it into the UDRW image format. To do this we use the hdiutil command.
As you can see from the above screen shot, you type hdiutil convert -format UDRW -o
after the -o you provide a filename for the file you are about to create. It doesn't really matter what it's called. I called my one ubuntu1610.img. Note that MacOS will append a .dmg filename on the end of it because. Well, because MacOS!
Finally you provide the source file. The source file is of course the name of the file you downloaded from the web (ubuntu-16.10-desktop-amd64.iso, in my case).
So, the command in full is:
hdiutil convert -format UDRW -o <outputfile.img> <sourcefile.iso>
When the command finishes, you'll see the filename of the newly created UDRW disk image. You can copy this to the clipboard to help with the next step if you like.
Step 5: Put the disk image onto the USB stick
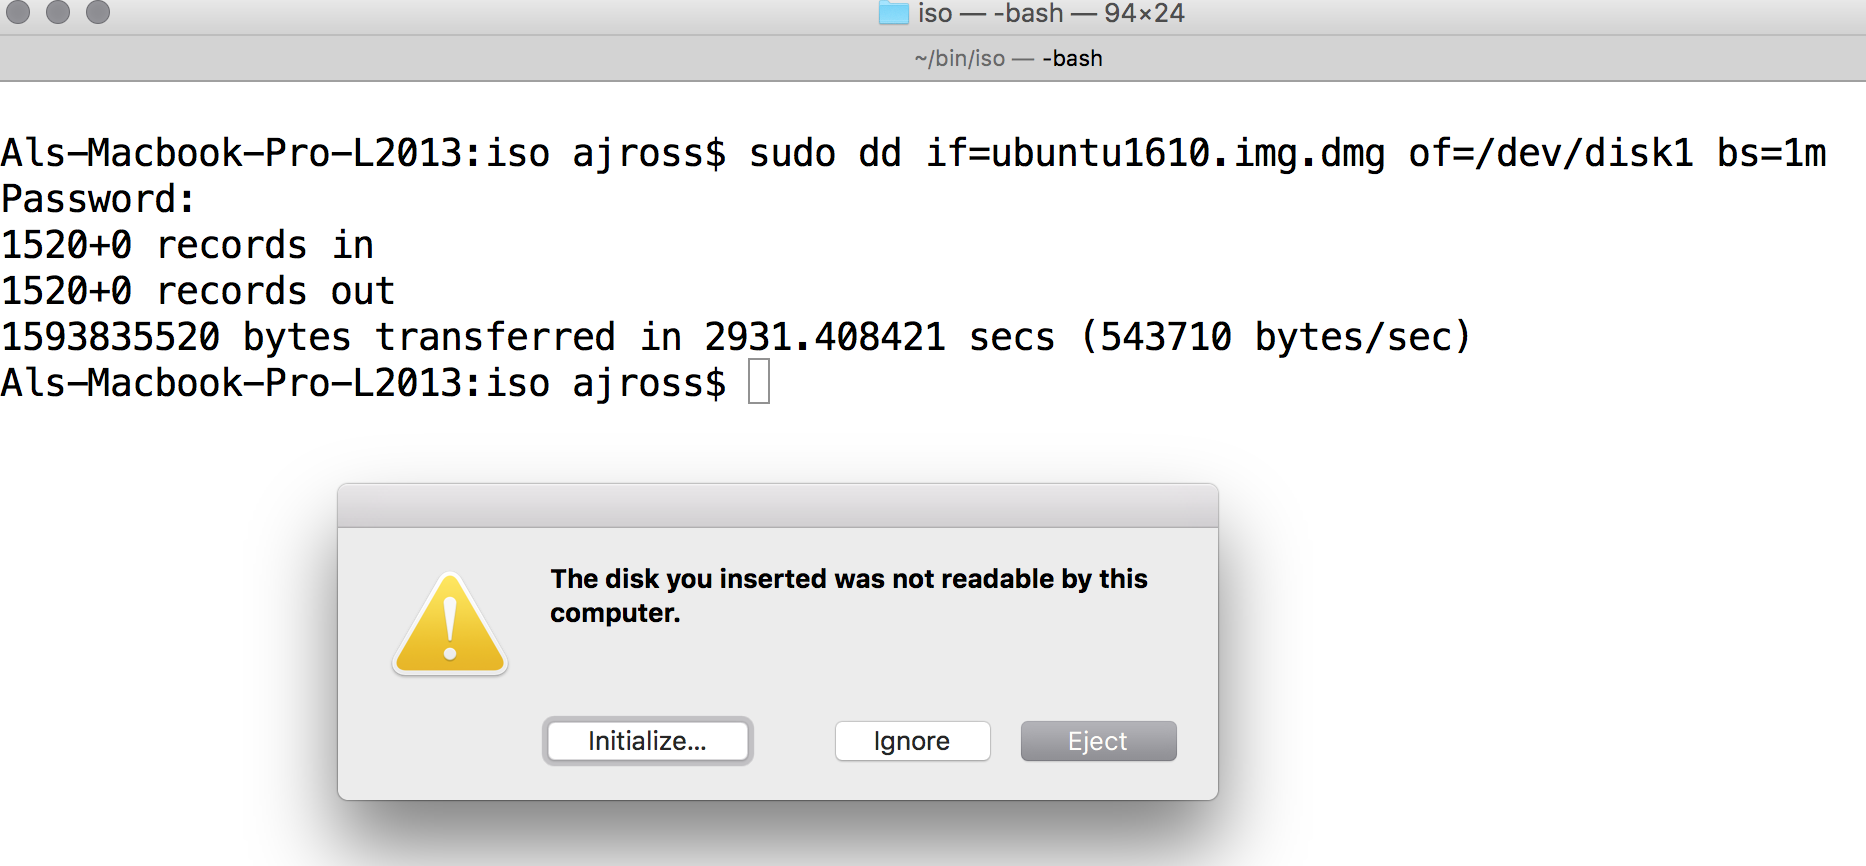 Use DD to write the image to the USB stick
This is the vital stage. And this is where, if you didn't take a note of that /dev/diskX bit in step 3 properly, you are going to be in a whole world of pain.
Still in the Terminal, carefully type the following:
sudo dd if=<UDRW_IMG_file_you_made_in_step_4.dmg> of=/dev/diskX bs=1m
It will ask you for your usual account password. Enter this and the dd command will start. Unfortunately, dd is about as old-school as it gets. Literally, you won't see anything happening on your screen for quite some time. If your USB stick has a light on it, you'll be seeing it flash, but otherwise you will have no idea that anything is happening. Hold on tight though, it's doing its thing. Go find some wet paint to watch drying in the mean time. I've tried this a number of times on different USB sticks. Some were done in 5 minutes, some took 25.
Once the process is finished, you'll see a screen that looks pretty much like the one above. You'll also likely get a popup from MacOS saying that the USB stick can't be read by the computer. Do not click any of those buttons, no matter how tempting that 'Eject' button might look!
Step 6: Finishing up
It's now time to eject the disk. We need to do this manually, to do so, enter the following command:
diskutil eject /dev/diskX
Replacing the X with the number you used earlier in this guide. It's now safe to press the Ignore button on the window you saw in Step 5.
That's it! You can now boot your computer (whether it's your Mac, or another PC), using the newly created USB stick. To start it on your mac, reboot your mac, with the USB stick plugged in. Whilst it's rebooting, hold down the 'option' key (sometimes it's called Alt, depending upon your keyboard).
You should see a selection of disks to start up from. Your USB stick should be visible as a yellow disk icon, you can select the USB stick using the left/right arrow keys. Hit return to start up from it.