Installing Linux (Ubuntu)
5.1 Installing a Linux Distribution: Ubuntu
Although this example shows the installation of the Ubuntu Linux distribution, installing most other Linux distributions is a similar process. I have chosen Ubuntu as it is a friendly, free, highly compatible distribution of Linux and at the point of writing, it has been the most popular Linux distribution for quite some time.
Please also note that this tutorial details the installation of Ubuntu Linux on a PC, if you have a Mac, the instructions are similar, but not the same. In particular, the tools you will use for partitioning your hard drive may be different.
5.2 Planning the Task ahead
If you remember back in Chapter 4 we discussed hard drives and partitioning. If you didn't read that part, to have a fuller understanding about what we're about to do with your hard disk, skip back and read it now.
WORDS OF CAUTION!
At this early point in the process of installation, be aware that you will be working with your hard disk in order to install Linux. You MUST make a backup of that data before starting. You do all of this at your own risk!
The main step with a Linux installation is to virtually 'slice' up your hard disk into partitions in order to put Linux onto it. This process is called partitioning.
You will not have to perform this step if you have chosen to use an additional new or recycled hard drive to install linux onto. Also, if you are brave and wish to simply delete the operating system (Windows/Mac OS) clean off your computer, then this step is also not necessary, otherwise, proceed forward!.
How to partition the disk
Since as far back as 2007, it has been possible to re-partition your disk drive during the installation process, making it easy to do, so this guide has been updated to follow this process. Read on and watch the below videos to learn how this is done.
 Tux tip: If you still want to partition your hard drive before installing Linux, for example if you want completely granular control of how you split up your disk partitions, even after you have installed Linux, then you can use a tool like GParted, or these others to partition your disk so that you can create some free space to put Linux onto.
The video below in section 5.4 will demonstrate how to partition your disk step-by-step before we go on to the video, here's some information about partitioning you will want to know:
If you are resizing your Windows partition to accommodate the installation of Linux, try and devote as much space to Linux as you can manage, if for example you have 40GB unused/free space on an 120GB drive, resize your windows partition down from 120GB to 90GB, leaving 30GB for linux and 10GB room to spare for windows. This way you probably won't have too much concern about free disk space in the future.
You can split it any way you like, here is an example of how your hard disk, if drawn as a sideways graph would look if you split it 50/50. The Unallocated space would be later formatted under the 'ext4' file system by Linux during installation:
 A graph demonstrating a 50/50 split of a hard drive. Windows uses the NTFS partition type (on the left) and the Unallocated space will be utilised by the EXT4 (Linux) file system during the installation process.
5.3 Downloading and starting the Ubuntu installation
In case you didn't read over the previous chapter, firstly, make sure your PC is up to the job of working with Ubuntu.
You will need:
- A PC with at least 2GB RAM, 40 GB free space on your C: drive or target install drive.
- A USB stick which is empty and is at least 2GB in size (or a DVD-R)
- An Internet connection to download the ISO image (approximately 1GB in size)
If that all checks out, then you are going to need a copy of Ubuntu, so head on over to their website (https://www.ubuntu.com/download/desktop) and download a copy.
When it's downloaded, you'll end up with a .iso file. This file type is what is known as a disk image.
Copying the 'ISO' image to the DVD or CD.
Copying the ISO image to a DVD is not the same thing as just dragging and dropping the file from your Downloads folder and copying it onto a blank DVD or USB stick, you need to burn or unpack the disk image onto the media first.
Unpacking the ISO file to a USB stick
If you prefer to use a DVD-R, rather than a USB stick, then skip this section and see below.
There are a few ways to put an ISO image onto a USB stick these days, and it's a lot easier than it used to be. As most of us have USB sticks lying around the house, this is now the most common way to install a Linux distribution.
For Windows users, the easiest way right now seems to be by using the free tool, Rufus:
Download it here (https://rufus.akeo.ie/).
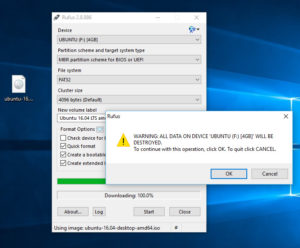
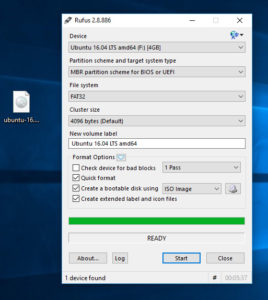
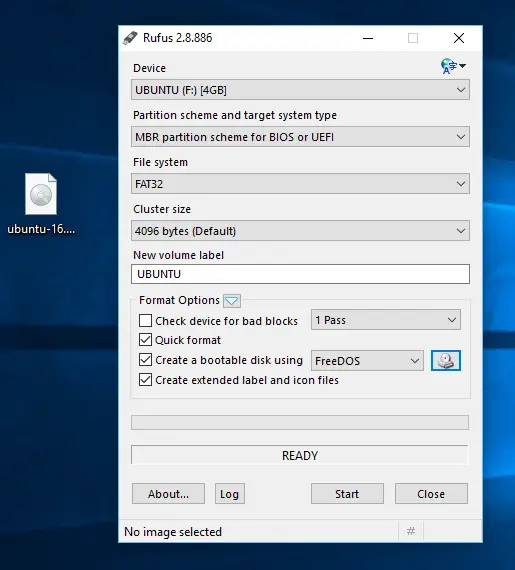
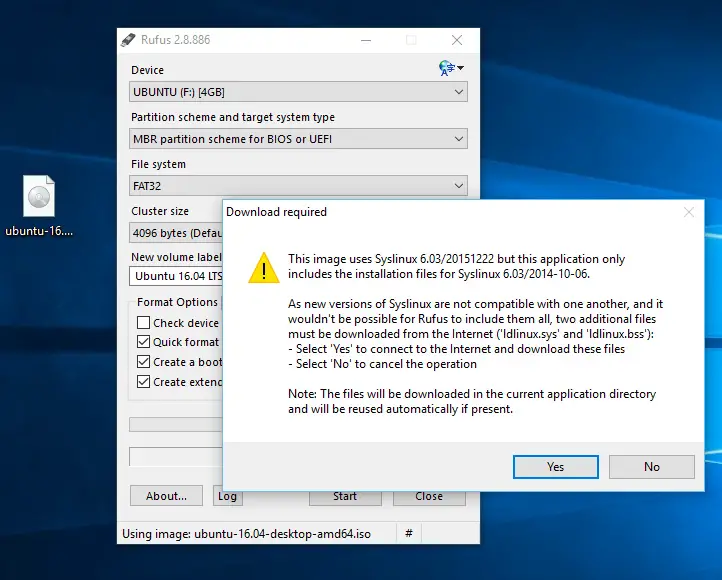
Pop your USB stick in your computer if you haven't already and open the Rufus tool you just downloaded. Now follow these steps (click on the images to make them larger, if required):
- Choose your USB stick from the dropdown entitled 'Device.
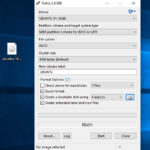
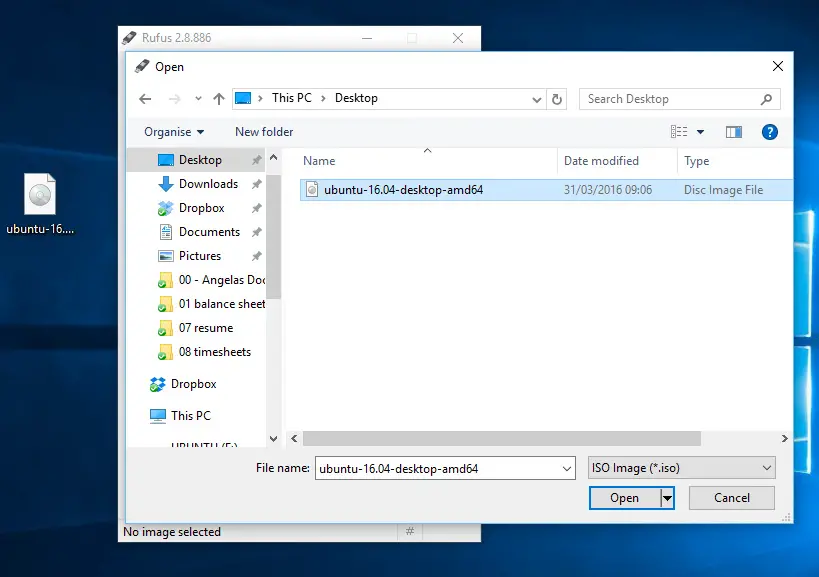
- Further down on the right hand side you'll see a CD icon with a little box under it, click on that and an 'Open' dialog box will appear, locate the ISO file that you downloaded and then click Open.

- Click on 'Start'
- You'll be asked if it's OK to download the SYSLINUX software. Click 'Yes'.
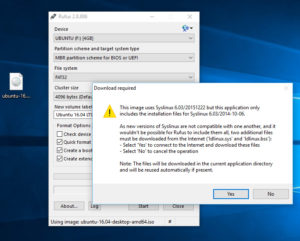
- Once that's done, you'll see a dialogue about an ISO Hybrid image being detected. Simply click OK (Write in ISO Image mode).
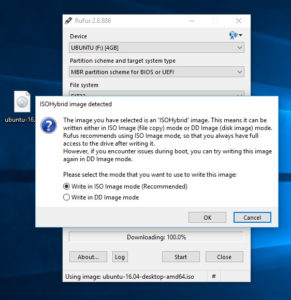
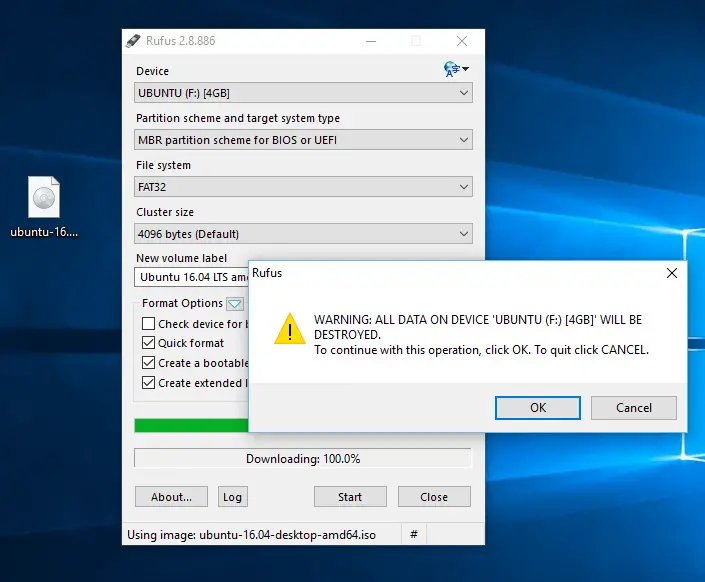
- Confirm that you selected your USB stick and not another one by accident! Take note that any data you have on the USB stick at this point will also be deleted. Press OK.
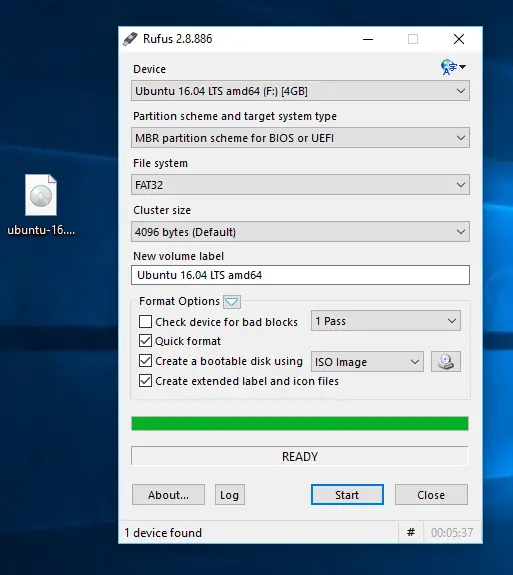
- Once it's finished, restart your computer, as detailed a little more in the following section.

'Burning' the ISO file to DVD
If you prefer to use a DVD rather than a USB stick then you are in luck, burning an ISO disk image to a DVD is easy these days if you have Windows 7 or later, then simply right click on the icon of the file you downloaded, which will be named something like ubuntu-14-04-desktop-amd64.iso. Once you right click the icon, you will see the option 'Burn disk image'. Select that option and pop a blank DVD-RW or into your PC and click burn. If you would like further instructions on this process or are using an older Windows or other operating system, check out this easy guide at the Ubuntu web site.
Ready to install!
Hopefully you are now armed with a Linux DVD or USB stick that's good to go. If the DVD was ejected from the CD player, pop it back in the drive and Restart your computer. Most PCs will automatically try to start the computer from the CD drive or even USB, so hopefully you will be presented with a welcome screen after a minute or so. If you don't see this, or if your PC started up in Windows instead, make sure your PC is set to boot from CD (or USB) before any other disks. You can change this setting in something called the BIOS or Boot Order setup. Often when you start a PC you will see a message like 'Press F10 to Enter Setup'. Hit that key and enter the setup, you should be able to change the boot order to something like CD/DVD or External USB Media, Save the settings from there and then restart once again.
5.4 The Install Process
Okay, it's time to put the DVD or USB stick in the computer and restart it. If you don't already have an Ubuntu CD, visit Ubuntu's Download site and download the ISO image of Ubuntu. It's around 800MB in size, so you will need a 800MB CD-R or DVD-R and a suitable DVD-RW drive.
If you don't have a DVD/CD-R Burner or if you have a slow connection then you can order a copy of Ubuntu from Canonical.
I've devised the following video tutorial to walk you through the process of installing Ubuntu Linux 13.04 on your home PC. It assumes that you already have Microsoft Windows pre-installed, so it shows you how to re-partition your hard disk to put Linux on it. Note that although the version is 14.04.01 LTS, the steps are practically identical for any modern version of Ubuntu or Linux Mint.
Part 1 of 2 (Guides you how to download and install the Ubuntu 14.04.1 LTS iso image and make it bootable on a USB stick):
http://youtu.be/Zz7rpuAmbCo
Part 2 of 2 (now you have set your PC up to boot from USB and set up the USB stick, it's time to boot the Ubuntu Linux installer from that USB stick!):
http://youtu.be/jWnMTvcoK5o
5.5 Notes for Installation
Usernames and the Administrative (root) user
When you are installing Ubuntu you need to set up a user account (as demonstrated in the above video tutorial). Something to note about this first user on your machine: Ubuntu always sets the first user specified as an administrative user. In this context, this means that you, the first account on the machine (you can have as many as you like), will also get administrative privileges on the machine to do things like install software and deal directly with hardware and all things associated with it. Take this information with a little caution. If you are asked again for your password when doing something in Ubuntu, it is asking you to escalate your own privileges into what Linux calls the 'root' user. Root is simply the username of the administrator in Linux, as administrator you have free reign over the system at all times. Do not perform tasks as root unless you know what you are about to do, or unless you have good confidence in the task ahead!
A little word on passwords
During the install process you'll be asked to select a password. It's important that you select a strong password, because in time to come, you may wish to open up services such as remote access onto your machine. It's a simple step but believe it or not, still a reasonably effective method of security, do not choose a simple word as a password. Choose random things, like for example, your favourite colour, and your first car, with a few numbers (maybe your year of birth) sprinkled in the middle for good measure. Here is a pretty strong password and could be pretty memorable to the right person:
blue77volvo240GLS
No, I wasn't born in 1977, my favourite colour isn't blue, and I've never had a Volvo 240GLS. However, you get the idea. The password is still important, especially if you ever run any server or sharing software on your machine in the future.
5.6 Finishing Up
By now, most of the software you will need will have been copied to your new partition on your hard drive, your user account will be set up and your regional settings are all ready for you. It's time to restart the machine. Make sure the CD is removed from the drive when prompted and continue onwards!
Welcome home!
When you start up your computer, you will likely see a boot-up screen asking you if you wish to choose Windows or Ubuntu (that is, if you installed Ubuntu alongside Windows). Choose Ubuntu from the list using the cursor keys (the up/down arrow keys) and hit enter and it will start up Ubuntu.
The next screen you will see is the Ubuntu login screen. It's the screen you will see every time you start up Ubuntu. If prompted, select the username that you created earlier (or type it in if required), then enter your password. The system will then log you on.
5.7 The Ubuntu Desktop
The Ubuntu desktop is a friendly place, which we will cover in later chapters. If you are used to Windows, your 'Start' menu is the bar along the left hand side. The top button which has the Ubuntu logo on it allows you to search your computer for content (Apps, documents, audio etc) simply by typing it's name, but if you don't know what App you are looking for, Click on the Ubuntu icon, note the litte 'A' icon down at the bottom of the screen, click on that and it will show you 'Recently Used', 'Installed' and 'More Suggestions' for Applications. Beside the 'Installed' line you can see it reads 'See 76 more results'. Click on this and you can see all of the apps installed on your Ubuntu desktop. This same action can be done for documents, music, photos and movies with each of the respective icons.
Favourite Apps
You'll note that a few favourite Apps have already been 'pinned' to the bar on the left, these include the Firefox web browser, the LibreOffice (free Microsoft Office compatible word, excel, powerpoint suite). You can pin your own favourites to the left-hand side bar if you desire simply by dragging an icon from the above Applications search list into the bar.
Where are all my files?
On the left-hand side bar there's a filing cabinet icon. Clicking on this will show you all the files on your computer. If your Ubuntu machine has been set up to see your Windows file systems, you will also be able to see your the files you work with in Windows from here, just look under 'Devices' on the left of the file browser.
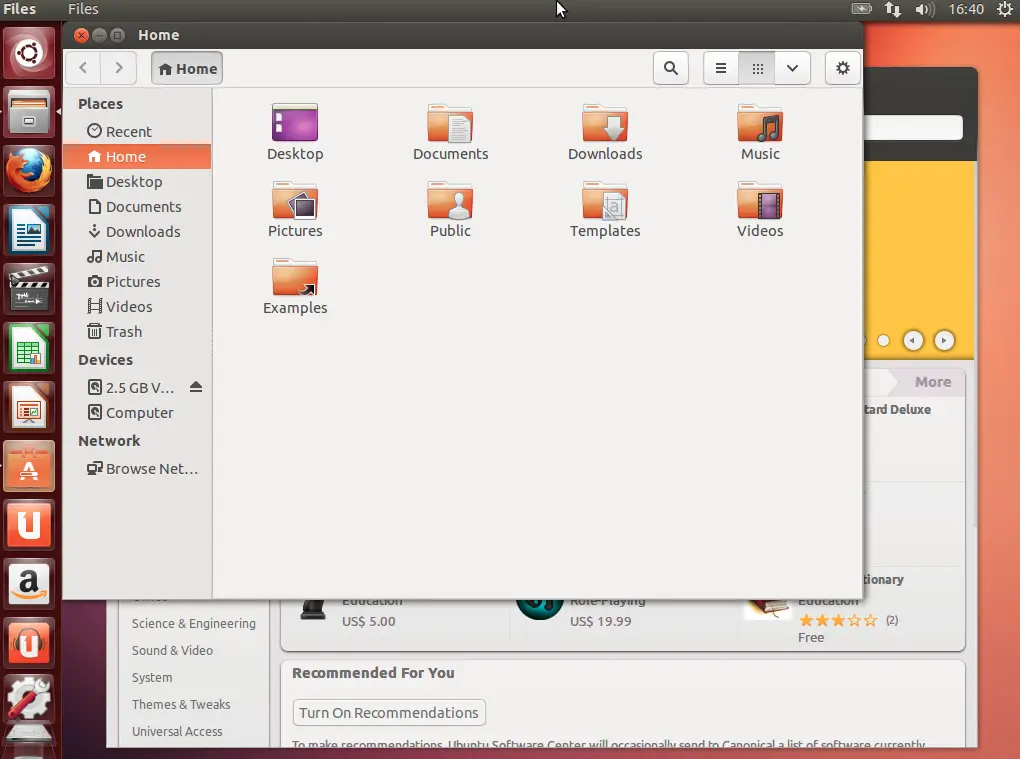 A screenshot of the Ubuntu 14.04 desktop with the file browser open. Note the 2.5GB Volume on the left hand side. This is similar to what you would see if you have a Windows file system available to you.