The Ultimate Linux Newbie Guide
The ultimate guide for choosing, installing and using Linux for everyday people

The ultimate guide for choosing, installing and using Linux for everyday people
Choosing, Installing and Using Linux has never been easier! The Ultimate Linux Newbie Guide is the guide for the everyday person.
This eBook version of the guide provides the main guide from the website, as well as a few select articles.
Since 2001, The Ultimate Linux Newbie Guide has been helping individuals switch to the Linux Operating System.
This guide can help both beginners and seasoned computer users alike learn all the important parts of choosing, using and installing Linux, a great free operating system for your computer and help you remove dependency on non-free, closed source software that is commonplace in Microsoft Windows or Mac OS.
Throughout the guide, you’ll find out heaps of valuable information, such as:
After you've finished reading the book, don't forget to visit the website. There's also an up to date blog with different sections including Quick Tips and Examples, In-Depth Tutorials, Video Guides, and even a more advanced Sys Admin section for when you want to start with Linux in a career! Please do head over to www.linuxnewbieguide.org to check out all of the latest content!
I hope that the Ultimate Linux Newbie Guide helps you into a new world of freedom when using your computer and hopefully makes you smile along the way!

Alistair J. Ross, March 2019.

About the Author
With over fifteen years of experience in Linux, if you are in need of Open Source based support or consulting services, be it remote assistance or in-person (Wellington, New Zealand only), then look no further than the author of this website! exposure to Linux in both large corporate environments such as Amazon, GE as well as small businesses, Alistair J. Ross has been at the forefront of Linux for most of his professional life. He loves providing creative solutions and best of all, it's at a rate suitable to you or your business.
Alistair has expert knowledge with many open source and propriatery technologies including LAMP (Linux, Apache, MySQL, PHP). Web programming and databases is no problem. From CMS customisation to Kernel performance tuning, Alistair can help make your visions a reality. Talk to Alistair today about your open source based personal or business needs and see how he can match them to a solution that fits your needs.
Alistair prides himself in being a people person, not a techno-babble speaking geek, so if you need one on one training or class based sessions for your business, why not discuss your training needs to find the perfect programme for you.
Alistair now operates an open source consulting business, OpenTech, click the below link to contact OpenTech.

The following seven chapters form the core part of the Ultimate Linux Newbie Guide. Following this section there are a number of example tutorials from the website.
Header
Welcome along to the Ultimate Linux Newbie Guide! In this chapter we cover the essentials including: What an Operating System is, What UNIX is and how Linux differs from UNIX.
Linux (/ˈlɪnəks/ (listen) LIN-əks) is a family of free and open-source software operating systems based on the Linux kernel, an operating system kernel first released on September 17, 1991 by Linus Torvalds. Linux is typically packaged in a Linux distribution (or distro for short).
-Wikipedia
The above definition is probably not going to help you much if you don't know what an Operating system is, and what this UNIX thing is, so let's start at the first major point: What is an Operating system? I promise I won't make it boring!A
Header
Imagine you have a brand new computer. Imagine that nobody had put a disk of any kind into it, ever. That would mean that there was no software installed on the system. If you switched the computer on; It would beep a few times and then tell you that it couldn't start an operating system. The most important software to a computer is one thing: -- the Operating System.
Without an Operating system, you couldn't surf the web, you couldn't play music, you couldn't write letters. You can't do anything.
Some of you will have heard of famous operating systems already but may not fully appreciate it. For example, Microsoft make a well known operating system called Windows, Apple make two that you may know: MacOS (on most Macintosh computers) and iOS (on iPhones and iPads). An operating system is the software that sits between you, the user, and the hardware inside the computer. If you click the mouse on an icon on your screen, the operating system interprets that you want to load the program that you are clicking on. For all of this to happen, The Operating system (some times referred to as the OS or O/S) must know how to use a screen (to show you what's going on), to use a mouse (so you can move it around and click with it), to use your hard disk drive (to load up the data from it). It must also need to know pretty much everything else about the hardware installed inside your computer, ie: RAM (Computer Memory), Hard disks/USB/CD drives, keyboards, joysticks, sound controllers, graphics controllers, printers, scanners, etc.
So when you start typing a letter, for example, you have already loaded up a word processing piece of software. This software is called application software and is running 'on top' of the Operating System, but nonetheless, all of the time whilst the word processor application is running, it talks constantly to the O/S for vital information.
Okay, we've established that an O/S is necessary, but what else does an O/S do: Probably the most basic and yet essential tasks of an operating system is the job of managing our files and data. A basic O/S should be able to do the following with files and folders:
Header
Now you have the idea of what an Operating system is, let's find out about a specific type of operating system called UNIX, the grandfather of Linux...

The UNIX operating system began life in 1969, in Bell Labs, a division of the American telephone firm, AT&T. There are now many different types of UNIX, making it one of the longest running commercial operating systems available, way longer than Microsoft Windows or Apple MacOS.
Linux is just one type of UNIX which is most famously known for being an open source, free (as in free speech, not always cost), derivative of UNIX. Most of UNIX's different flavours are still being updated and are still in use all over the world today. Most of the successful ones are based on the AT&T System V (system five) release, which set a standard for UNIX back in 1983. Here are just some popular manufacturers and brands of UNIX, that you may or may not have heard of before:
Developed from 1993, by Sun Microsystems (acquired by Oracle), Solaris was a leader in the commercial UNIX world until the prevalence of open source software & Linux. Solaris still exists today, but Oracle seem less interested in the future of Solaris, and so many organisations have, or are in the process of moving to Linux.
Header
HP's implementation of the UNIX standard System V, called HP-UX was released in 1984 and is still being used today in many enterprise environments.
Which band of big names wouldn't be complete without big blue? Interestingly enough the recent logo of AIX is now green.... Anyway, IBM released their take on Enterprise Unix in 1986, dedicated for it's own IBM hardware, so that they didn't miss out on all of this UNIX malarkey.
AIX actually represents a series of proprietary Unix operating systems. Originally released for the IBM RT PC RISC workstation, it now supports a vast array of different hardware platforms.
Like HP-UX, AIX is based on UNIX System V with 4.3BSD-compatible extensions.

Berkley University: NetBSD and FreeBSD. Berkely Systems Distribution (or BSD) is the closest match to Linux in terms of a direct relationship. Apple macOS and iOS is even built on a modified BSD core (kernel) called Mach. FreeBSD is a fork of BSD which is cost zero.
With the exception of FreeBSD, there was (and still is) a pretty grand fee to own one of the above versions of UNIX. Mainly large commercial organisations and universities have traditionally used these UNIX variants, however Linux appears to be replacing traditional UNIX on a lot of corporate systems due to it's proven track record, it's growing reputation as a contender to UNIX, and it's low price tag, which can often be free.
Header
UNIX is good because it is a true multi-tasking, multi-user operating system. This means that it can do more than one thing at a time (for example, have a word processor and a music player open and working at the same time) and it can provide all it's services to lots of users at the same time. Modern day workplaces rely on servers to provide a central resource of information and connectivity to users. UNIX was also the platform that many firsts came on: The Internet, the C programming language which is the basis for most modern computer programming languages. These were all firsts that took the other operating systems like Windows and Mac OS a long time to catch up to.
So, Unix is pretty clever, huh? Well, yes. It is, but Unix was also traditionally a pretty boring system that involved learning lots of commands that were tedious to learn.
In 1981, a small company based in Seattle called Microsoft released an operating system. Through chance (Digital Research were supposed to get the contract), IBM took them on to provide an operating system on their new home/small office based computer. This was the IBM PC (or Personal Computer). This operating system was also not graphical. It required commands, in a similar format to UNIX or CP/M, but they were less powerful. The main pitfall of MS-DOS - (Microsoft's PC Operating System) was, that it had no multi-user, multi-tasking or networking support as standard. By the early 1990's, this was really starting to wear on PC users. UNIX still had far more power than most operating systems of the time, it was just way too expensive, and legal issues between UNIX vendors licensing UNIX was causing headaches and therefore did not have much exposure outside of large organisations, educational establishments and government offices. It made a lot of sense for most small and medium sized businesses to continue using MS-DOS (and later Windows), it ran the software most people needed, even if it wasn't delivering the benefits that we all would later take for granted.
Header
During the 80's, Apple had released another computer, which was separate from the PC, and did not run any PC software, because it relied on it's own O/S, named MacOS. This time, Apple had decided to make an operating system that was graphical, and later, incorporated colour, pictures, icons and even sounds! Instead of typing everything into the keyboard as commands, the same actions could be made as clicks and movements with a mouse. As with all things Apple, this was revolutionary at the time and changed the face of the world of computing, but still, they hadn't really grasped UNIX's multi-tasking, multi-user, networked benefits.
At around the same time, the UNIX world got it's graphical operating system which began creating a graphical front-end to it's command-line world, it was called X, or 'The X Window System'.
Header
In 1990, Microsoft eventually released Windows 3.0 (versions 1 and 2 did not sell well). Windows at the time was a 16-bit, single-tasking, single user, graphical interface built on-top of MS-DOS. UNIX still prevailed: it was multi-user, multi-tasking and it worked on 32 or 64-bit platforms.
It took until 1995, with the advent of Microsoft Windows 95 for Windows to finally go 32 bit, multi tasking. It was also sort-of capable of being multi-user, however it was not best suited: Windows NT came along shortly after, to do that job.
During the time from 1991 to 1995, many computing or engineering students were accustomed to the power of UNIX and X, at university. Many students had wonderful new things like E-Mail, the web and more. At home, they would have to make do with their 16 bit computers, waiting for all these powers to come to their homes one day. A lot of them felt like all this good stuff was being reserved for the computers at Uni. They had to make do with MS-DOS or Windows 3.1. UNIX was a big, expensive beast.
Enter: Linus Torvalds
Header
Linus was, in 1991, a student in Finland studying Computer programming at The University of Helsinki. Linus used UNIX at University on a daily basis. He got bored of his 386 PC running MS-DOS, and decided to start his own UNIX kernel. A kernel is the name for the program at the heart of every operating system that talks to the hardware directly. He wanted to distribute the kernel software freely, because it was a hobby, not a commercial product. He also wanted to see what others thought of his work so he decided to publish it for free on the Internet. He finished the first Linux kernel in late 1991. In quite a short space of time he had made a 32 bit kernel, in which programs could be run. At that point he had a kernel, but he didn't really have any useful software to run on it.
Here is Linus' very first post to the Internet in 1991, about the creation of what would become Linux:
"Hello everybody out there using minix -
I'm doing a (free) operating system (just a hobby, won't be big and professional like gnu) for 386(486) AT clones. This has been brewing since April, and is starting to get ready."
Over in the USA, a fellow by the name of Richard Stallman had created a team (of programmers) devoted to free software. Richard called this the "Free Software Foundation". The goal of his organisation was to make software free to distribute, and free to obtain the source code along with it so that others could make improvements to the software through the Internet. The FSF created a bunch of tools that mirrored the functionality of their commercial, proprietary UNIX counterparts. These tools were called the GNU tools. GNU stands for 'GNU's Not Unix'. Don't ask!
The Free Software Foundation needed a license for the software that they (and anyone else) could use it. The license was based on the principles of CopyLeft. It was released as the GNU GPL (General Public License). The GPL is now at version 3, but at the heart of it, the license still has the same pretenses: That any authors of the software using the GPL could charge for the software, as long as they are willing for it to be freely distributed. By creating community-based software, that has open standards and is subject to peer review, the quality of the software would be good. Richard Stallman may be an eccentric hippie, but he gave birth to the whole wonderful world of open source, from as far back as 1984.
Header
Stallman had been busy making a whole suite of software, for example: a text editor called emacs, and bash (the Bourne Again Shell) which is a command line interface based upon the original Bourne Shell that comes with the BSD variant of UNIX. The FSF's software was entirely based upon the UNIX software suite, and generally improved on it. In 1991, the only thing that the FSF were missing to make it a fully fledged operating system was The Kernel (the brains of the operating system).
Linus managed to ensure that his kernel would work with the GNU's apps. Once Linus made the combination of the GNU UNIX applications, the code compiler (gcc) and a working kernel, Linus had something that worked! Linus decided to call his creation Linux.
Linux is pronounced 'Lih-nucks' not 'Ly-nucks'. Here's Linus Torvals pronouncing it!
Header
Now, over twenty five years on from the original post on the Internet, Linus is still working on Linux, but it's now an effort which is collaboratively worked upon by millions of other individuals, corporations and organisations around the world. You probably don't know it, but Linux is everywhere today. It's on your Android mobile phone, in your TV and nine out of ten websites run Linux on their servers (think Google, Amazon and Facebook to name but a few), Linux might even be in your new dishwasher or fridge-freezer!
Now, visit Chapter Two to see why using Linux instead of Microsoft Windows or MacOS may be the best thing you ever did with your computer!
Header
So, you now know that Linux is a Unix-like operating system, and you know what all that means now. However, that doesn't really tell you why you would prefer to use Linux, instead of Windows or Mac OS on your computer. In this chapter, we will discuss just a few of the benefits of Linux. Not that it really needs selling! It's free and it'll make your computing life a whole lot better!
Linux is far more than a Unix-like operating system and is pretty unique because of its licensing system. Enter 'Open Source':
What exactly do you mean by 'Open Source'?
Header
This means that software can be of high quality for everyone, and money can be made out of support, distribution, training or working with open source software.
It's a revolutionary change in the way we perceive software and do business, however huge names like IBM, HP and Intel and even non IT firms such as Boeing, Glaxo Smithkline and thousands more are all using Open Source and Linux. Some of them are even putting work back into it.
Linux is fast and many flavours of Linux (called distributions) work on computers that are pretty old. You'll be amazed at just what sort of old machines you can get to work on Linux. Even a 20 year old PC could be put to use as a router or basic firewall, for example. If you have an old PC or laptop kicking around your house and you think it's slow old junk, you'll be amazed at how much it can do, just by wiping off Windows and starting fresh with Linux!
Google's Android mobile platform is a Linux variant, and because it runs on mobile devices, it needs to run in a small memory and CPU footprint. Linux is very good at running on the most modest of hardware, including that which has low power requirements. This was one of the main reasons Linux was the obvious choice for Google when they made Android. When Apple built macOS and iOS, they too didn't hesitate to choose a Linux-like core from a system called BSD Unix.
Header

Security is baked in at the heart of a Linux operating system:

Header
If you are one of those sort of people that love to tinker with things, to make something appear, or work in a particular way that you want it, Linux allows you to go crazy. There literally not one element of your desktop that cannot be completely customised to a manner that you like. For example, I find it quickest for me to work without a Mouse. My work laptop almost never needs me to remove my hands from the keyboard to use the mouse. I use a window manager called i3 to make this happen, it's very bare bones and has a tiny memory footprint so it's fast. Other users may be simply be content in changing their desktop wallpapers, icons and themes. Whatever you want to customise, there's an app or a tool for that!
Linux is home to some of the best new software, and best of all, most of it is free. Installation is a snap these days just by clicking on an icon in the 'Software Center' and installing it from a banquets worth of great apps. In Chapter 7 we have a detailed look at some of the fantastic apps out there for Linux, but for starters, have a look at just a few of these great titles that you may already be familiar with:

LibreOffice/OpenOffice
A fully featured Office suite including a Word Processor, Spreadsheet, Drawing Package, Database and Presentation suite. Compatible with Microsoft Office.

Mozilla Firefox
The browser that reloaded the web - all thanks to Open Source! Most other popular web browsers (including Google's Chrome browser) is also available for Linux.
Header
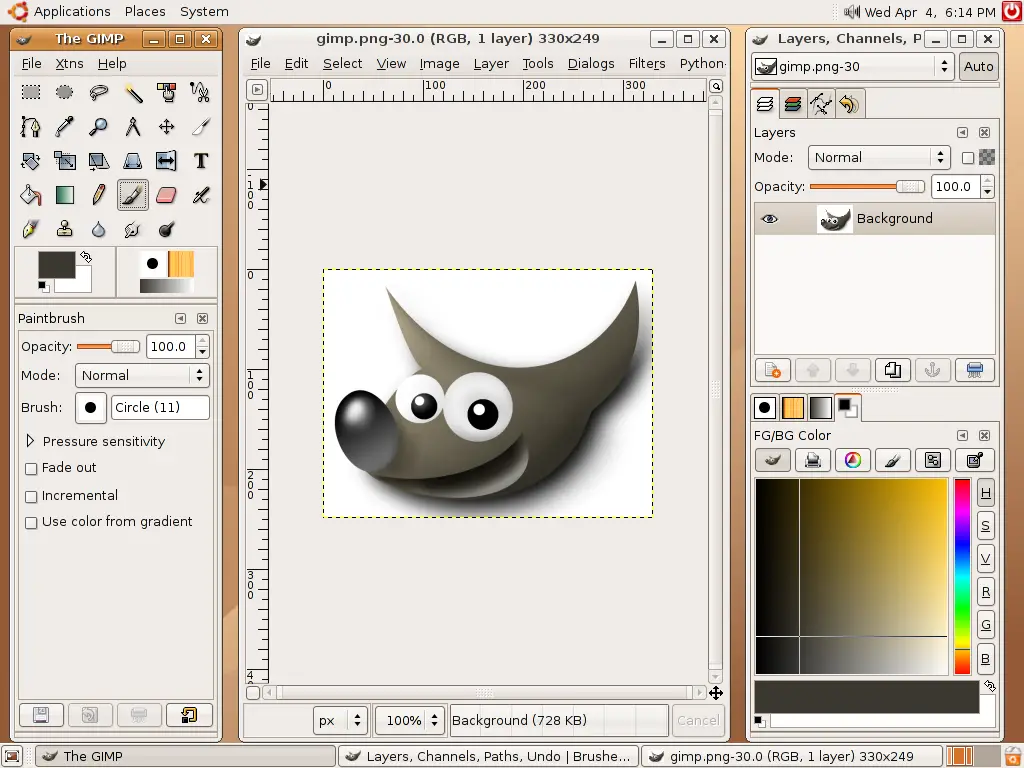
GIMP (GNU Image Manipulation Project)
An excellent open source image editor, similar to Photoshop by Adobe. Used to edit many of the images on this website!

VLC Media Player (VideoLAN)
A great media player, play your DVDs/VCDs/DiVX's on any computer, even stream them to another computer connected to a network! VLC is one of the most popular media players available today, and it's also available for Mac OS X and Windows users, too!

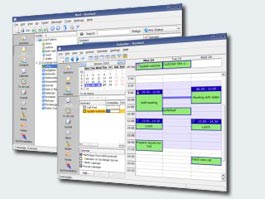
Evolution (and Thunderbird).
Evolution is a full-featured Groupware client which includes E-Mail, Calendar, Tasks, Address Books and the ability to connect to a Microsoft Exchange mail server.
Thunderbird is a very popular email client which was created for use by the Mozilla Foundation.
Header
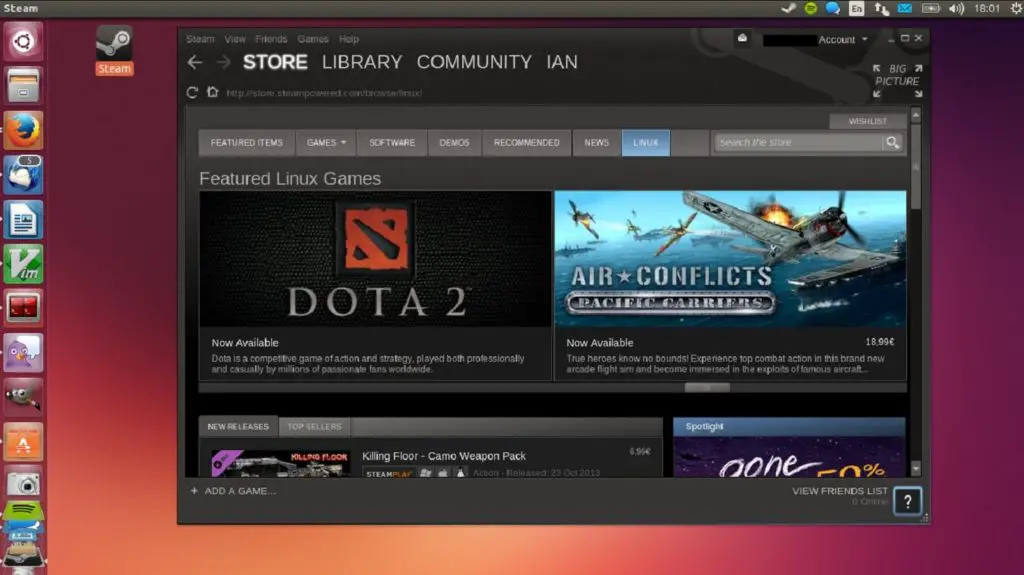
Yep, you read it right! Solitaire isn't just the only game Linux does any more! Steam and SteamOS are de facto Linux platforms now, literally thousands of the games available for Windows/Mac are available on Steam for Linux and whats more, they are usually released around the same date as their Windows counterparts.
Those are just some of the titles that you may end up using all the time, however there are literally hundreds of thousands of titles to choose from. Most of them are completely free of charge. Why not have a sneek peek at Chapter 7 to see more of the most popular titles.
I'm not going to say that there is plug and play availability for absolutely every device out there, but in general, most of the devices you can get today, be they wireless adapters, webcams, graphics cards, printers and scanners, they are very often plug and play. Downloading drivers from the Internet when you buy a new printer on your Windows PC just seems so painful. Forget that, Linux did!
Header
You might think that as Linux and the associated open source titles that go with it are free in cost and also free 'as in speech' that this means that there is no money to be had from Linux. Indeed, many companies originally thought that Linux was nothing more than a hobby or a geeks plaything, but this perception has diminished over the years, and with Linux going strong since 1991, it's here to stay. Here are a few reasons why Linux helps businesses and can generate profit over the traditional software business model:
Header
Now, visit Chapter Three to decide on which flavour of Linux you want!
Or, if you need more convincing, why not take a sneaky peek at Chapter 7, where we show the greatest in open source software and detail how Linux helps out with your life on the desktop every day.
Header
Header
As described in the first chapter, we discovered that Linux was a flavour of the UNIX family of operating systems. This chapter talks about what types of Linux are available in the market today. These flavours are called distributions and all have their own merits and disadvantages. We will cover the most popular distributions in this chapter.
If you ever read the IT press, you may have heard of the larger Linux company names such as Red Hat (RHEL/CentOS/Fedora), Canonical (Ubuntu) and SuSE. There are literally thousands of other smaller companies and organisations that also make Linux distributions. Examples of which can be seen on websites like distrowatch.
These are all companies or organisations that have created their own 'distributions' or flavours of Linux, there are distributions to cater to everyone's needs. Probably too many distributions! In the Ultimate Linux Newbie Guide we will keep it simple by basing it only on the most popular distributions.
Header


"Some distributions are built with older computers in mind, such as Lubuntu (top) and Bodhi Linux (bottom). The quantity and quality of the software pre-bundled can be varied. This is often because corners have been cut to ensure the desktop experience runs smoothly on PCs that have as little as 512MB RAM and a 700MHz CPU. That's less than the minimum requirements for Windows 7!"
Header
So in summary, whatever distribution you choose you may get a better range of options with distribution X over distribution Y. However Y may suit your specific needs more than X in some cases. The choice is for you to decide. As Linux is almost always free to download, it lends itself to be evaluated until you find just the one you are looking for.
There are two main ways you can evaluate Linux before you commit to putting it on your machine permanently. One is to use virtualisation software like 'Virtualbox', or to use a 'Live distribution' on a USB stick or CD. You might ask why you'd want to ever install Linux fully onto your computer if you can simply use these methods to run them alongside your computer. The main reason is the performance overhead makes using them feel like you are running a sluggish machine. The methods of how to evaluate Linux are described below.
Header
If you have a reasonably powerful computer, you can install a piece of free software called 'VirtualBox'. This software allows you to run Linux (or any other operating system) inside your normal computer (Windows or Mac). It's not great for everyday use due to its performance (you are running an operating system inside an operating system), but it does serve as a great springboard for you to evaluate the perfect distribution for your needs because you are effectively evaluating the entire system as if it was fully installed.

Live distributions can be downloaded and 'burnt' to a USB stick or CD. Even the 'full fat' Linux distributions like Ubuntu will offer you to select from 'Install Linux' or 'Try Linux' when you start them up. You usually get most of the main functionality of the distribution so you can really evaluate if the distribution is for you before you choose to install it for real. See Chapter 5 on how to put Linux on a USB stick.
Header
Buying Linux can provide benefits that downloaded versions do not provide, such as:
Choosing a Linux distribution is a personal thing. It greatly depends on what you want to do with it.
This is a short collection of some of the more popular distributions out there. For more in-depth information on the differences between each 'distro', we would recommend visiting distrowatch.com
Here is an example of just some of the more popular Linux vendors today:

Suitable for: Beginner to Advanced/Server
Ubuntu is one of the most popular Linux Distributions today. It is built on a Debian core, but has a more regular release cycle. It is arguably more polished than Debian, is easier to use and has major financial backing. Ubuntu is a completely free distro, therefore copyrighted materials such as DVD & MP3 playing 'codecs' do not come as standard with Ubuntu, you must download and install it separately, but can be done easily. Due to Ubuntu's prevalence and ease of use, I have based the later chapters on installing and using Ubuntu.
Header
Canonical, the company that make and back Ubuntu, also offer enterprise level support for Ubuntu. There are three main versions, Desktop, Server and Core. However, there are lots of other 'spins' available such as 'Edubuntu', made specifically with primary and secondary education in mind and Kubuntu (KDE version), Lubuntu (a lightweight version). In addition to the official spins, there are over 40 third-party versions in circulation today!
Ubuntu is released twice a year (in April and October). Every two years a 'Long Term Support' release is provided in the April release. These offer five years support at no extra cost. This includes security patches and bugfixes. Normal 'intermediary' releases offer 9 month support, but upgrading from one release to the next is an easy process.
If you don't like the look and feel of the Ubuntu desktop, Linux Mint is based on Ubuntu, it is made for beginners and still offers a GNOME, KDE and 'Cinnamon' version. Linux Mint works very similarly to Ubuntu.

Suitable for: Beginner to Advanced/Server
The company Red Hat was founded around 1993. They have become arguably the most commercially successful Linux based company in the world and are now owned by IBM.
Red Hat Linux had nine major (free) releases until Red Hat decided to take a more corporate approach to Linux in 2003. They then created Red Hat Enterprise Linux (RHEL). This product is used by businesses around the world and is a fully supported, commercial Linux distribution. Most users of RHEL use it as a server operating system, rather than a desktop one.
CentOS is the free version of RHEL and it is said to be 'binary compatible' (meaning it has the exact same software). A lot of businesses use CentOS if they don't need the commercial support or backing from Red Hat.
Header
When Red Hat moved to a more corporate model in 2003, it also released Fedora. Fedora is Red Hat's cutting edge, completely free desktop Linux distribution. It uses the GNOME desktop by default, however just like Ubuntu, there are many 'spins' on this and a dizzying number of different Fedora versions exist to be downloaded. As Fedora is bleeding-edge, it can also suffer from less stability than their enterprise-grade counterparts as well as other distributions like Debian or Ubuntu LTS releases. I also find that all of the Red Hat system installers are counter-intuitive and needs a good user experience person to give it a once over!
"Fedora has a reputation for focusing on innovation, integrating new technologies early on and working closely with upstream Linux communities."
distrowatch.com
Suitable for: Beginner to Intermediate
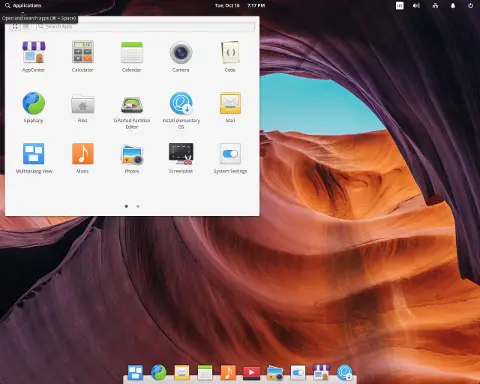
elementary OS is an Ubuntu-based desktop distribution. I really like it because it's incredibly intuitive for a new user coming from another system (especially from macOS!). Some of its more interesting features include a custom desktop environment called Pantheon which takes cues from the look and feel of macOS. It has many custom apps including Photos, Music, Videos, Calendar, Terminal, Files, and more. It has swapped out some of the standard apps. For example, Firefox has been swapped out for the Epiphany web browser and the email app has been changed for a customised email app based on Geary, much of this is done for aesthetic reasons; if you want Firefox or Thunderbird, for example, you can simply install them through the Software Centre.
If you like distros which have a common look and feel to Windows or Mac, or perhaps just something with a really polished, but familiar look and feel, also be sure to check out Zorin, Solus, and Deepin. These distributions are highly customised to give experiences unlike other distributions. For example, Solus has its own window manager called Budgie, and it was built completely from scratch, not derived from Ubuntu or Fedora.
Header

Suitable for: Beginner to Advanced/Developer
SuSE was once an independent German Linux distribution, which later was purchased by Novell, who were acquired by Micro Focus. They have since been acquired and sold a number of times and have a net worth of over $USD 2.5 billion.
Like RedHat, SuSE split its distribution models into a fully enterprise version. SuSE is an excellent all-rounder which is geared up for the Enterprise which includes support and has corporate partnerships with companies such as SAP. The corporate model isn't the only thing SuSE shares with Red Hat, SuSE was originally based on Red Hat Linux and therefore shares the same RPM based package management system, but over the years it has changed itself enough to make it clearly a distribution in its own right. It's YAST configuration management system makes configuration of services a breeze.
Header
The completely free version of SuSE is called OpenSuSE. OpenSuSE has a lot of interesting features including a 'bleeding-edge' software package system called Tumbleweed. There are a lot of Developer tools baked in too, openQA is built for automated software testing, while Kiwi creates Linux images for deployment on real hardware. OpenSUSE uses the KDE desktop by default.
If you are a developer, definitely give OpenSuSE a try, however I have found recent versions to be buggy and the installation process a bit harder than it should be.
Suitable for: Advanced to Server Users
Arch Linux, unlike most, is not derived from a parent Linux distribution like Red Hat or Debian. It stands alone and is revered by geeks for being a blazing fast distro because it is based on a simple (yet solid) base. Everything else can be added through its pacman packaging system.
Manjaro is a separate distribution that has an Arch based core. It claims to be a user-friendly and desktop based distribution. Both Arch and Manjaro run on a rolling-release mechanism, meaning as long as you keep the system updated, you are always running the very latest version of the distro; there is no need to download the newest version from the website every time a new release comes out.
It's also worthy to mention Slackware here too. Slackware was probably the first real Linux distribution, starting back in 1993! Similarly to Arch and Manjaro, it uses .tar.gz packages rather than more popular APT or YUM systems. If you fall into the more advanced camp, but don't like the sound of compiling everything, perhaps Arch or Mandriva is for you, as it still offers similar levels of customisation as Slackware.
If you are starting out with Linux, then I believe that Arch, Manjaro and Slackware are probably not the best choice. Once you get into Linux, you may want something that is at the bleeding edge and is very fast. You might find yourself a fan of tweaking 'all the things' like a car enthusiast might.
Header
Suitable for: Intermediate to Advanced Users
Debian is the grandaddy Linux distro of so many offshoots, including Ubuntu. It was originally released in September 1993. The early distinctions that Debian had over Red Hat based systems was that it had a massive (~50,000 software package library) and secondly that it has an auto-dependency software packaging system called apt. This meant that rather than having to download loads of application packages individually, you could simply tell Debian what app you wanted and it would down the rest for you automatically. It took Red Hat etc a long time to get up to pace with this! . Traditionally known for being further behind than some other distros in terms of having the most up to date packages, it offsets by this by having good stability as the main packages are well tested.
Note: If a distribution is at release 10 (ie: Slackware), but another distribution is only at 4.1 (ie: Debian), this does not indicate that Debian is an old version of Linux.
Check out The DistroWatch Linux distribution popularity rank (Page Hit Ranking) for a good idea on what's hot in the world of Linux Distributions right now, it's updated daily!
If you think you may have found the right distribution for you and you are ready to start preparing to install Linux on your computer, then move forward to Chapter 4
Header
This question has a lot of answers. The bottom line is: depending upon what you want to do with Linux, the system requirements can range from an old Intel 386 to a state of the art PC.
This section of the chapter will go through all the major parts of hardware attached to a typical computer and detail what is expected to run a typical modern Linux desktop, starting first, with the CPU.

Header
Most Modern day Linux distributions will require a minimum of around 2GB to use it to a reasonable degree, but if you wish to use Linux for non-graphical based uses, such as web page hosting, or a firewall, you can run a basic installation of Linux from almost nothing. Some of the most basic installations will run on 8 MB (yes megabytes, not gigs!). If you're going to be serious about Linux, and want optimal performance, then as with any software, the more RAM you have for it, the better it runs. Ideally, if you reckon you're going to be a fairly standard home user, 4GB RAM is a reasonable minimum. If you want to do demanding stuff like perform movie editing, edit artwork or edit lots of audio, then we're probably talking about 8GB+. Server users who want to serve up hundreds of websites may want 4GB, 8GB or even more, but again, if you want to make a small server with only a website or two and a low number of users, then you can get away with 1GB or less.
In summary, If you have the RAM, Linux will use it, and it will be used well, thanks to the superb memory and process management within the Linux kernel a modern-day 64-bit version of Linux will support up to 64 TB (terabytes) of RAM.
 As with all things Linux, it's possible to do it in the smallest of setups. Using distributions such as Puppy Linux, you can achieve a fully working Linux setup in a few hundred megabytes. However, if you want to install a standard desktop installation of any up-to date distribution, you will probably want at least 20-40GB (gigabytes) free hard disk space. If you are going for the plunge and will convert your entire system over to Linux, then the more the better - 100GB+ in order to store all of your stuff: Apps, MP3s, Movies, Documents, emails etc and over time, it uses up quite a lot of drive space.
Header
Modern Linux distributions easily support new drive technologies such as software RAID and SATA out of the box. Enterprise grade iSCSI or fibre channel disk arrays, are supported by distributions like Ubuntu Server edition or RHEL.
SSD (Solid State Drives) have become commonplace on higher end laptops and PCs these days and increase read and write speed significantly, making the whole system feel faster. This benefit is mirrored in Linux with an SSD.
Another option is to purchase a new hard disk to install Linux on or recycle an old hard drive if you have one spare! The reason for using a seperate disk is because you are likely to be using another Operating System already such as Microsoft Windows or Mac OS. If you wish to use both Linux and Windows/Mac OS (so you can see if Linux is for you), then the easiest way to set it all up is if you have another drive to put Linux onto. You won't have to mess around with resizing partitions and the like.
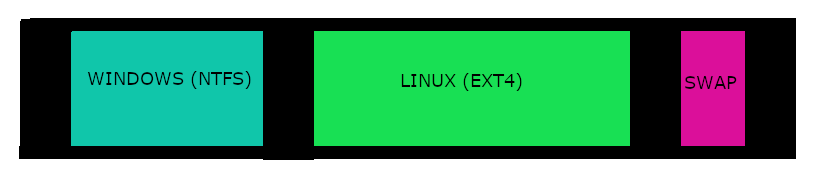
Typically, Windows/Mac OS will allocate 100% of your computer's hard drive to it's own use, meaning there is no space left for Linux. If you don't want to buy a new hard drive for Linux, then you will somehow have to re-allocate some of the unused (free) space on your Windows/Mac OS drive for Linux. The act of slicing up the space on a hard drive into distinct segments is called Partitioning.
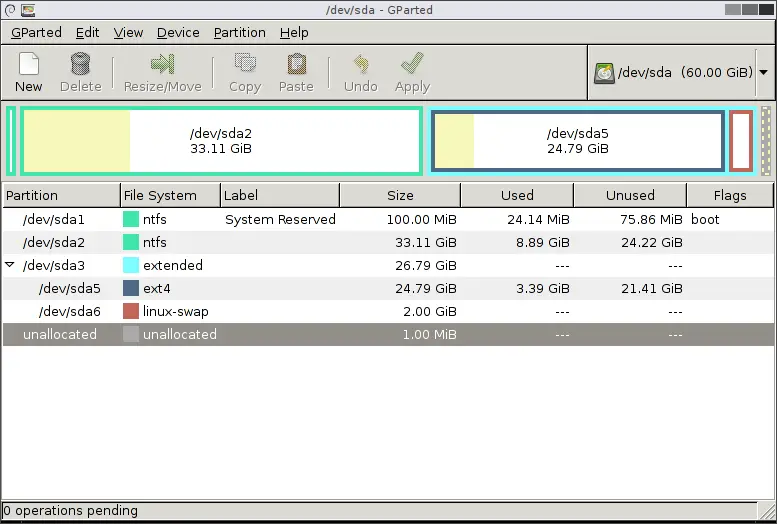
Thankfully, recent versions of popular Linux distributions now make it a snap to re-partition your disk. They work by utilising the free space that you have in your Windows drive (say your C: Drive) and creating a partition out of some or all of that free space for Linux. Although not necessary, you can also use something like the freely available GParted or commercially available Acronis Disk Director (for Windows). This allows you to split your disk into partitions as well as resize existing partitions before you even start to install Linux. It gives you absolute control of the whole process.
Header
If you are resizing your Windows partition to accommodate the installation of Linux, try and devote as much space to Linux as you can manage. If for example you have 100GB unused/free space on an 500GB drive, resize your windows partition down from 500GB to 410GB, leaving 90GB for linux and 10GB 'breathing room' spare for windows. This way you probably won't have too much concern about free disk space in the future.
Header
Although the process of re-partitioning and dual-booting your PC with Linux and Windows is far easier than it used to be, to a computer novice it can still appear to be a daunting task. Don't worry though, I've got it all covered in Chapter 5.
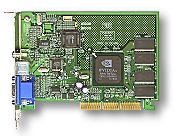
Any bog standard graphics adaptor will do for linux. Optimally you will want to have an SVGA adaptor in your PC that has enough RAM to support resolutions of at least 1024x768. Graphics Accelerator cards of many types are supported by today's modern distributions for even faster graphics. If you're looking for really good graphics performance under Linux, the NVidia range are an excellent choice, because they are well supported under Linux by Nvidia. ATI cards are also popular, however their driver support for Linux does not appear to be as good as NVidia's, which seems to be an ongoing issue with ATI. If you don't know what card you have in your machine, visit your device manager in Windows, or System Preferences in Mac OS. Integrated graphics chipsets such as the Intel i Series or Cirrus Logic on board chips like those found in modest-price laptops generally work well, however if you need 3D graphics performance, or intend on playing games, you are best using a 3D accelerated graphics card/chip from the likes of Nvidia or ATI.
Header
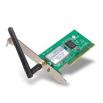 Wireless card support in Linux is generally good. Standard desktop PCI based WiFi adapters will work out of the box without any need to install a driver. WiFi adapters that work out of the box include Broadcom, TP-Link and ASUS. For more information on Wireless compatibility under Linux, see the Linux Wireless LAN wiki. Some vendors have made cheaper soft-pci, mini-pci 'wintel' based adapters which are proprietary in nature and won't work out of the box. This can usually be resolved by loading a Windows driver inside Linux, using a tool called ndiswrapper (see this wikipedia link for further information).
Almost every wired network adapter available should be quite happy with Linux. Modern PCI or integrated based options such as those manufactured by Intel and Realtek range will automatically plug and play.
Internet routers or ADSL & Cable modems are usually one of two breeds, either they either plug into the USB port of your computer directly or they are fully blown Ethernet routers, today these mostly contain WiFi radio as well. Thankfully, most ISPs are now providing 'proper' Ethernet based routers which simply plug and play with Linux either over WiFi or via an Ethernet cable. If you do have a USB modem from your ISP, consider shelling out for a proper router as the USB modems support under Linux is somewhat hit-or-miss and you will often find that performance from a USB modem is less than you would get from a router (regardless of whether you are using Windows, Linux or a Mac).
Hardware changes so rapidly, it's hard to keep up, especially if the hardware vendors aren't willing to help out the Linux community. Fortunately, more and more vendors are these days and most installations of Linux I have seen recently have 'just worked'.
Now that you have a rough idea of whether your hardware is fit to run Linux in a manner that you want it to perform for the tasks you need, let's get started on installing Linux. Chapter five shows you all the steps you need to know to install Linux safely and properly.
Header
Although this example shows the installation of the Ubuntu Linux distribution, installing most other Linux distributions is a similar process. I have chosen Ubuntu as it is a friendly, free, highly compatible distribution of Linux and at the point of writing, it has been one of the most popular Linux distributions for quite some time.
This example shows how to install Ubuntu alongside Windows. You can also select an option to just install Ubuntu on its own (shown later).
Also see: Linux Mint 18.3 Installation & Review
Please also note that this tutorial details the installation of Ubuntu Linux on a PC, if you have a Mac, the instructions same. In particular, the tools you will use for partitioning your hard drive may be different.
Also see: How to install Linux on a Macintosh and dual boot with macOS
If you remember back in Chapter 4 we discussed partitioning your hard disk. If you didn't read that part, to have a fuller understanding about what we're about to do with your hard disk, skip back and read it now.
WORDS OF CAUTION!
At this early point in the process of installation, be aware that you will be working with your hard disk in order to install Linux. You MUST make a backup of that data before starting. You do all of this at your own risk!
The main step with a Linux installation is to virtually 'slice' up your hard disk into partitions in order to put Linux onto it. This process is called partitioning.
You will not have to perform this step if you have chosen to use an additional new or recycled hard drive to install linux onto. Also, if you wish to simply delete the operating system (Windows/Mac OS) clean off your computer, then this step is also not necessary, otherwise, proceed forward!.
Header
Since as far back as 2007, it has been possible to re-partition your disk drive during the Linux installation process. This makes it far easier to do, so this guide has been updated to follow this process.
For those of you that prefer a visual demonstration of how to install Linux alongside Windows, there is a video on the Ultimate Linux Newbie Guide website (www.linuxnewbieguide.org).
If you still want to partition your hard drive before installing Linux, for example if you want completely granular control of how you split up your disk partitions, even after you have installed Linux, then you can use a tool like GParted to partition your disk so that you can create some free space to put Linux onto.
In case you didn't read over the previous chapter then firstly make sure that your PC is up to the job of working with Ubuntu:
You will need:
If that all checks out, then you are going to need a copy of Ubuntu Desktop edition. Head on over to their website (https://www.ubuntu.com/download/desktop). Download a free copy of Ubuntu. When it's downloaded, you'll end up with a .iso file. This file type is what is known as a disc image.
Header
If you prefer to use a DVD-R, rather than a USB stick, then skip this section and see the one below.
There are a few ways to put an ISO image onto a USB stick these days and it's a lot easier than it used to be. As most of us have USB sticks lying around the house, this is now the most common way to install a Linux distribution.
The easiest way to put the ISO image you downloaded onto a USB stick is to use a free tool called Etcher. Head over to their website (https://www.balena.io/etcher) and download the tool.
If for whatever reason you have troubles with the BalenaEtcher tool, you can alternatively use a tool called Rufus if you are using Windows. Read this short guide.
Once you have downloaded BalenaEtcher, open the app and insert your USB stick into your computer.

Header
As you can see from the above image, the rest is a piece of cake. Click on 'Select Image' and point it to the ISO file you just downloaded. If you have already inserted your USB stick, it should already show up in the middle. Finally, just click Flash (your PC may ask you for authorisation to do this). This 'flashing' process takes around five minutes.

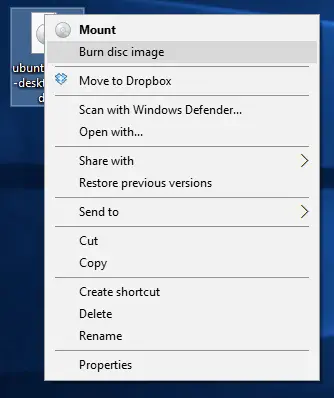
If you prefer to use a DVD rather than a USB stick then you are in luck, burning an ISO disk image to a DVD is easy these days if you have Windows 7 or later, then simply right click on the icon of the file you just downloaded, which will be named something like ubuntu-18-10-desktop-amd64.iso. Once you right click the icon, you will see the option ‘Burn disc image’. Select that option and pop a blank DVD-R or into your PC and click burn. If you would like further instructions on this process or are using an older Windows or other operating system, check out this easy guide at the Ubuntu web site.
Header
Note for mac users: If you are using a Mac computer, note that all of these steps will be completely different so you should follow our guide on installing on a mac computer on our website.
Hopefully you are now armed with a Linux DVD or USB stick that's good to go. If the DVD was ejected from the CD player, pop it back in the drive and Restart your computer. Most PCs will automatically try to start the computer from the CD drive or USB, so hopefully you will be presented with a Ubuntu welcome screen after a minute or so.
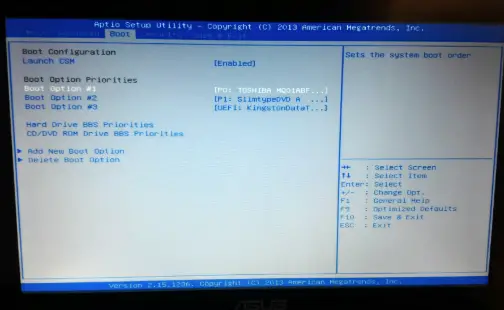
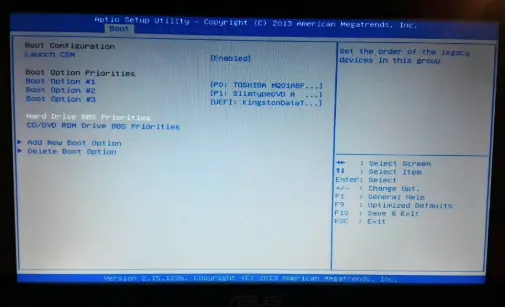
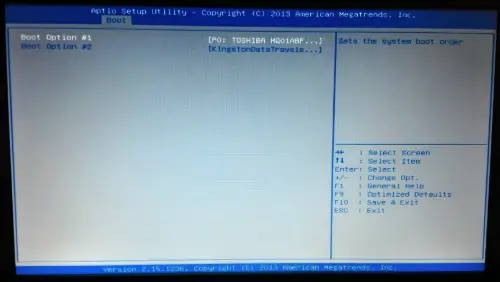
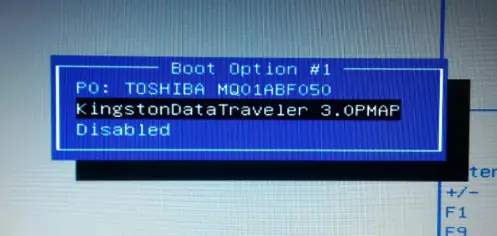
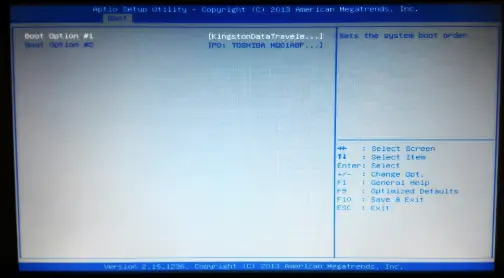
If you don't see an option to start from USB/CD, or if your PC started up in Windows instead then make sure your PC is set to boot from CD (or USB) before the hard disk. You can change this setting in something called the BIOS or Boot Order setup. Here's how to do that:
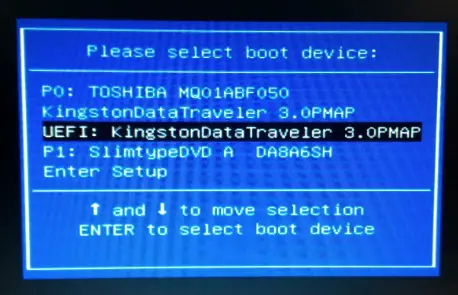
Header
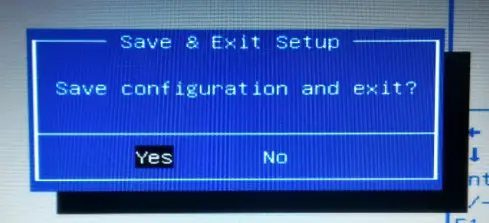
If you don't see anything like 'Boot Options' but you see something like 'Press F2 For Setup' then hit that key and enter the BIOS setup utility. In there, have a look around the menus using the arrow keys. You should be able to change the boot order to something like CD/DVD or External USB Media first (as opposed to hard drive first). Save the settings from there and then restart once again.
The images on the following page shows a typical 'BIOS' Setup screen. It shows the process involved in making sure USB (or CD) is the primary boot option, hard drive secondary.
Header
Header
This next part of the guide steps you through installing Ubuntu alongside Windows.
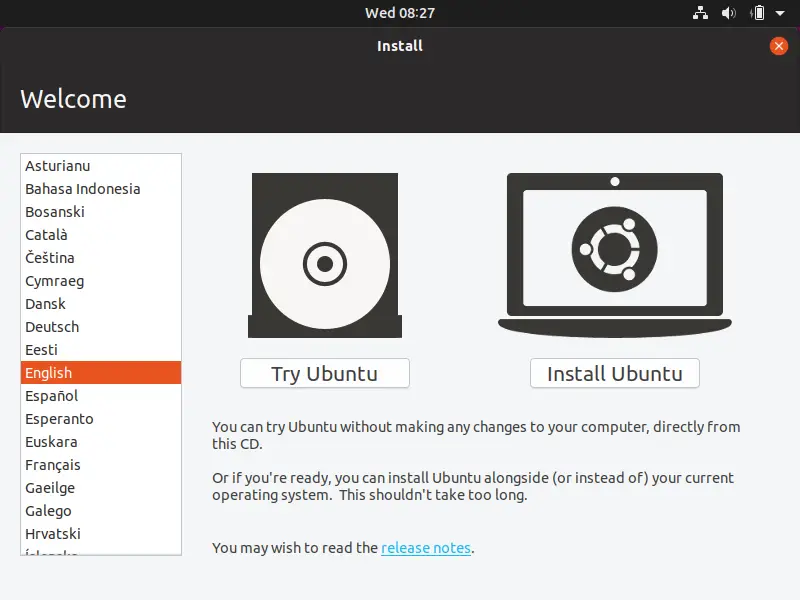
Once you've started up Ubuntu from the USB stick or CD, the first thing you will see is an option to Try Ubuntu or Install Ubuntu. Select your language from the left hand side and click on Install Ubuntu.
Header
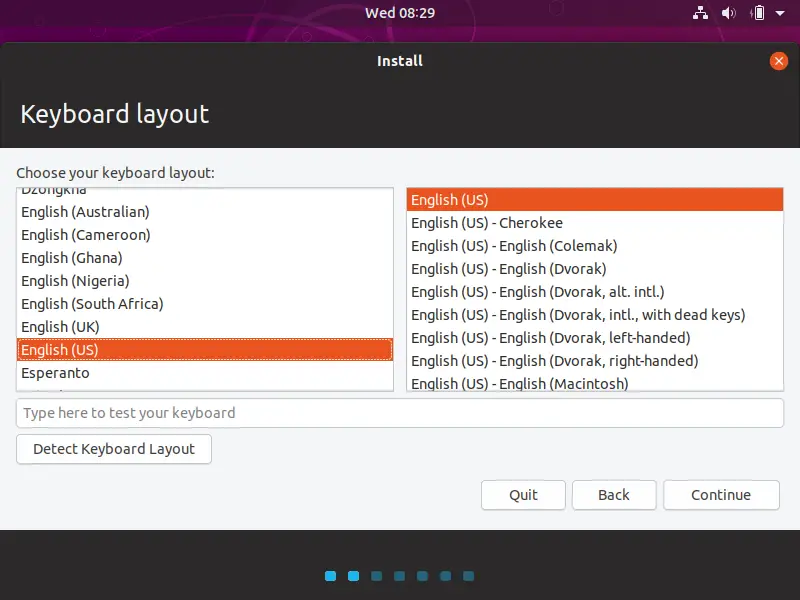
Next select your keyboard layout and language. Press Continue.
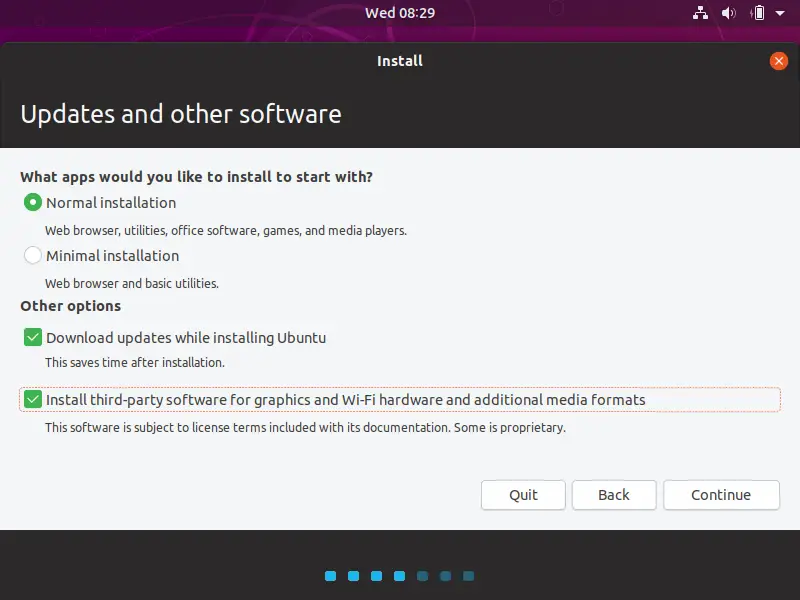
You'll be asked to choose which installation type you want. The default is 'Normal installation'. Leave that as-is.
You'll see Other options also. Two tickboxes; one for 'Download Updates whilst installing Ubuntu' and the other 'Install third-party software for graphics and Wi-Fi hardware and additional media formats'. Make sure both of these are ticked, as per the image below.
Press Continue.
Header
This step is the most important part!
For this example, I have Windows 10 on this PC. For whatever reason, I'd like to keep that and install Ubuntu alongside it.
This is the easiest option to choose if you want to keep Windows because the Ubuntu installer takes all the pain out of partitioning your hard drive.
Alternatively, you can choose to 'Erase disk and install Ubuntu'. If you select this option then Windows will be no more. If you've got a system that you're done with and you want to start with a blank slate, then this option is for you. This option is the easiest of them all.
Header
Finally there is another option called 'Something else'. We won't go into this one for this guide, however this allows you to manually create partitions in the way you want them to be.
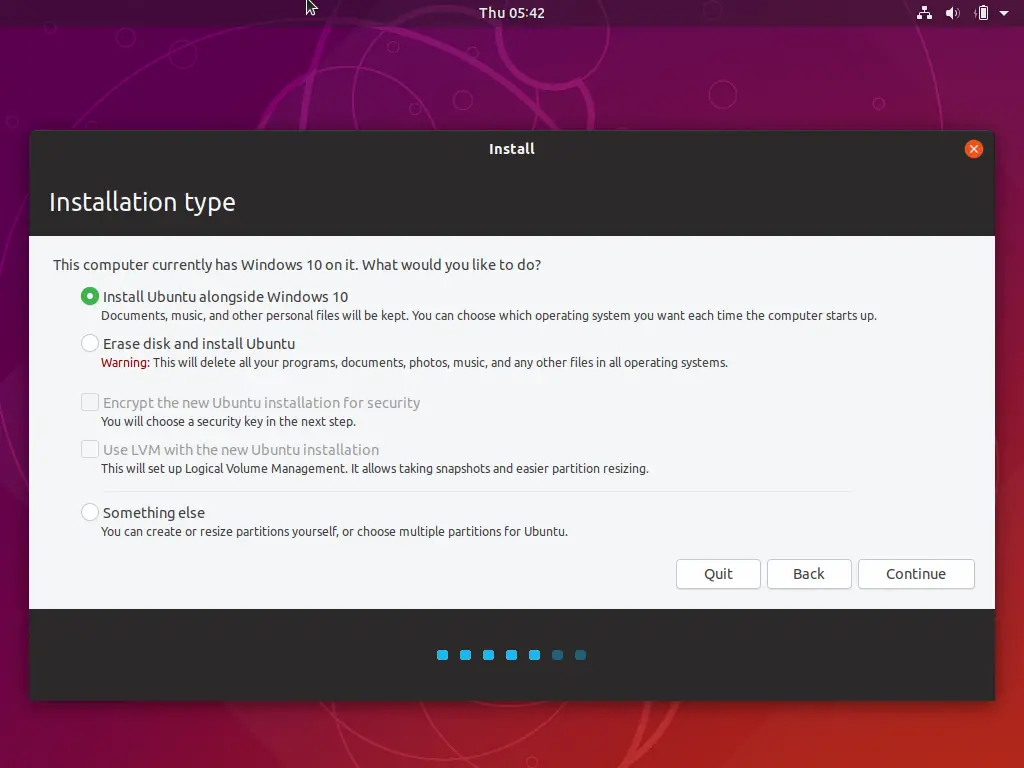
I've selected 'Install Ubuntu alongside Windows 10'. I have clicked Continue.
The next screen allows you to resize your Windows Partition (ntfs) to the size you want, freeing up enough space for Ubuntu.
Have a look at the below screenshots. You can see that by default the Ubuntu installer has decided to give most of the space (30.6GB to Windows). It set 22.5GB to give to Ubuntu. I decided that this was a bit miserly, so I slid the size of the Ubuntu partition to the left, so it was equal in size to the Windows partition. Below you can see the before and after screenshots.
Header
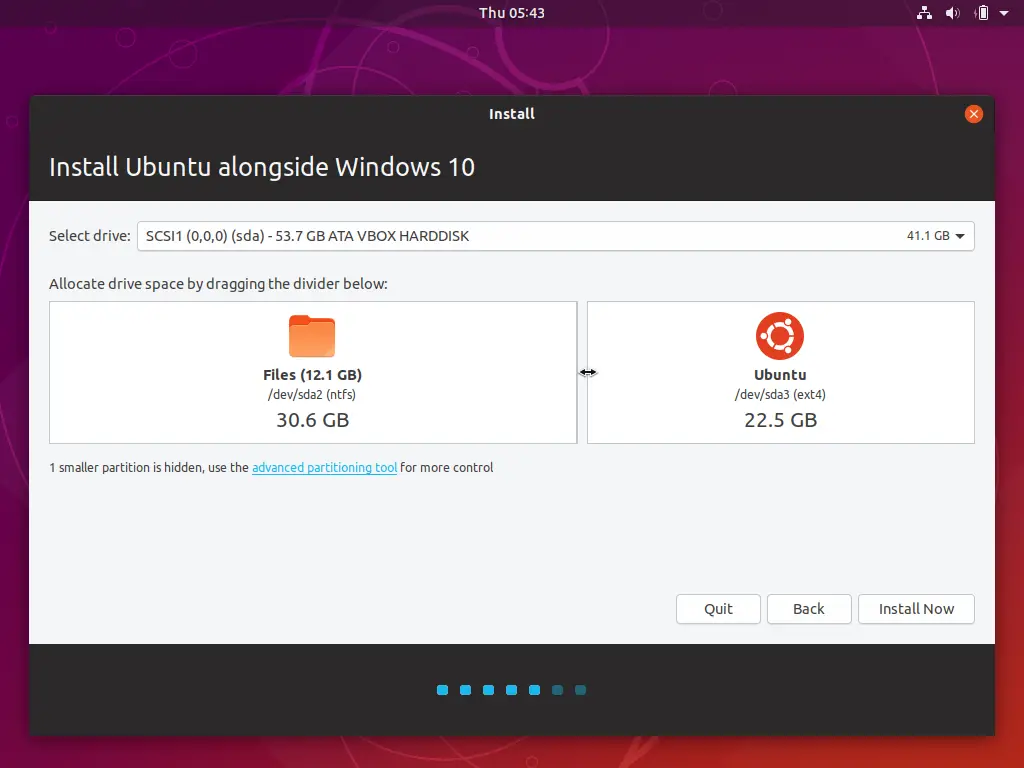

Once you are happy with the sizes, Press 'Install Now'.
Header
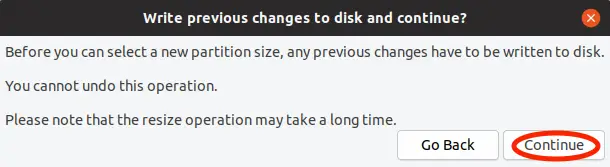
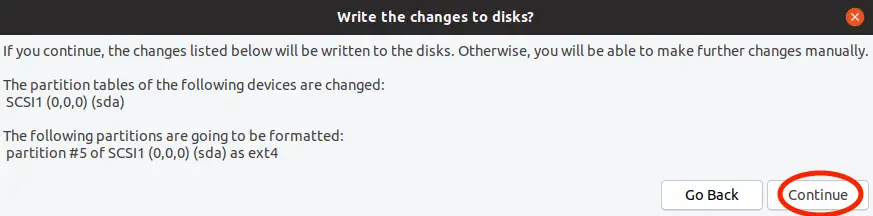
Next, you'll be asked to confirm that you want to make the changes to the disk. Press Continue to both.
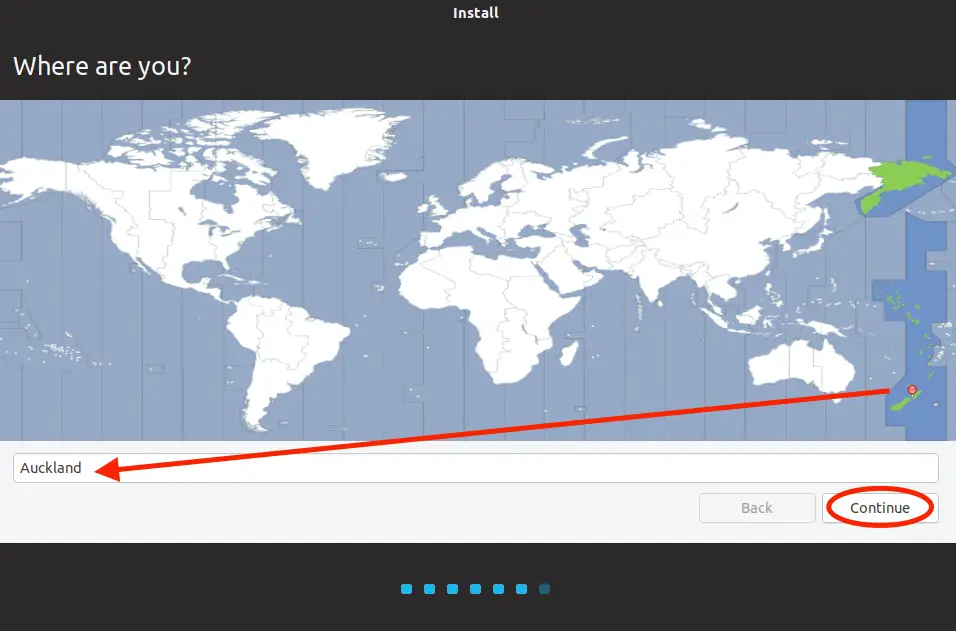
The next few items are all fairly self explanatory. Choose with location you are in the world so that your time zone and regional settings are appropriate to you. Once you have selected the right one for you, press 'Continue'.
Header
The final step is to set up a user account and set the name of the computer.
In the below screenshot you can see that I've put my name as 'The Ultimate Linux Newbie Guide'. Of course you would enter something like 'Jane Doe' in this field.
The computer's name can be whatever you want it to be. When it is seen by other devices on your home network, this the name it will be seen as.
The next item is to select a username to use to log in with, etc. Don't use your full long name here, use something without spaces. For example 'jdoe'.
Note that Ubuntu always sets the first user specified as an administrative user. This means that as you are the first account on the machine, you will get to do privileged tasks. Such tasks for example; install software, update the system and deal directly with hardware. Take this information with a little caution. If you are asked again for your password when doing something in Ubuntu, it is asking you to escalate your own privileges into what Linux calls the 'root' user. Root is simply the username of the administrator in Linux. As administrator you have free reign over the system at all times. Do not perform tasks as root unless you know what you are about to do, or unless you have confidence in the task ahead!

Header
At this point you'll be asked to set a password for your username. It's important that you select a strong password, because in time to come, you may wish to open up services such as remote access onto your machine. It's a simple step but believe it or not, still a reasonably effective method of security, do not choose a simple word as a password. Choose random things, like for example, your favourite colour, and your first car, with a few numbers (maybe your year of birth) sprinkled in the middle for good measure. Here is a pretty strong password and could be pretty memorable to the right person:
blue77volvo!240GLS@
No, I wasn't born in 1977, my favourite colour isn't blue, but my dad did have a Volvo 240GLS! However, you get the idea. The password is still important, especially if you ever run any server or sharing software on your machine in the future. Having a secure password makes sense.
Once you are satisfied that you have set a name, username, password and computer name that you are happy with, Press 'Continue'.
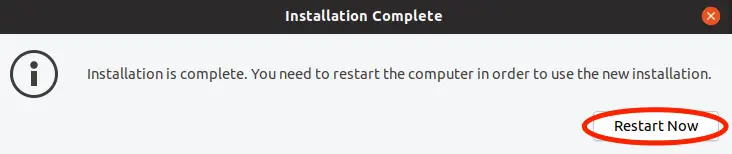
By now, most of the software you will need will have been copied to your hard drive. Your user account will be set up and your regional settings are all ready for you. It's time to restart the machine. Make sure the USB stick or CD is removed from the drive when prompted and continue onwards!
Header
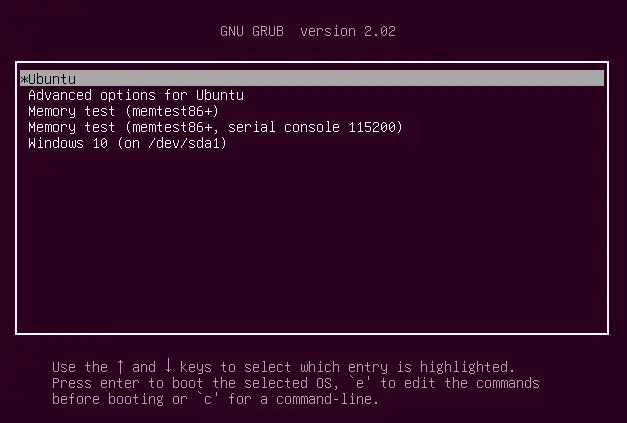
When you start your PC, you'll see something like the above screen. You can choose whether you want to start up Windows or Linux (Ubuntu). Select the system you want using the arrow keys. If you do nothing, the computer will start up with the default option after a few seconds. You can tell the default because it's marked with an asterisk.
When you start up your computer, you will likely see a boot screen (GRUB) asking you if you wish to choose Windows or Ubuntu (that is, if you installed Ubuntu alongside Windows). Choose Ubuntu from the list using the cursor keys (the up/down arrow keys) and hit enter and it will start up Ubuntu.
The next screen you will see is the Ubuntu login screen. It's the screen you will see every time you start up Ubuntu. If prompted, select the username that you created earlier (or type it in if required), then enter your password. The system will then log you on.
Header
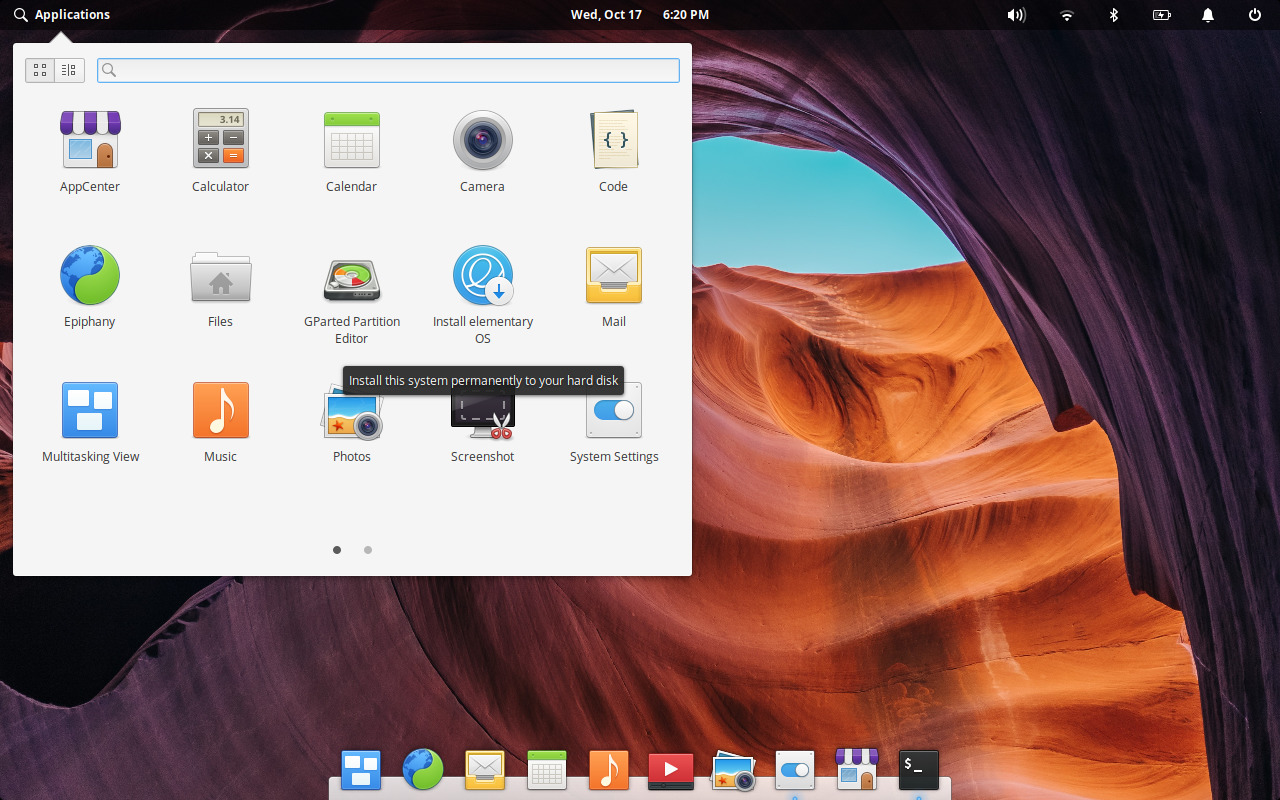
The Ubuntu desktop is a friendly place, which we will cover in the chapters six (How do I use Linux?) and seven (Using Linux Every Day). If you are used to Windows, your 'Start' menu is the bar along the left hand side. The bottom button which looks like a bunch of dots allows you to search your computer for Apps. Simply by start typing the app's name (eg Firefox) or simply by looking at the list of icons for all of your apps.

You'll note that a few favourite Apps have already been 'pinned' to the bar on the left, these include the Firefox web browser and LibreOffice for example (LibreOffice is a free Microsoft Office compatible word, excel, powerpoint suite). You can pin your own favourites to the left-hand side bar if you desire simply by dragging an icon from the Applications list into the bar.
Header
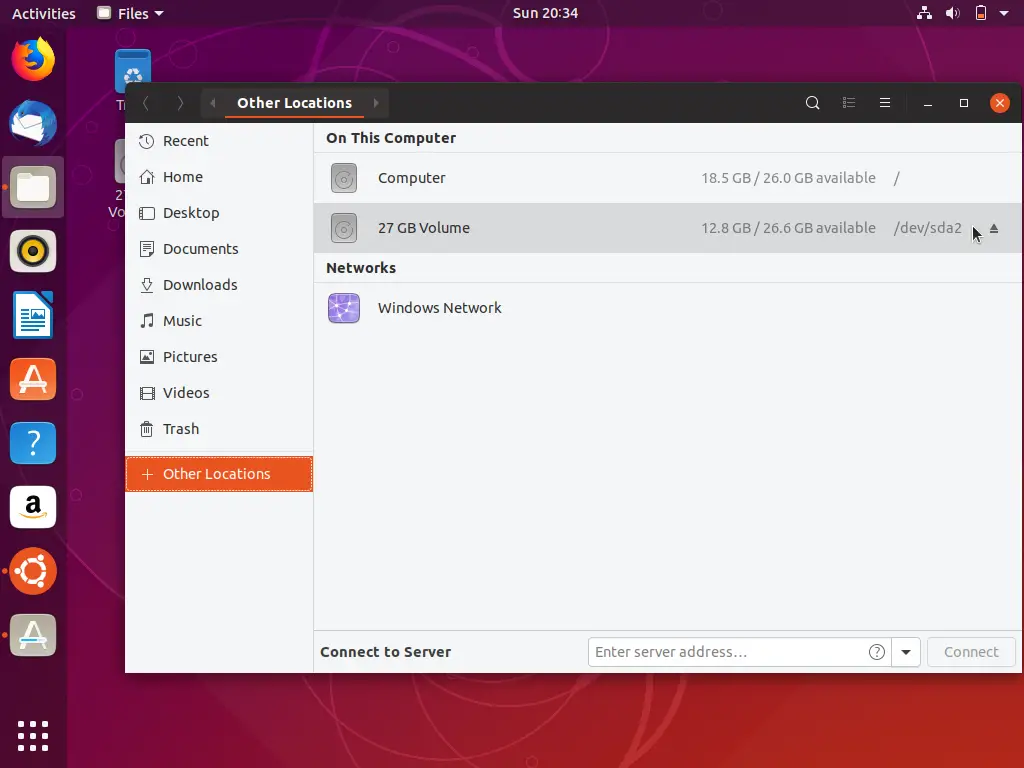
On the left-hand side bar there's a folder icon. Clicking on this will show you all the files on your computer. In most cases, your Ubuntu machine will have been set up to see your Windows file systems by default. Clicking on the folder icon, you'll see 'Other Locations'. In here, you can see your Windows drive. Illustrated in the below screenshot.

Now that you've seen how to install Linux, get on to chapter six, to see how to use your Linux Desktop!
Header
Using Linux really is a lot easier than it used to be. When Linux first came about, it was for computer enthusiasts, tinkerers and geeks. Now with Linux powering everything from Android smartphones to smart washing machines, Linux is such a big part of our life, using it for an every day operating system really is a no brainer.
Now that you have installed the system onto your computer, it's time to have a quick introduction to the Linux Desktop.
Header
One of our Quick Tips about GNOME and KDE etc, talks about the availability of Window Managers or Desktop Environments. Depending upon which Distribution of Linux you have (eg, Ubuntu, Fedora, elementaryOS), they ship with different default Desktop Environments. Ubuntu, Fedora and Debian (as well as hundreds of other Linux variants) ship with the GNOME desktop environment. Whereas OpenSUSE and many other Linux variants ship with KDE by default. Then there are other, generally more niche Linux distributions that ship with alternative window managers. LXDE (for low specification PCs), OpenBox, i3, AwesomeWM and xmonad are some examples.
Choice is a fantastic thing, but as a fledgling Linux user, this can also get confusing: which desktop environment is best? Which is easiest? What tools do one provide vs the other?
There is no one-size fits all answer, and that's why Linux users are spoiled for choice. However to make this chapter simple, I'm going to assume that you will be using the GNOME desktop. I've chosen GNOME because it's arguably the most popular Linux desktop environment available at the time of writing. It's definitely one of the easiest desktop environment's to use, and it looks nice too. GNOME has been around since 1999. Now on its 3rd major release, it has stood the test of the time.
All this said, remember, you are totally free to choose any Linux desktop you like. Simply install it using your software installation tool and try it out!
Header
When you first start up your desktop, depending upon your distribution, you may see a fairly spartan view. With any GNOME desktop there is an empty desktop and a single bar across the top. The bar simply shows the word 'Activities' at the left. A Clock in the middle and a few icons at the right hand side. If you are using Ubuntu or some other more user friendly Linux distributions, you may have some other icons on a 'dock', either on the left hand side, or at the bottom (see the screenshot at the beginning of this page for an example of the Ubuntu desktop GNOME experience).
The apps on the dock that come 'favourited' as standard in Ubuntu are the Firefox web browser, Thunderbird email, Files (the file explorer), Rhythmbox (music player), LibreOffice Writer (word processor), The Ubuntu Software Centre (to install more apps with). The final two icons are GNOME help and a link to Amazon. Note that the apps that come with your Linux distribution may vary from the ones listed here.
Header
At the very bottom of your screen you'll see an icon that looks like a 3x3 grid of boxes, this is 'Show Applications', much like the Windows 'pane' icon on your start menu brings up your Apps. If you download/install new apps, they appear when you click on this icon. You can add any of the apps from your applications list to your favourites on the Dock by right clicking their icon and selecting 'Add to Favourites'.

If you left click on any of the icons, as you'd expect, the app is launched. If you right click with your mouse, you will see a context menu. For example, right click on the Firefox icon and you'll see a few options such as 'New Window'. The options available are obviously different depending on the app, thus the name 'context menu'.
Clicking on the text at the top of the screen 'Activities' brings up a screen with a zoomed-out look of all the applications you are presently running. It also gives you the ability to search for other applications you can run. If you start typing an app's name into the search bar, it will appear in the results. Simply hit return and the app will launch, which is a quick way to launch apps.
Header
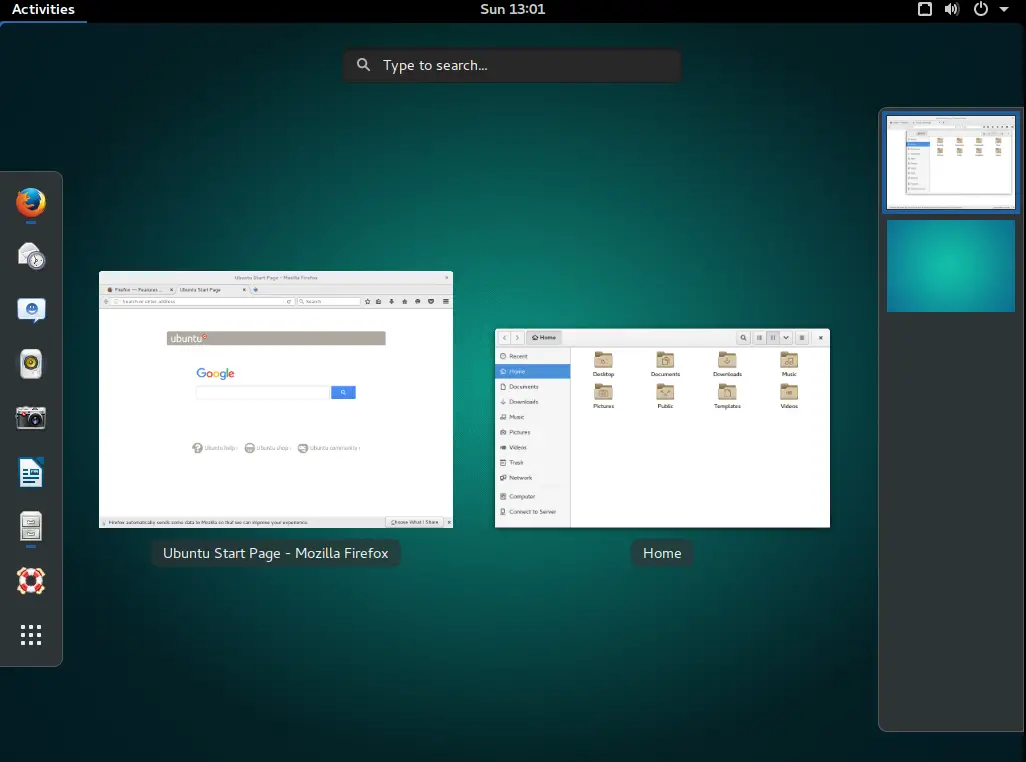
The image on the right shows the Activities view. The dock shows the favourites on the left hand side. Notice that beneath the Firefox and Files icons there is a blue 'underline' (this will be a small dot in Ubuntu). This shows that those apps are running. You'll notice that any normal apps also appear zoomed out when you are in the Activities view. This is kind of like Mission Control if you are used to a Mac. You'll notice that both of the running apps, Firefox and Files are zoomed out here, placed side by side with the text below them describing what the App is. If you click on any of these 'thumb-nailed' (zoomed out) images of the apps and it will immediately zoom back in to that particular app, making it very quick to switch between Apps.
Tux tip: Press your Windows key on your keyboard (cmd on a mac) and you will automatically be taken to the Activities view so it's even faster to get there!
Header
A theme that has now become common across Windows, Mac and GNOME is the notion of Virtual Desktops. The benefit of having virtual desktops is that you can de-clutter your desktop workspace. Having lots of windows open on one desktop can quickly get distracting.
To launch a virtual desktop, enter the Activities view. On the right hand side you'll see a drawer containing two thumbnails of a desktop; hover your mouse over the drawer, and the drawer automatically slides out. The desktop thumbnail at the top is the current (first) desktop. The next one is a blank desktop. Click on it and you'll have a fresh desktop. If you launch an app now, it will start up on this second desktop. If you want to go back to the apps you were running on the first desktop, simply enter the Activities view once again, and click on the first desktop in the drawer. Notice also that once you have apps running in the second desktop, a third virtual desktop is created for you automatically.
Header
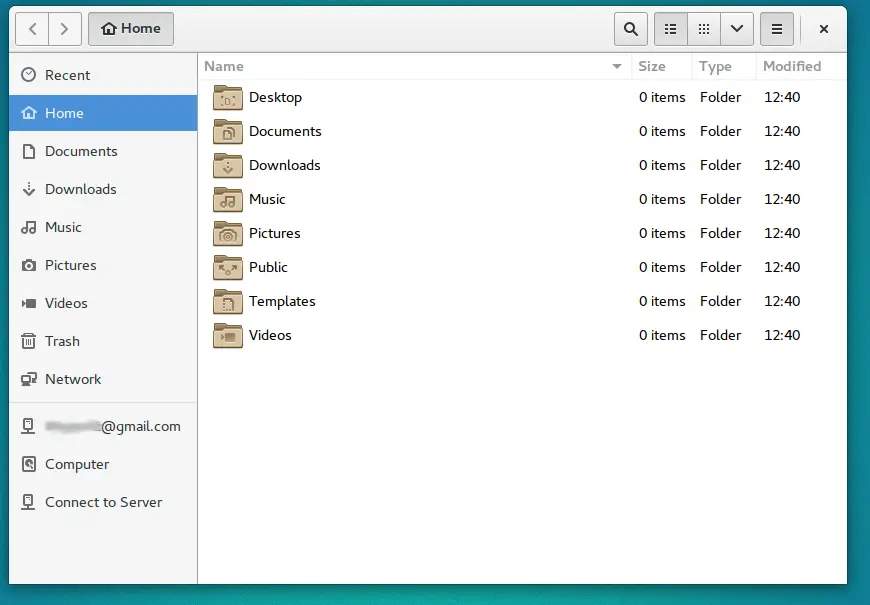
You'll see 'Files' listed in the dock as one of the favourites. Click on this and you'll see a file browser much like any other you may be used to. By default, you'll be in grid (icons) view. On the right, note there are different views that can help you organise your files. The button with the 6 dots/dashes on it (top right) indicates that you are in grid view. The button to the immediate left with three dashed lines indicates the detailed view, which is what you can see in this screenshot. If you want extra details to appear by default in the list view. Click on the button with the down arrow and click 'Visible columns'.
On the left hand pane of the file navigator, you'll see favourite locations. You can add a location to your bookmarks (below the favourites) simply by dragging and dropping the folder of your choice to there.
If you have set up an online account set up with the likes of Google Drive/Microsoft OneDrive/Nextcloud etc, you'll see any connected drives you might have. In this case, I have my Google Drive available. Clicking on this will allow you to view the files in your drive just as it were any normal folder (albeit a bit slower!).
Header
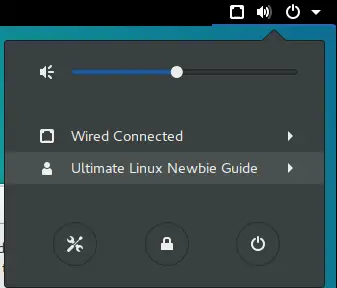
When you first launched GNOME, the only thing you might have really noticed was that dark bar across the top and maybe one on the left. On the right hand side of the top bar, there is a bunch of icons. Click on any of them and you'll see a drop down menu. It'll show you the audio volume, your network connections (eg WiFi or Ethernet). It shows you your username and finally, three icons (Settings, Lock Screen and Power Off/Restart). Other items will appear here depending upon your computer and settings, but these are the basics. Much of the items in this menu will be self explanatory, but if you aren't already on WiFi or plugged into the network, you are going to want to do this. Click on the WiFi icon and a drop-down list offers you to select your WiFi base station from a list, as well as selecting other more advanced WiFi settings.
Many of these menus lead you to the gnome settings dialogue. This is always accessible by clicking on the icon with the spanner & screwdriver. When you click this you can change most of the pertinent settings relating to your computer, from your background wallpaper, to power management settings. This is analogous to the Control Panel in Microsoft Windows, or System Preferences for a Mac.
Header
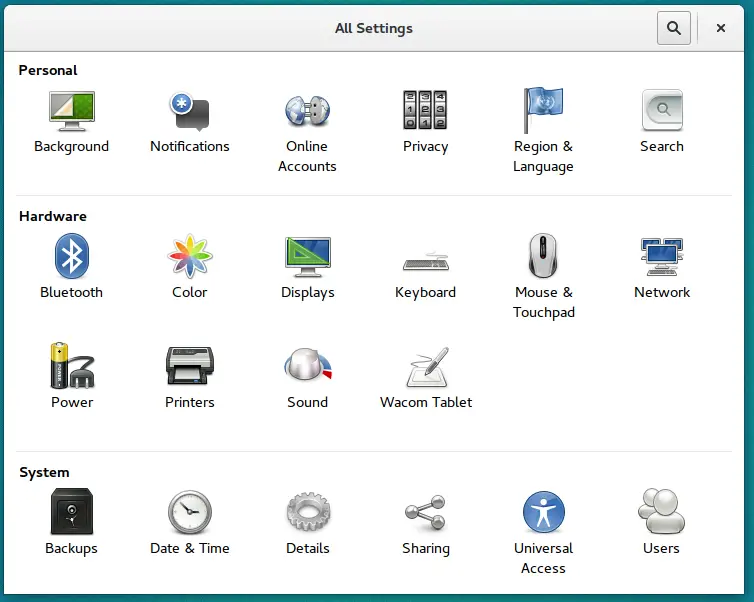
Much of the items on the settings dialogue should be fairly self explanatory, so for the interests of brevity I'll explain the more in-depth items only. The look and feel of the settings dialogue differs between distributions (and versions), however most of the actions available perform the same functions.
Notifications are the pop-up messages that appear at the top of the screen when a particular App wants to make you aware of something. Just in the way that your mobile phone shows you an alert when someone sends you a message, for example. When apps are installed, they automatically get added to this list (if they are apps that use notifications). You can choose to disable notifications on an app-by-app basis, or switch off notifications entirely (Notification Banners - toggle to OFF). By default, notifications can be seen even when your screen is locked, so for example, you can see if you have a calendar appointment coming. You can switch this behaviour off too.
When you click on a particular app in the list, you can enable and disable specific notification items depending upon the context of the notifications the app makes. For example, an app may make sound alerts as well as pop-up banners. You may wish to add privacy by not showing the message content in the banner; this setting is the default. This may be useful to switch on for emails for example, so you can see whether an email is important to you or not, simply by seeing a preview of it in the notification banner. This saves you time having to switch back and forth to Evolution for email.
Header
This item is where your digital life becomes one. It combines all of the most common online services in one easy dialogue, so you'll want to set this up before long. When you enter this setting, it'll be empty apart from a button saying 'Add an online account'. If you want to add more than one account (or remove one), note the + and - icons to the bottom left.
At the time of writing, you can add 10 different accounts. These are: Google, Facebook, Flickr, Microsoft Live, ownCloud, Pocket, Foursquare, Microsoft Exchange (calendar/email etc), Media Server and Other Accounts (such as standard IMAP/POP3 Email and AIM chat). Click on any of these to set them up.
Tux tip: Your connections to cloud accounts like Google and Facebook may disconnect and you will have to re-authenticate periodically. This is to keep your accounts safe.
If you want to connect to your Google account for example, Click on the Google icon. It will ask you to enter your email address associated with your Google account, followed by its password. It will then ask you to give the GNOME desktop permissions to use Google's features. Scroll to the bottom of that list of permissions and press 'Allow'. You'll now be presented with a list of toggle items which you can use your Google account within GNOME for. For example, Email, Calendar, Contacts, Chat, Files, Printers and Photos. Note that if you select them, they will automatically be downloaded to your computer.
Tux tip: At the time of writing Files are not synchronised like they are with Google Drive on Windows or Mac. Rather you can upload and download files from your Google drive via the Files app. If you'd like to know how to use Google Files fully, check out this tutorial. It also shows 'full synchronisation' alternatives.
In this settings dialogue you get to change the settings for your Network. This includes your Ethernet and WiFi adapter(s), set up a proxy, add a VPN, configure a VLAN and bond, team or bridge a network interface. If you want to change settings for any of the configured networks, click on the cog icon to the bottom-right.
Header
By default, system backups are switched off. This option unlocks a very powerful, yet simple to use backup feature which works in a similar way to the 'Time Machine' app in macOS. You can schedule when your backup runs (eg, weekly, daily etc), whether each backup is kept indefinitely or not, which folders to ignore and where to store the backups.
By default, the backups are stored in your home folder on the local disk. You'll want to change this, so Select one of the alternative storage locations from the drop-down list. These can be Amazon S3, Google Cloud, Rackspace Cloud or generic FTP/SSH/WebDav/Windows Share based locations.
The following apps are some of the apps pre-installed with Ubuntu. Note that they are just the basics. Check out Chapter Seven for the low down on the wonders of awesome Linux software. To launch your apps, just click on the '9 dots' icon at the bottom of the Dock and you'll see all of the Apps on your system just waiting for you to explore!
Ubuntu has Firefox pre-installed. You can download Google Chrome from the Google Chrome if that's your fancy though (Chromium is also available in the App store - it's a free alternative to Chrome, made by Google, just without the proprietary bits). You'll find each of these browsers work in exactly the same way as it does on Windows or Mac.
Header
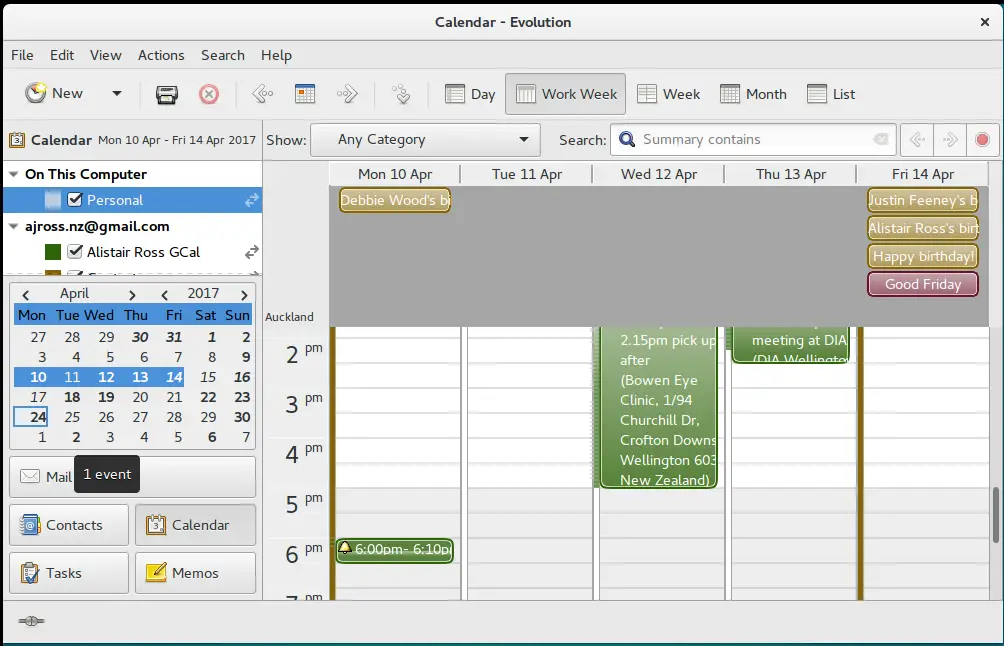
Whilst Thunderbird is now the default Email client for Ubuntu (with the Lightning calendar add-on), GNOME also ties in closely with Evolution. Evolution is a powerful e-mail, calendaring and contact management productivity tool which can connect to your online accounts (eg Google, Microsoft Exchange etc). It works very much like Microsoft Outlook on a Windows PC does. Of course, if you prefer another email client, there's plenty more to choose from!
Header
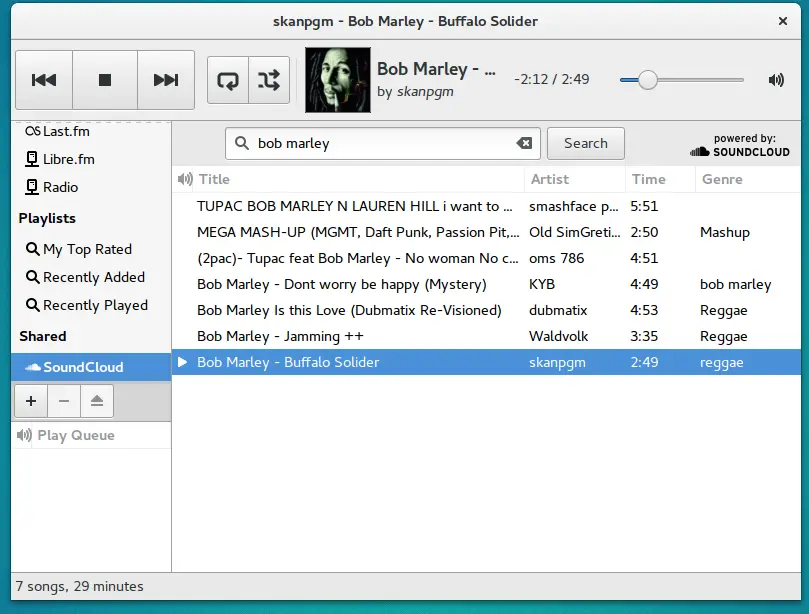
Rhythmbox works like iTunes or similar. Copy your music from your Windows/Mac over to your Linux hard drive and you can play your tunes straight away. You can even mount your Windows/Mac hard drive partition so you don't have to copy your music. You can also play music from Internet radio stations and cloud based audio including SoundCloud.
To view video files, simply click on your video in the File browser and it will launch the GNOME Video player. It's no-nonsense approach is lovely, however if you are after a more fully featured video player, then there are tons to pick from. The most popular video player is VLC, which is a cross-platform app that, whilst is a little more complex, it'll play just about any movie file under the sun.
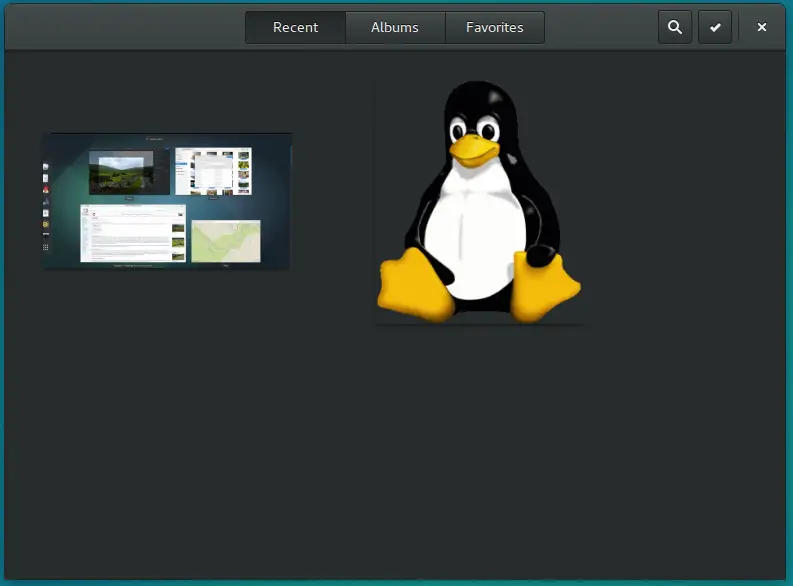
As with all of the built-in GNOME apps, they are deliberately simple in nature. The files which are in the 'Pictures' folder, which is inside your Home folder, are automatically displayed. To organise your photos, you can assign photos to customised albums, and mark some as favourites.
If you have hooked up an online account which supports photo sharing (Google Photos for example), then you will see all of your cloud photos in there too (it will take a long time to synchronise if you are like me with thousands of photos!).
Header
GNOME Photos is great for viewing and sorting, however, if you want to edit the photo, you will need a photo editing tool. If you want something really basic (a drop in replacement for Microsoft Paint), then use Pinta. If you are looking for the full power of something like Photoshop then try GIMP (GNU Image Manipulation Project). Both of these apps can be installed through the Software tool which we mention below.
LibreOffice is the de-facto Office suite for open source computer users. It supports Microsoft Office formats (mostly), and using the applications feel just like they should do. LibreOffice Writer is for word processing, Calc is for spreadsheets. Impress is for presentations. Math is for complex calculations. Whatever your office productivity needs, LibreOffice should have it covered.
Header
GNOME also comes with an app called Documents, which allows you to view cloud based and local copies of PDFs and other cloud format format files (eg Google Spreadsheets/Docs).
There are hundreds of thousands of free apps just waiting to be discovered in Linux. From CAD to Calculators, MS Visio alternatives to Vehicle maintenance apps.
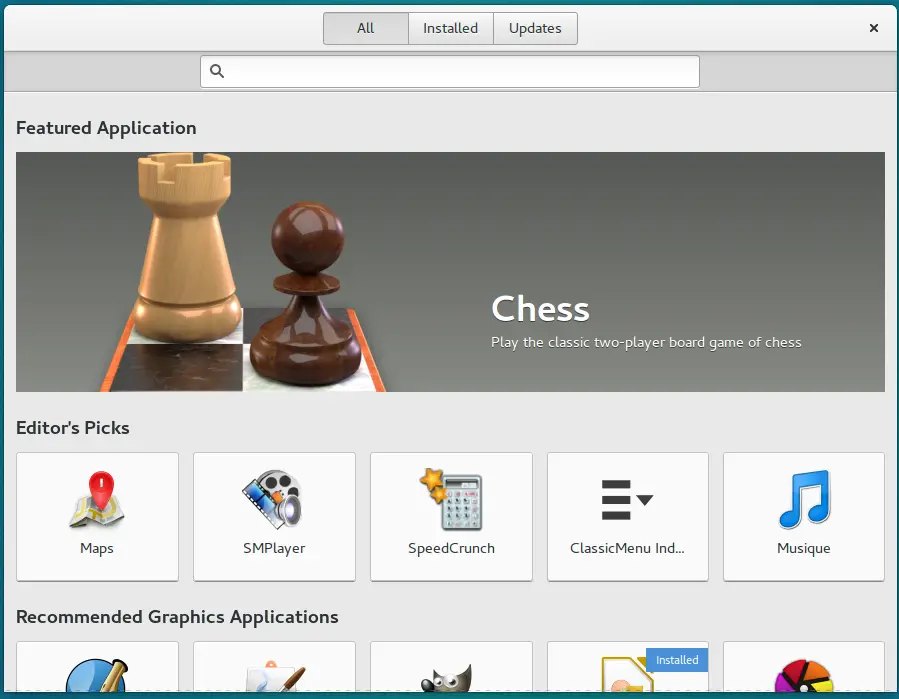
To install anything, just launch the Software Center. In GNOME, its simply called 'Software', but each distribution may call it something slightly different. Ubuntu Software, Software Center, App Store, Software Boutique; you get the idea!
For a very quick introduction to how to install software via the Software Center or via more traditional methods, see this tutorial.
Now that you are well on your way to being a bonafide Linux desktop user, have a look at Chapter Seven, which introduces you to many more fantastic open source apps, from E-Mail to music players, games to video editing, even how to use your Linux machine as a TV!
Header
What would be the use in Linux if it didn't have great software? I'd rather put up with a poorer Operating System than have no software, wouldn't you?
Fortunately, Linux is teeming with great software for all sorts of purposes, and most of it is free of charge. This chapter discusses the most popular uses of a modern-day PC, and where Linux fits in with all of this; however before we get started, I better cover the rather ugly elephant in the room...
First things first, it is understandable that some of you may not wish to move from what you know best. Even although many of the titles (even at zero cost) compete directly, or even exceed the quality of their big commercial counterparts.
You may find solace in knowing that it is possible to run Microsoft Office as well as a great many other Windows apps on Linux! - Although it is not software written for Linux, it is possible to run it using software from a firm called CodeWeavers. The software, called Crossover supports Microsoft Office, as well as many other popular Windows titles such as Adobe Photoshop, Microsoft Visio, Lotus Notes, Apple iTunes and so on. It retails for a modest fee. There's also free options that allow you to run Windows software in Linux such as Wine with WineTricks and Play On Linux.
Don't forget that these days, Linux ships with many native apps that are cross-platform, meaning they run on Windows, Mac and Linux. And now with Ubuntu's snap and Fedora's Flatpak systems, they even run 'containers' that allow you to run software like Skype, Spotify and Kodi amongst thousands of others.
Header
Despite of all the abilities to run software that wasn't built for Linux, it's reasonably easy to get your favourite titles brought over to Linux if you really must keep them. However, not investing a little time in evaluating just some of the amazing native Linux software titles out there would be a travesty indeed, so the rest of this page is dedicated to showing you how great Linux software is. Most of it free!
When Linux first came out back in the early 1990s one of the downfalls of Linux was that good office software was lacking, making it an impractical system for business users. From the late nineties onwards, this is no longer the case.

LibreOffice: Microsoft Office users will be pleased to know that the most popular Office suite in Linux, LibreOffice, supports Microsoft Word Documents, Excel Spreadsheets and PowerPoint presentations.
Header
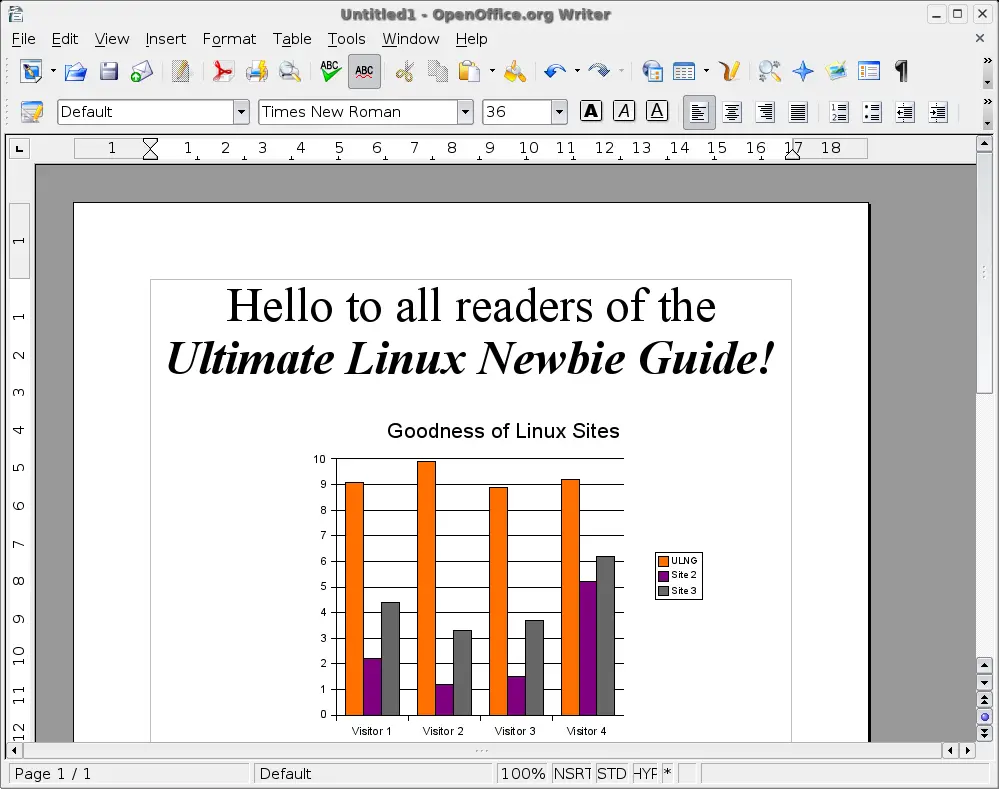
The latest incarnation of LibreOffice includes a Word Processor (with export to PDF feature), Spreadsheet, Presentation creator and more.
OpenOffice: LibreOffice was originally built on software made by Sun (now owned by Oracle), which is a 'fork' of the still available OpenOffice. The Apache project currently maintain that. It looks and works in a similar way to LibreOffice.
My recommendation is to start off with LibreOffice as it's included in most Linux distributions and is a well-known, multi-platform alternative to Microsoft Office, however if you need more compatibility, or have a niche requirement, then there are a plethora of alternatives, here are some that are worthy of mention:

Header
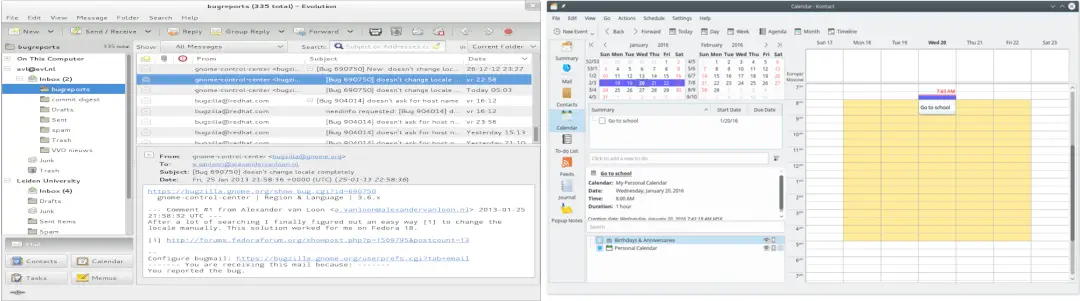
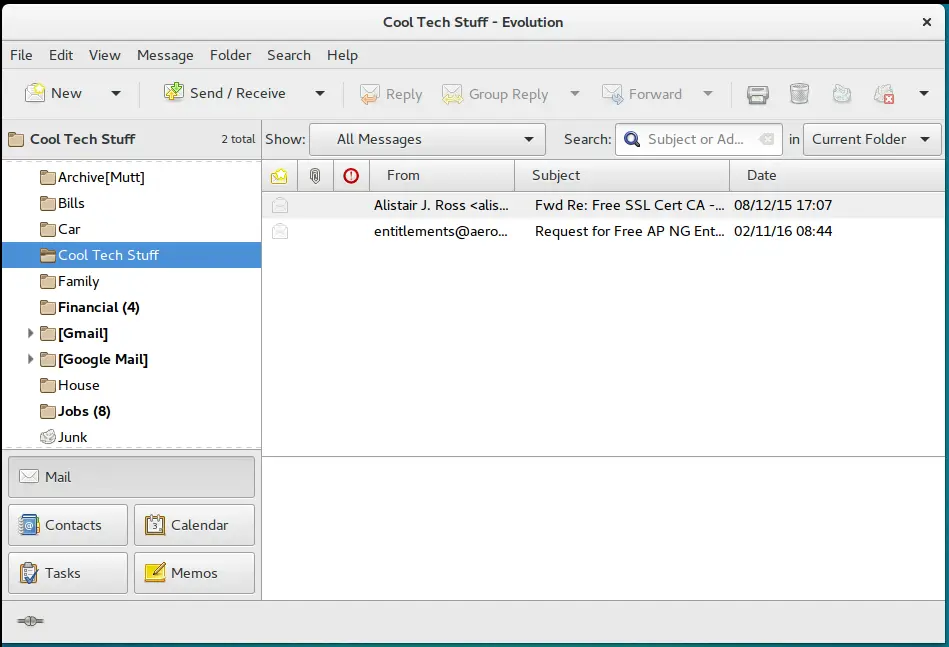
Evolution is provided with a standard GNOME desktop environment and is a groupware suite for performing all of your day to day E-Mail, Scheduling, Contact Management, Address Books and more.
Users can retrieve their E-Mail from a vast array of sources including IMAP, POP3, Gmail, Microsoft Exchange and Novell GroupWise Servers amongst others.
It's overall look and feel is similar to that of Microsoft Outlook. It also supports some mobile devices and LDAP directory servers for great connectivity, wherever you are.
Header
KDE's personal information manager management software is a fantastic groupware suite for Linux.
Kontact features a summary overview, a very capable E-Mail client, contact manager, to do list, journal, news reader, note taker, RSS/Syndication client and a mobile device synchronisation tool.
Support for Novell GroupWare and Microsoft Exchange are not as mature as with Evolution, but are pretty much there in terms of usability.
Thunderbird is made by the same people that brought us FireFox and is as sharp as it's browser counterpart. It offers E-Mail with built in Junkmail filters, IMAP and POP mail server support, contact manager and address book. It is lightweight and easy to use. You can also download its calendar companion, Lightning, it works, but it's not nearly as full featured as Kontact or Evolution.
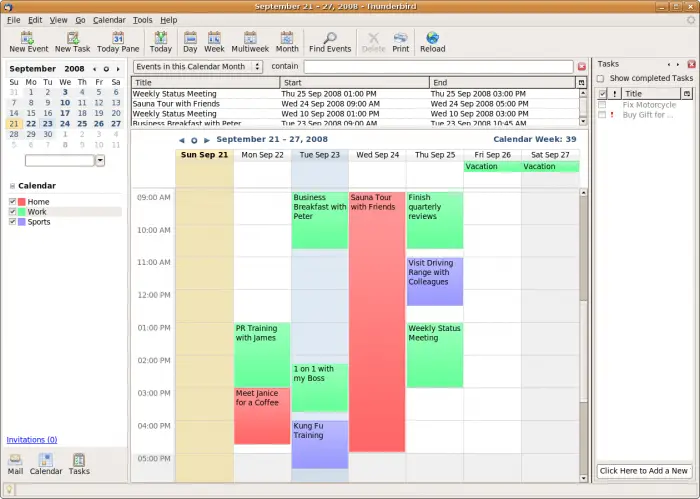
Header
Artwork has often been the lair of Mac users. This is mainly for historic reasons these days - (Apple used to have an exclusive contract with Adobe). However, times have changed, and Windows users enjoy many of the same fruits as the Mac users do. It's also fair to say that this software is often expensive, however some excellent software exists for Linux for vector and bitmap artists alike and most of it is free.
The GNU Image Manipulation Project (GIMP) is the classic Photoshop-like image editor for Linux. It's been around for a long time and can do most of the features of all the popular off-the-shelf competitors. In case you were wondering, GIMP stands for GNU Image Manipulation Project.
GIMP was made with tasks like photo retouching, image composition and authoring in mind, and it should be fairly easy for an accomplished Photoshop user to convert to the GIMP. If you can't live without Photoshop, it is possible to use Photoshop in Linux, using Crossover.
Header
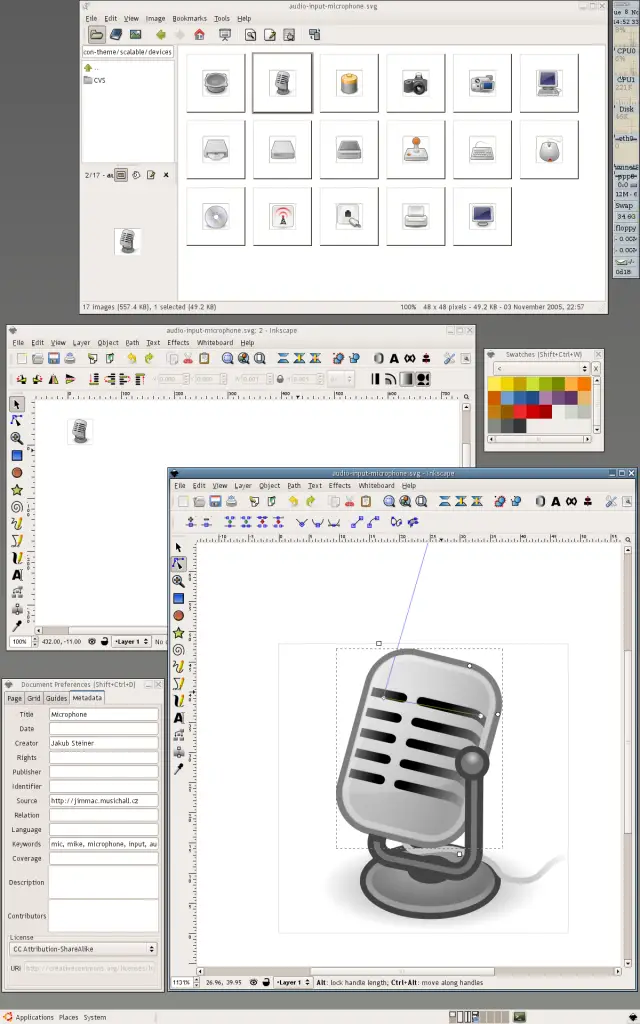
Inkscape is a vector graphics editor, similar to Adobe Illustrator, Freehand, CorelDraw, or Xara X using the Scalable Vector Graphics format.
Features include shapes, paths, text, markers, clones, alpha blending, transforms, gradients, patterns, and grouping. Inkscape also supports Creative Commons meta-data, node editing, layers, complex path operations, bitmap tracing, text-on-path, flowed text, direct XML editing, and more.
It imports formats such as JPEG, PNG, TIFF, and others and exports PNG as well as multiple vector-based formats.
Don't forget that OpenOffice.org also has a component called Draw, which has a reasonably good vector graphics editor. Also Kivio (part of KOffice), and Dia are great alternatives to Microsoft Visio.
Header
Linux has many applications for playing music and it's also really taken off as a platform for audiophiles. If you are a budding DJ, or play with MIDI instruments, Linux is a great operating system to use. There is a wealth of software available today which exceeds the requirements of many a Cubase user, and all for free!
If you have just started using Ubuntu, you may notice that if you try to play some types of music or video files, you will find that can't do it!
There is a good reason for this - Ubuntu, (as with Fedora, Suse Open Edition and any other completely free Linux distribution) cannot ship with software that is either not free, or contains a license which is considered commercial. It may not be illegal to distribute such software without a charge, but you may be required to accept a seperate license from the authors of that software, or use the software on different terms than the rest of the system. In order to keep your distribution of Linux truly free, and the legalities of licensing a non-issue, this software is distributed separately from Ubuntu (as with other distributions).
You may have noticed when installing Ubuntu for the first time that there was a tick-box which asked if you wanted to install "Proprietary codecs", if you ticked the box then, the software you require to play most movie and music formats should already be installed, otherwise, Here is how to add support for these 'codecs' after installation of Ubuntu:
If you are using the Ubuntu Software Centre, simply search for ubuntu-restricted-extras and click 'Install'. Otherwise, if you wish to use the Synaptic Package Manager or 'apt install' at the command line, follow these steps:
If you need a refresher on installing software, refer to this guide for detailed instructions on installing software for your particular distribution.
See the official Ubuntu documentation for more info on restricted formats.
Header
As usual, both KDE and GNOME desktops have excellent offerings, and whilst there is a wealth of audio player software available for both platforms, I will limit the following reviews to just two players, one from each desktop platform: Rhythmbox (GNOME), and AmaroK (KDE).

Rythmbox and it's little sister, GNOME Music is one of the many audio apps available for Linux both built with the GNOME aesthetic in mind. Both are fairly similar in interface to iTunes, it allows you to listen and organise all your music on your PC. Rythmbox is a little more feature-rich and allows connecting your digital music player to upload/download music to. It also connects you to Internet radio stations, Podcasts. It has in-built support for playing, ripping and burning audio CDs.
Header
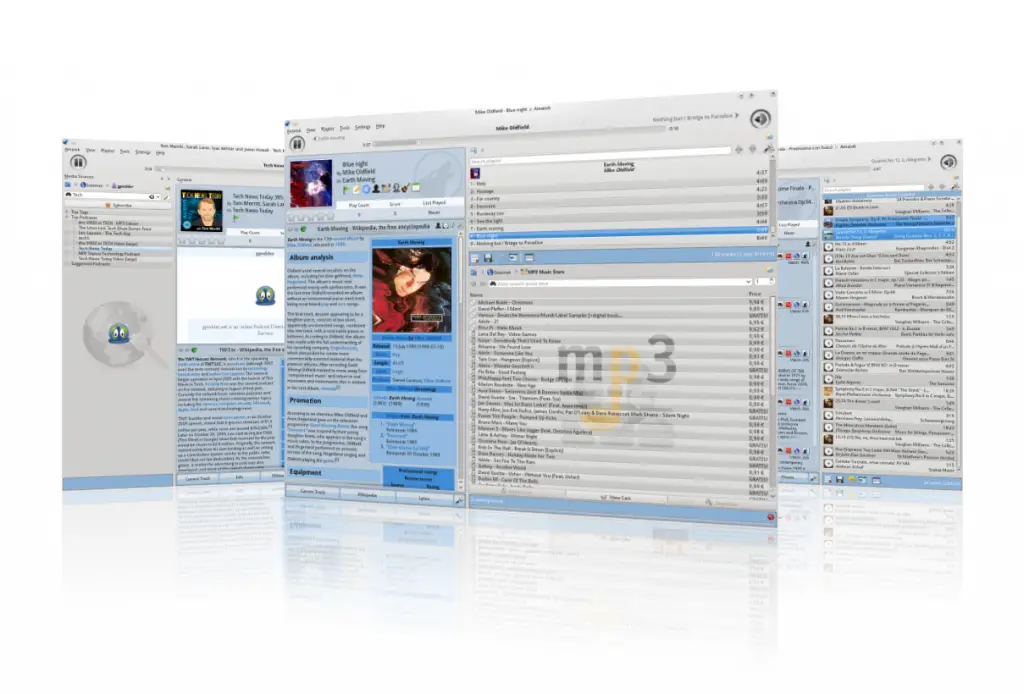
Despite having a silly name, amaroK is a great music player for KDE users (it can also be installed on any other desktop). Fans of iTunes will be immediately relieved to hear that it looks very like iTunes and syncs with your iPod/iPhone flawlessly.
It creates dynamic playlists too, like the party shuffle feature in iTunes, but better! amaroK features automatic CD cover finders for each album on your PC, so you know what the CD looks like when you play it. It also grabs the lyrics for every song you play on demand, as well as telling you pretty much all the info you would ever want to know about the band you are listening to, from Wikipedia. It also features a built in ID3 tag editor to sort out those rogue MP3s with invalid entries, and features MusicBrainz to take some of the guesswork out of it.
Again, there are so many good tools out there for sound editing, it is hard to name but a few here, but we will try to keep it to a good few!
Give Audacity a spin, for example, if you want a great multi-track audio editor. Ardour is a professional digital audio workstation application. For the budding drummers, there's Hydrogen, the drum machine software. Guitarix, the Virtual Guitar App and RoseGarden which is a powerful audio, MIDI and score editing and sequencing environment for musicians.
Header

Ardour is a digital audio workstation which can be used to record, edit and mix multi-track audio. It even goes as far as mixing video soundtracks. Ardour is similar to ProTools in it's ultimate quest, and uses the much acclaimed JACK audio system. It allows the use of plugins such as AudioUnit, LV2, LinuxVST and LADSPA formats. FX plugins. Software instruments. MIDI processors.
Ardour has an excellent manual, and a quick and easy to use GUI. Ardour appears to be quick, snappy and doesn't use up too much CPU time, making it an excellent choice for a sound buff!
Header
Audacity is well worth a mention because whilst it does not have all of the features and power of Ardour, it does fill all of the needs of a sound-editing novice, whilst still beating any entry level sound editing software on the shelves.
Audacity's standard features can be picked up in a matter of minutes and allows for some really professional results. It offers unlimited tracks and many different effects in-built, so if all you need is straightforward multitrack or single-track editing, Audacity is a great tool. It is my go to.
Rosegarden is a professional audio and MIDI sequencer, score editor, and general-purpose music composition and editing environment.
Rosegarden is an easy-to-learn, attractive application and ideal for composers, musicians, music students, small studio or home recording environments.
Sound on Sound magazine called Rosegarden the closest native equivalent to Cubase for Linux, which is no mean feat, and Rosegarden has come to the acclaim of many other publications such as Linux Format's Top Stuff awards.
Header
The most popular titles today are:

VLC is a Multiplatform media player (Works on Linux, Windows and Mac). VLC is now regarded as the king of all media players on all of the platforms and is a great app, if a little difficult to navigate, however it offers a wonderful array of playback possibilities - handling almost every format out there, it's very versatile, but it's real power comes from the fact that you can serve up media from any pc and get it to appear anywhere else - beam videos over the net, or just to another monitor in another room in your house. Support for resampling makes bandwidth problems with Internet broadcasting less of a problem.
MPV is a video player that has a sleek minimalist GUI and plenty of features. You can even use it in the command line. If you are not happy with VLC, you should give MPV a try.
(It's also an online video content player, a Hulu or Netflix of Linux, if you will)/Miro allows you to convert any video formats you like as well as download and play almost any video. It will work with your current music library and will synchronise content to android and kindle formats. It will download Bittorrents and you can also buy music and apps inside Miro.
Header
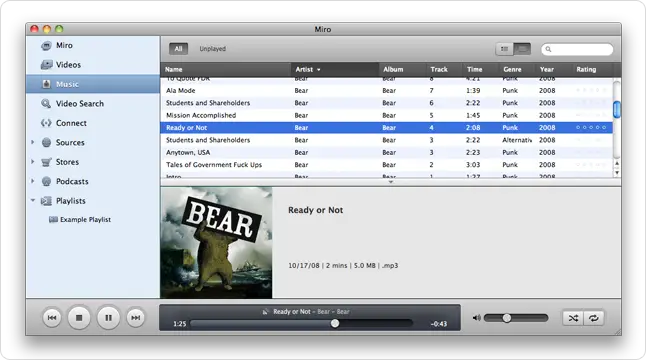
Believe it or not, some professional movie studios have actually made the leap to Linux, which is a huge sign of just how good some of the software is out there. I'm not a professional video editor as you can probably tell from a number of the videos on this site (!) but you can see that even someone inexperienced like me can pick up the tools and get pretty good output without much work.

Header
If you've ever used a Mac before, you may have had a play with iMovie. It's a great tool. It's the every-person's video editing app. Kdenlive is the Linux equivalent and if you want a straight forward movie editor, this is your best bet. If you want something more fuller featured, this might not have everything you want.
Supporting HD video, Blu-Ray and 3D, it's got a lot of features you might not expect from a simple to use video editor. If you are a fan of software like iMovie for the Mac, you'll feel at home with OpenShot.
Straight forward movie editor, with support for hundreds of audio and video formats. It's got lots of device and transport options as well as a nice looking interface.
If you need more than the others above, then Cinerella is for you. Hue, Saturation, Denoising, Compression, Time Stretching, Text-to-movie, batch rendering and much more are all staples of this sophisticated video editing suite. It's been around since 1998, so this surely means it's the grandfather of all the other video editing tools out there for Linux!
Header
Although Blender is not technically a movie editor it's worthy of a mention. A number of movies have been created with this sophisticated 3D graphics and animation creator, it's been around a long time and is still in active development.
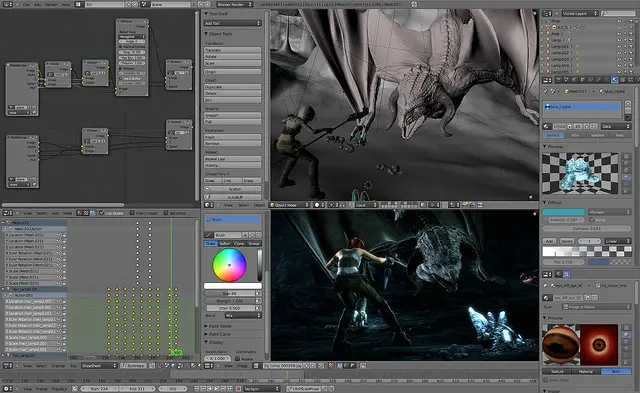
With Linux, you can literally turn an old PC into a Linux style Sky Plus/Tivo box, all you need is a TV card and a big enough hard drive to record all your binge watching of Game of Thrones!
MythTV is open source software that turns your PC into a PVR (Personal Video Recorder). It enables the user to pause live TV, Skip ads, use an electronic program guide, set recordings to record whole series of a particular program, edit recording schedules, organise and view your home photo and videocamera collections as well as listening to music and record content from the Internet, it excels at many points, making it a cut above the current offerings from Microsoft (Media Centre) and PowerCinema.
Header
Also check out MythBuntu,which is an Ubuntu based pre-packaged distribution of MythTV, making it easy to install on a PC.
If you only want to do the basics, you can record and watch live TV then you don't need to use something as feature-laden as MythTV. Popular titles for viewing and recording TV are tvtime and xawtv.
The Hauppage series of TV cards seems to work best with the Linux TV software as it is the most popular range, and best supported through the video4linux driver.
In the past, games a had been a mixed bag with Linux. The games landscape has come a long way in recent years, however it still needs perfecting. Large name companies are releasing their top titles for Linux as well as Windows these days, helping the overall popularity of Linux as a gaming platform no end.
Steam is a popular Windows (and laterally Macintosh) games platform. Steam hosts thousands of blockbuster titles, and is now available for Linux. Not all of the titles are available for Linux yet, but this seems to be a work in progress.
Header
Many new games are being released 'natively' for Linux (that is, the software is written to work in Linux). Other games which will also work with Linux because they have been ported from their Windows base. Popular Linux games that you can play for free at the time of writing (January 2019) include Team Fortress 2, DOTA 2, War Thunder, Star Conflict, Robocraft, the zombie shooter No More Room in Hell and the new release of Super Tux Cart (yes, its Super Mario Cart, but with your favourite Linux mascot!). These are just some examples.
However, the number of natively available Linux games is still relatively low compared to Windows, there is a solution to offer some ability to play Windows only games - Crossover is a program which allows the user to play most of the Windows games titles within Linux. This software is not free, but is fairly priced ($48 USD/yr), and offers a good degree of ease of use and includes support.
There are a great number of resources to find Linux games titles, both free and non-free. Check out the following for inspiration:
These are just some examples of the hundreds of thousands of great Linux apps out there. With all this awesome software out there, you'll start to wonder why you ever bothered with Windows or macOS at all!
Now that you've finished the seven chapters of the main introduction to Linux, why not check out some other areas of the guide once you feel comfortable with your new operating system!
Visit www.linuxnewbieguide.org for all of the guides, howtos, videos and more!
The rest of this ebook takes select tutorials from the website to give you an introduction to the rest of the guide which is online at www.linuxnewbieguide.org
Header
Just as cavemen learned to develop their skills from grunting and groaning to writing meaningful representations on the walls of caves, The computer world started off with the keyboard and the CLI (Command Line Interface). No mice, no graphical user interface (GUI), no icons. All text.
Xerox's PARC research center managed to invent the very first graphical user interface in the early 1980s, however, When Linux first came to be in 1991, most things were still text. True, Windows 3.0 was out, and MacOS had been with us since 1984 but the PC world was still dominated the market, and because graphics were memory hungry 'nice to haves', people worked predominantly in a text user interface. If you wanted graphics, you had to have an expensive, powerful PC and most people didn't think that was really worth the cost.
Just think of it now - we use Microsoft Word (or of course LibreOffice!) in a graphical manner, even though we are writing text, there are fonts, buttons, icons and ribbon menus, it's all graphical. Back in the 1980s, a word processor was pure plain text! The primary operating system, MS-DOS was also text based.
Header
Step forward a bit to when Linux came out, around 1991. Anyone who wanted to use their PC in a quick, efficient manner with a Microsoft machine would use Windows 3.0 to run their graphical programs like Aldus PageMaker or Lotus 1-2-3, but they would often open an MS-DOS prompt. This meant they could type a few commands. They would do that so that they could quickly rename a file or move it from one place to another. Sure, even then users could use a graphical file explorer, select the file(s) they wanted to rename or move and drag them to the relevant location, but a lot of people were finding that DOS was still quicker to use if you knew the commands. If you spent a few days learning the rudimentary commands of DOS, you could really use your PC in a quick, no nonsense way. Coupled with the graphical usefulness of Windows, you could cut workload down by a good deal. Even today, when using modern GUI O/S's like Windows and Mac OS, I still finding myself going to Start going to Start>Run and typing in cmd (Windows) or Terminal.app (mac) to access the command prompt to do something quickly.
Over the years, the people who use the Desktop operating systems such as Mac and Windows have mainly forgotten about the fact that the command prompt still exists, but for systems people, the people that want to do operations in bulk, or do them quickly, they still use it often. In Windows, Microsoft created a thing called PowerShell for this exact reason. MacOS X brought about the bourne shell (the UNIX shell from BSD) and of course, Linux gives us the Bash shell (the Bourne Again SHell, which is just an enhanced edition of the bourne shell that you find on a mac).
Once you get to grips with it, it's not scary at all. Also, if you want to have a career in Linux, you'll find that you will need to know around the command line.
Header
Imagine the following scenario:
You have 300 files in a folder (call the folder 'work'), and within that folder you have 2 other folders, one called 'old' and one called 'new'. Your task is to separate the files in work to the new and old folder. You must put the files that are older than 1 month into old, and the files less than 1 month into new. In a graphical file manager, you would need to right click each of the 300 files separately to find out their creation date, and then move each of the files one by one into their relevant folder. This operation is seriously time-consuming.
How's about the command-line option: type in one line at the shell, and the files are automatically sorted into each folder, determined by todays date. Sure, you would know that you would have to type something like
'find /usr -ctime +30 -exec ls -ld {} \;' to get it to happen, but hey, it's still faster than going through 300 files.
There are yet many other reasons that you may want to have a CLI, for example, a User Administrator has 3 dead (crashed) programs on 3 different workstations across a building. He has two choices: Go run around the building like a headless chicken and kill the programs manually at each workstation, or sit at his or her desk and SSH into each machine, using the CLI, killing each of the programs, finishing the job 20 times faster.
If you start to use Linux a lot, you'll start to find it's a lot easier just to issue a direct command instead of clicking on a bunch of different icons to do something you could do in one command at the CLI. In fact, even Microsoft have, as of 2017 stated that they 'Love Linux'. They've brought the Bash shell via Ubuntu to the Windows desktop, and MacOS has has the bash shell built into it since the beginning of MacOS X. The reason for this? Because it's where people get serious about being effective system administrators and programmers. If you fancy a career in being a system administrator then you should read the bottom of this article.
The Terminal application can be run by pressing Ctrl+Alt+T (Ubuntu and similar) or clicking the icon in your Applications > Accessories menu, or pressing the Windows key to enter the apps dash and typing terminal, then press return.
Header
There are many terminal apps available and have slightly different features, but effectively they all do the same thing. Common terminal apps are called Gnome Terminal, Konsole, rxvt, xterm, terminator and lxterminal to name but a few.
GNU/Linux has a lot of commands, luckily though, you'll probably only ever want to know around 10-15 of them for anything at the CLI if you simply want to remain a desktop user.
You can find the files for these commands in folders like/bin and /usr/bin on your Linux box.
If you have used computers since at least the late 90s, then you will probably remember DOS, you'll find that the syntax of DOS commands compared to UNIX commands are often similar, and even some of the commands themselves are the same. Have a look at this comparison table if you can remember any DOS commands:
| DOS/Windows Command | UNIX Counter- part | What it does |
| dir | ls | Shows the files in the current folder |
| cls | clear | Clears the screen |
| type | cat | Shows the contents of a file, eg cat foo.txt |
| move | mv | Move a file from one place to another, eg: mv foo /home/ |
| copy | cp | Copies a file, eg: cp /home/foo /users/foo |
| ren / rename | mv | The mv (move) command also doubles up for renaming |
| echo | echo | output (or echo) something to the screen |
Header
Here are a few more advanced commands, along with their explanations and one example for each:
| Command | Action | Example |
| chmod | Changes permissions for files | chmod u=rwx myfile.txt |
| chown | change the owner for a file or folder | chown myuser /home/myfile.txt |
| chgrp | change the group owner for a file or folder | chgrp mygroup /home/myfile.txt |
| mv | Moves or renames a file | mv /home/me/myfile.txt /home/them/ |
| grep | searches text for results | cat myfile.txt grep "hello" |
| ls | list the files in a folder | ls -l |
| find | finds files or file designators | find /home -name "myfile.txt" |
| mount | mounts a drive/block device for use | mount /dev/cdrom /mnt/cdrom |
| ps | Show the list of live processes | ps ax more |
| kill | kill a process (running software) by process ID | kill -9 12345 |
| tar | de facto Unix archiver - archives files into one file (a .tar file). Using the 'z' flag uses compression (gzip). | tar zxvf myarchive.tar.gz |
| rpm | The Red Hat Package manager, used to install, remove, upgrade and query RPM packages. | rpm -Uvh mynewpackage.i386.rpm |
Header
If you ever need to know how to use a command, or just find out what a command does man (short for manual) is your friend. For example, by typing man ls, a comprehensive guide is given on using the ls command, what it's purpose is and what it's syntax is. For more information on using man, type man man.
There is not a better source for quick, easy to find information on almost every Linux command. The only times when man lets you down, is when you don't know that a command that does a specific purpose exists, thus, you don't know the name of the command, so you don't know what manual page you want to ask man for. If man doesn't fit the bill, you can get by with reading the rest of The Ultimate Linux Newbie Guide and some googling!
Some other helpful links:
Header
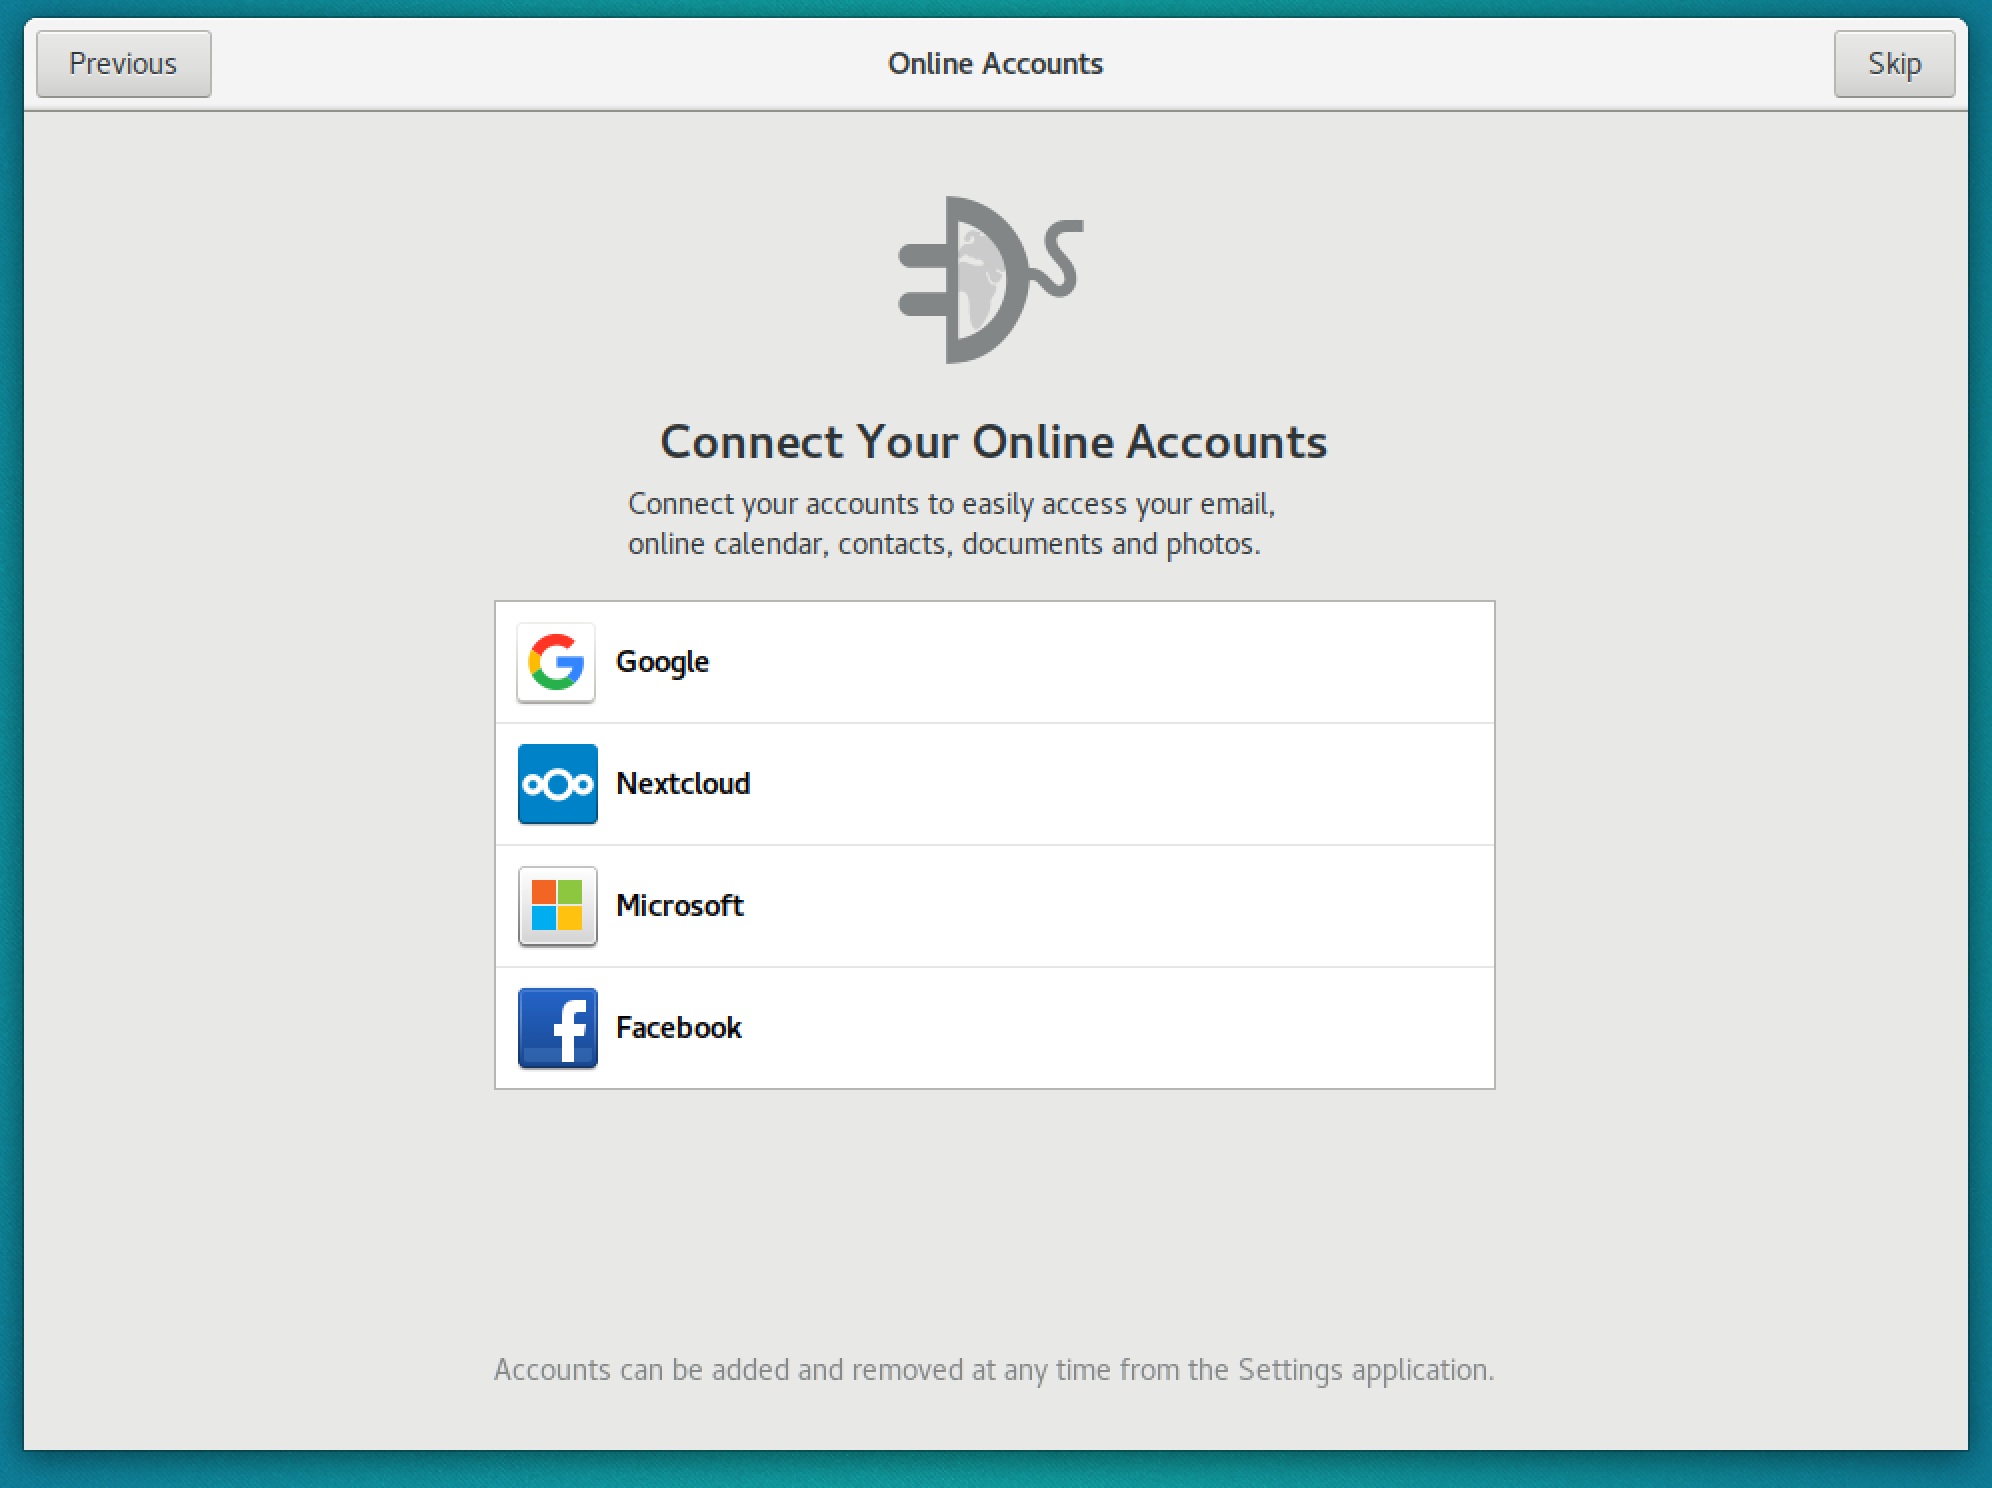
OneDrive for Linux. You’ve probably no doubt heard Microsoft whitter on about how much they love Linux and Open Source recently, but what about the use of their flagship products and their associated technologies? Microsoft Office has arguably got to be the most popular consumer application that Microsoft provide, and if you have used Office (or Office365) recently, you’ll see that saving your files to your PC is no longer the default option. In fact, in my opinion, its downright obfuscated. Instead, saving to their take of DropBox or Google Drive; Microsoft OneDrive is the default.
If you are ‘forced’ to use Microsoft products at work, there’s a good chance that they might be forcing you to save files into the cloud too. This is life, we can’t all be software freedom supremes!
So, the question is firstly, have Microsoft released an official OneDrive client for Linux? Put simply. No.
Fear not! There are many ways to solve the conundrum, which might actually work out pretty well for you!
Here’s a few options for you, we will go into each of them in turn:
Header
| Name | Website | More information | OneDrive for Business/365 Support? |
| OneDrive Official website | onedrive.live.com | Of course, you can always upload and download files via the official Microsoft OneDrive website. Yawn! | Yes |
| Rclone for OneDrive | rclone.org/onedrive | A command line client that synchronises OneDrive and other cloud storage services | No |
| DAVFS2 via WebDAV Protocol | savannah.nongnu.org/projects/davfs2 | WebDAV is a file transfer protocol using HTTP, OneDrive uses WebDAV under the hood | Not natively |
| OneDrive free client | github.com/skilion/onedrive, and abraun's new fork of this client | A reliable, free CLI client. Includes state caching, Real-Time file monitoring with Inotify, Resumable uploads and Support OneDrive for Business (part of Office 365). The new fork from abraunegg resolves some issues that people had recently (thanks philnc!) | Yes |
| onedrived-old and onedrived-dev | github.com/xybu/onedrive-d-old and github.com/xybu/onedrived-dev | CLI client which offers two way sync. The new client is written in Python3 and is being actively developed. | No |
| GNOME 3 Desktop | http://www.gnome.org | The native GNOME desktop has built in support via the 'Online Accounts' feature to have read only access to your OneDrive | No |
| KDE Desktop | www.kde.org | The KDE desktop uses the Konqueror file browser, which also has a built in HTTP/web browser capability. This allows you to browse files and authenticate properly | Quite likely, via the Konqueror web page interface |
| SPFileZilla (mod) | github.com/suoko/spfilezilla | Written in Mono (open source .NET), it allows the user to access Sharepoint Online/OneDrive for Business clients via GUI that looks and operates just like the popular FileZilla FTP app. | Yes |
Header
WebDav
There really is no great way to use OneDrive for Linux. There are plenty of ways, however.
If you have OneDrive Personal, using DAVFS2 might be the cleanest option. You will see it using your file manager straight away and it will act pretty much like a normal network drive. Firstly, find out what your HTTPS WebDAV address should be (found HERE). You can either add an entry to your /etc/fstab (so that it is mounted on startup every time – recommended), or you can use GNOME Nautilus/Files (or KDE Konqueror) to mount it.
WebDAV is simply an HTTP file sharing protocol. Linux has strong support for it.
If you are using fstab, here is the sort of entry that you would use:
https://cid-blablabla.users.storage.live.com/items/blablabla /home/media/MS davfs user,noauto,file_mode=600,dir_mode=700 0 1
Make sure davfs2 is instaled on your machine before you do this obviously!
Header
From the above table, clearly OneDrive Free is the leading client, supporting sync and OneDrive for business. Obviously you can still see the files it has downloaded in your normal file browser, however I can’t be 100% sure if this doesn’t cause any issues with file synchronisation. I’m pretty sure it won’t, but never say never!
Installation of OneDrive free requires you install a few things first (instructions for Debian/Ubuntu):sudo apt-get install libcurl4-openssl-dev curl git(this number will vary depending upon the version of dmd, note the output of the dmd build command)
sudo apt-get install libsqlite3-dev
curl -fsS https://dlang.org/install.sh | bash -s dmd
source ~/dlang/dmd-2.076.0/activate
git clone https://github.com/skilion/onedrive.git
cd onedrive
make
sudo -s
source ~/dlang/dmd-2.076.0/activate
make install
exit
Then simply start the tool by entering the word ‘onedrive -m &’ at the prompt (note the space after the -m – the & puts the program in the background). You’ll be given a URL to enter into your web browser. Enter this, log into OneDrive and you’ll end up on a blank page. Copy the URL of your browser back into the terminal, where it will be waiting for the URL. Once you enter it, a new folder in your home folder called ‘OneDrive’ will be made. It will start synchronising all of your OneDrive files.
Note that onedrive -m puts the tool into ‘monitor’ mode so that it can monitor for changes. Therefore, it runs permanently. Ideally you should run this in an init script or similar on startup, so you don’t have to run it from the terminal every time you start up your PC.
Header
On testing GNOME3’s latest ability to use OneDrive, I’d say its a bit of a joke. Read only file access is almost near useless. Konqueror should be able to accept your OneDrive token and start working like a normal file share – please post a comment if you get it working! However, if you are not a KDE user, like me, then this is a moot point! SPFileZilla is also an option, but it doesn’t support sync and its pretty ugly, considering you are really just using a Windows client! There is always the web browser with the OneDrive website, but again this is simple upload/download, no sync option.
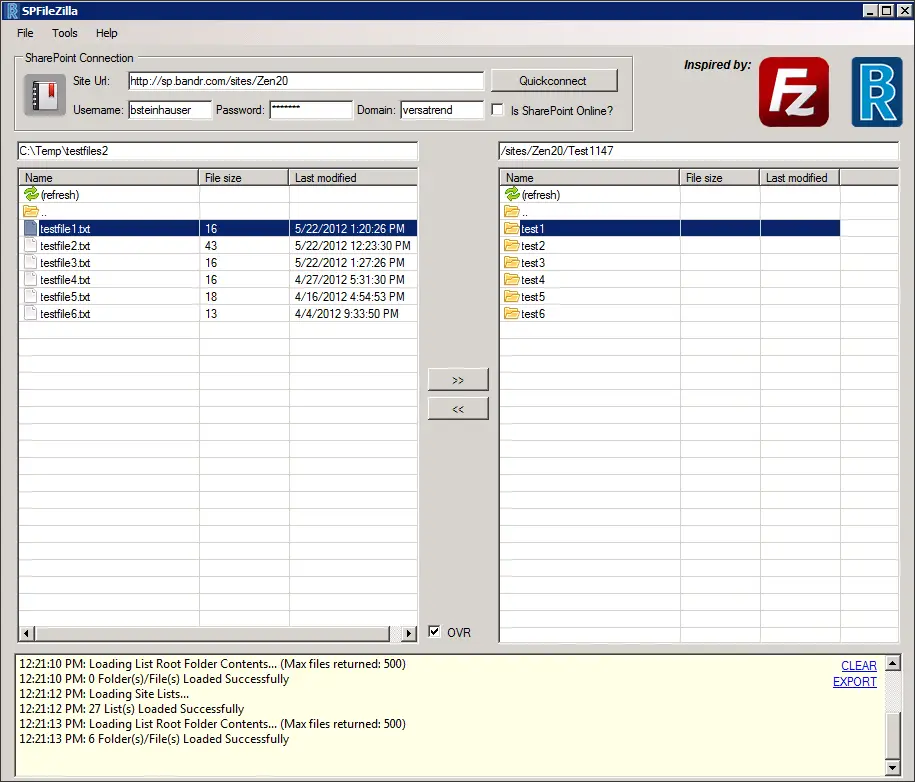
Due to its maturity as a protocol and support under Linux, you can also choose to use WebDAV, but only if you are using OneDrive Personal.
Overall, however despite it being natively a CLI option, OneDrive FREE is the most feature rich, and once in monitor mode. Also, don’t forget that you can see all the files in your preferred GUI based file browser, such as Nautilus/GNOME Files etc. Have a look at the screenshot on the following page:
Header
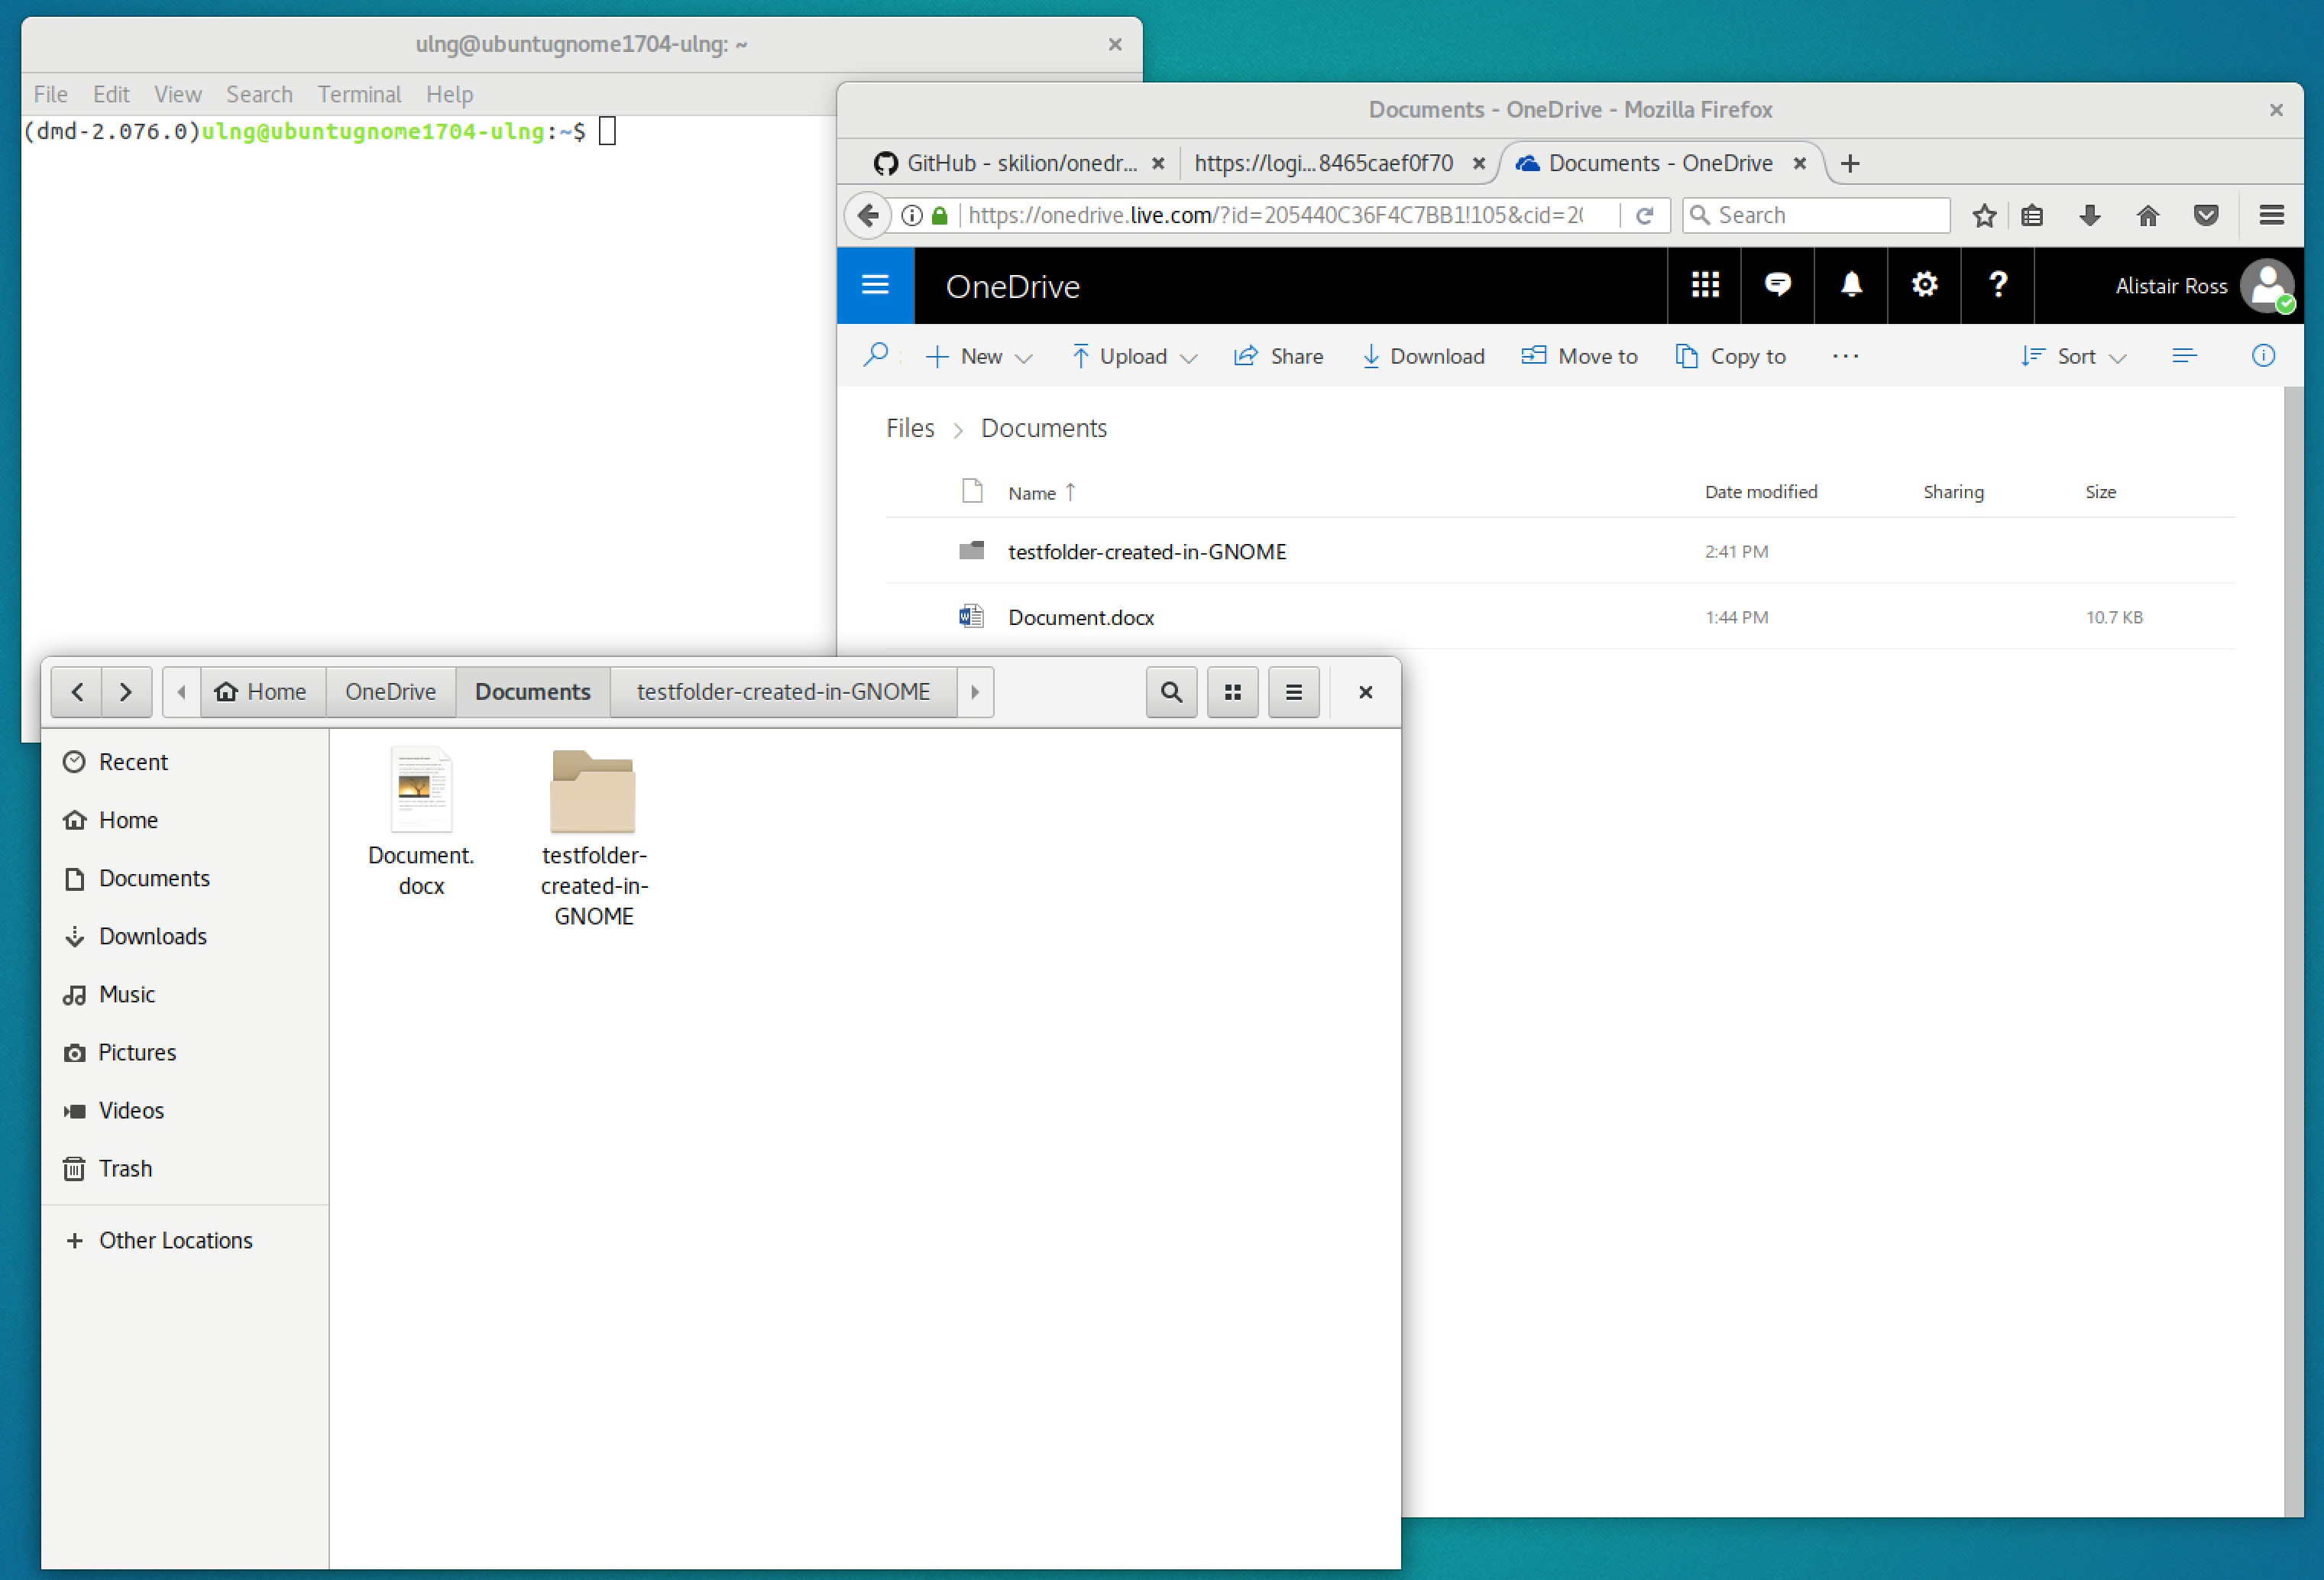
Screenshot Using OneDrive FREE on Linux, demonstrating the sync capability and use use in GNOME Files
Header
Google Drive hasn’t been supported on Linux officially, well, ever….
It’s been possible to use it in the past using third party apps like inSync or the more basic Gdrive. However since version 3.18, the GNOME desktop has inbuilt support for Google Drive ‘files’.
We will also be covering a third party tool called RCloneBrowser which supports OneDrive and Dropbox as well as Google Drive, so you can choose whether you’d like to use the new ‘native’ inbuilt support for Google Drive, or use a third party tool. The choice is yours, vive la Linux freedom!
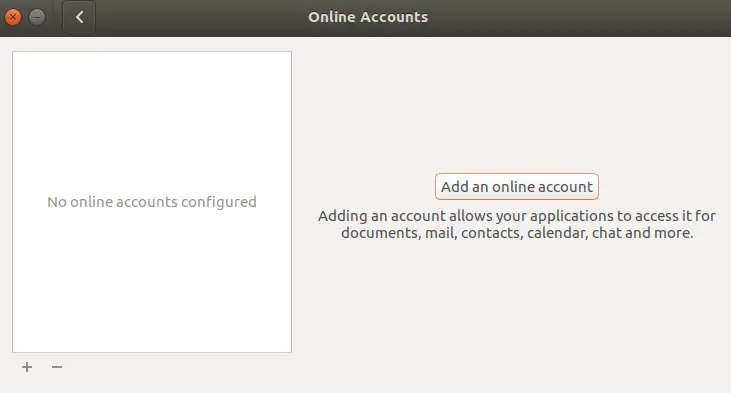
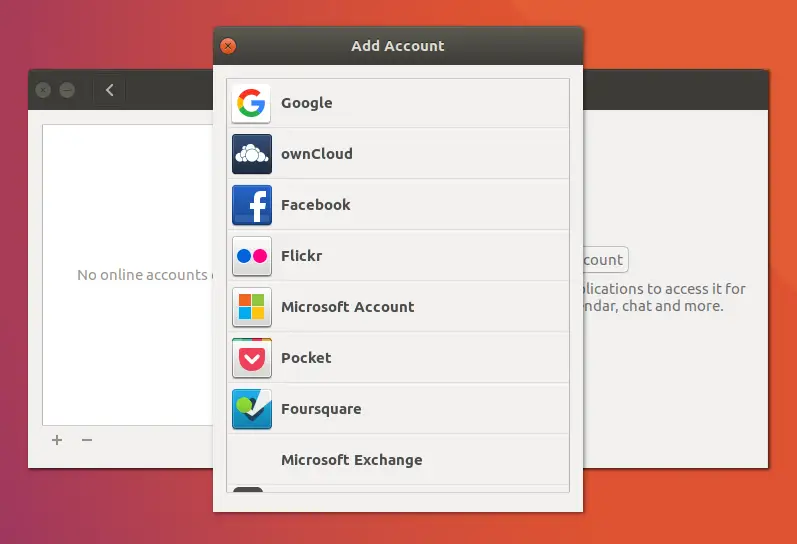
Header
You’ll next be asked to enter your google credentials, go ahead and fill them in.
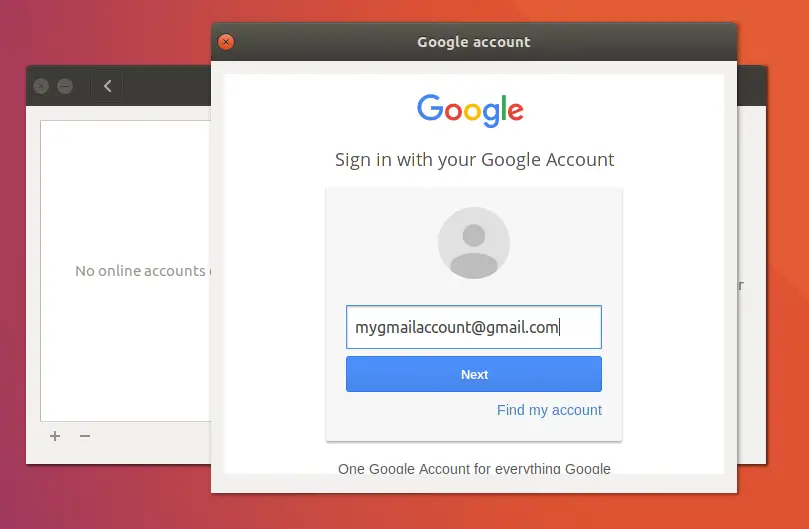
Once you have entered your Gmail address/username and password, you will be prompted to give Ubuntu / GNOME permission to use your Google account. Scroll to the bottom of that dialogue and press ‘Allow’.
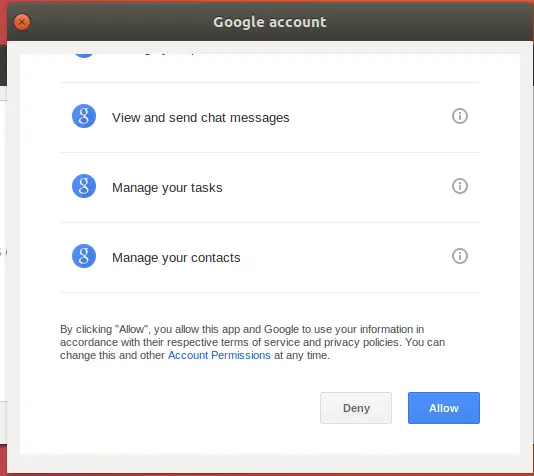
A few moments later, you will see the original ‘Online Accounts’ box, however you’ll see it now has your Google account in there. You can see that one of the options is ‘Files’. By default this option is selected as ‘On’.
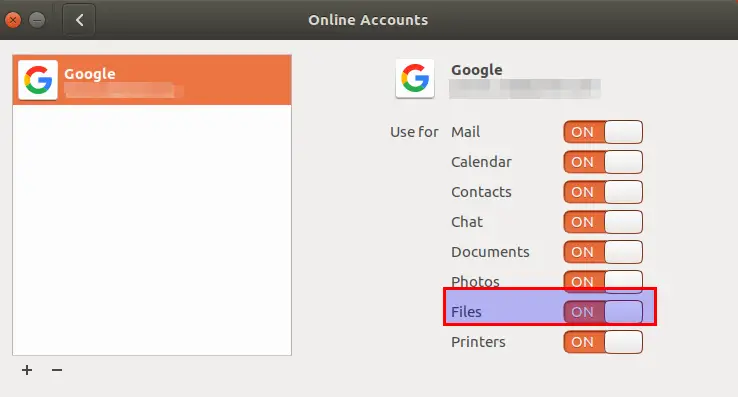
Header
Finally, if you open the File Manager (Nautilus), you’ll see a new entry (most likely below ‘Trash). It should have your Google account username. Click on that and you’ll start to see your files (this may take quite some considerable time!).
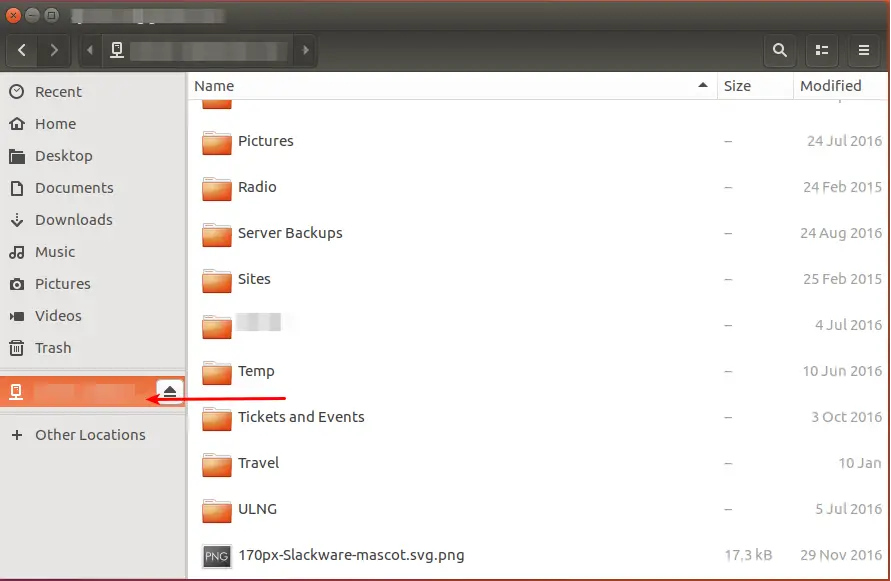
I have a lot of stuff in my Google Drive account. My photos alone are around 50GB. Browsing through the folders can take quite a while. This is a problem when you find out that none of the content is locally stored offline. Fortunately, every change you make is synchronised, including file deletion, copy and add. So, be aware that performance might not be ideal when you browse some of your larger folders.
RCloneBrowser is a QT5 based GUI that you can synchronise files from Google Drive, Google Cloud Storage, Dropbox, Microsoft OneDrive, Amazon S3, Amazon Drive, Openstack Swift / Rackspace Cloud, Memset memstore, Hubic, Yandex Disk and Backblaze B2. An impressive list!
If you know what RSync is (which is great!), you’ll love RClone. It’s basically rsync for cloud storage. RCloneBrowser is the GUI for RClone!
The only unfortunate thing about RCloneBrowser is that it’s new, and not prime-time yet. It’s not included by default in the Ubuntu Repositories, nor in most of the other popular distributions. So, you’ll either need to download (and compile) the source code, or download a binary. For more information on what compiling/binaries are all about, check out this guide.
Header
Either way, RCloneBrowser is not as easy to get going for a newbie as one would hope. I’m sure it will be soon, but hopefully when you get it going, it will be worth the reward.
To install RCloneBrowser, you’ll need two packages, and you’ll need to install RCloneBrowser from source:
sudo apt-get install build-essentials cmake qt5-default pyqt5-dev (you may need other QT5 build tools depending upon your distro).cmake .. from the build folder. If cmake doesn’t find Qt, add -DCMAKE_PREFIX_PATH=path/to/Qt to previous commandFor those of you interested in console only based offerings, you can check out:
Header
This is the definitive guide!
UPDATED FEBRUARY 2019
Using a Macintosh is (mainly) a delight. The hardware is solid, fast, and beautiful, but over time, macOS has become dumbed down and in some places, downright silly. I long since realised that I could do exactly what I wanted to do with my macbook using Linux, rather than being encumbered by having to follow the 'Apple' way of doing things. I never looked back. Here's the definitive guide to installing Linux on a Mac.
DISCLAIMER: This is an advanced tutorial which sometimes works at the command line and can cause irreparable damage to your data. If you do proceed, make sure you have backed everything up with TimeMachine or such like tools. The Ultimate Linux Newbie Guide cannot be held responsible for any damage caused as a result of following this tutorial.
This tutorial has been tested on a late 2013 Macbook Pro Retina 15", however it should work with any EFI based Mac (more on that in a bit). The EFI based Macintosh started around 2008 (you can check the list of the Apple EFI systems here). This should include Macbook Pros, Macbook Air, iMac and probably Mac Pro's...
Header

Unfortunately, from 2018, Apple decided to add a new 'secure boot' T2 chip into their mac hardware. This basically means that you can't use anything other than macOS on Apple hardware, however it is possible to switch off secure boot. See the image above to show you how to find out if your machine has the T2 chip.
If you have said T2 chip, then you may be completely out of luck for Linux on your mac, or at least for now. If you want, you can try to disable the secure boot option in order to install Linux on your mac. Note that I haven't tested this (I don't have a new mac), so please let me know if it works for you.
Disabling the Secure Boot Option
You'll need to start your mac into the Recovery mode and launch the Startup Security Utility. To do this, just follow these steps:
Header

I am writing this assuming that you want to keep MacOS on your hard drive and that you wish to dual-boot it at any time. You should have plenty of free space on your disk drive (the more the better), so either delete some cruft or move some of your old data onto a separate external archive hard drive (because I know you got one or ten of them lying around!).
Header
I used MacOS Mojave, which is the latest version of macOS at the time of writing. Recently Apple introduced a 'security feature' called 'SIP' (System Integrity Protection) which you will additionally have to overcome if you are using El Capitan or newer. More on that in a bit. We will be installing Ubuntu. This tutorial was written with Ubuntu , but this should apply to any Linux distro more or less, although your mileage may vary with Video stuff particularly.
NOTE: You may have to install an EFI boot manager (rEFInd) and/or do a few gnarly things to get your hardware working before it is Linux ready, so if you get stuck at any point, read towards the end part of this guide.
The tutorial you are about to read has four main steps. These are:
Next, unless you haven't already downloaded the Linux distribution of your choice, it's time to go grab it. You'll find that you'll download a .iso file, which we will need to 'burn' onto a USB stick. Make sure you have a 4GB or bigger USB stick that you don't care about deleting ready for use.
For this particular tutorial, we are using Ubuntu, however most other Linux distributions should work. Using more hard-ass systems like Arch or Slackware, or even Debian, this will be more challenging. This guide is challenging enough, so do what you will, but I recommend you stick to the easier distros to begin with like Ubuntu or Linux Mint.
Header
Make sure you download the x64 version of the distribution you choose, if there is an EFI boot version, choose that also.
There is now a snazzy tool called Etcher (you can download it for free from balena.io/etcher. This would now be my choice for downloading and burning a Linux distribution download to a USB stick because it's literally as easy as popping in your USB stick and pressing go!
Now that you've got your ISO file downloaded, and you've downloaded BalenaEtcher, Fire up Etcher, and follow these steps:
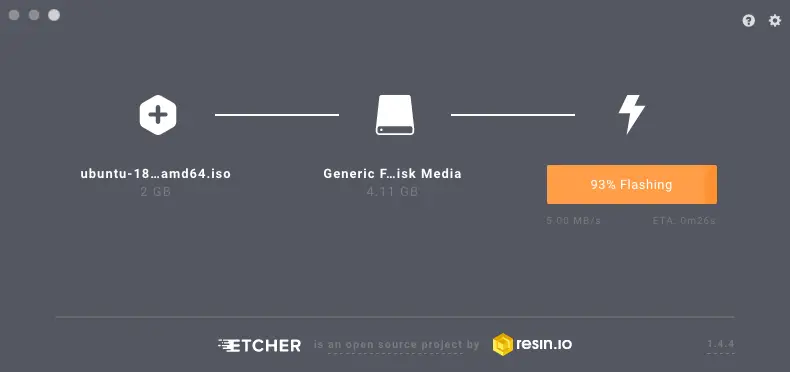
Yep, that's it! If there is any reason why you can't get this to work, then you can follow the 'old fashioned' way of doing it over on this short guide.
Header
This step chops your disk up the way you want it - some space for macOS, some space for Linux. This is called 'Partitioning'. Make sure that you delete as much junk from your mac before you start, that way you can give as much space as you can to Linux.
To modify your partition table in macOS simply look in your Utilities folder, you'll find Apple's Disk Utility. If you like, quickly scan your hard drive for errors, just to make sure it's all sweet before we get down to business. Repair any errors you may find.
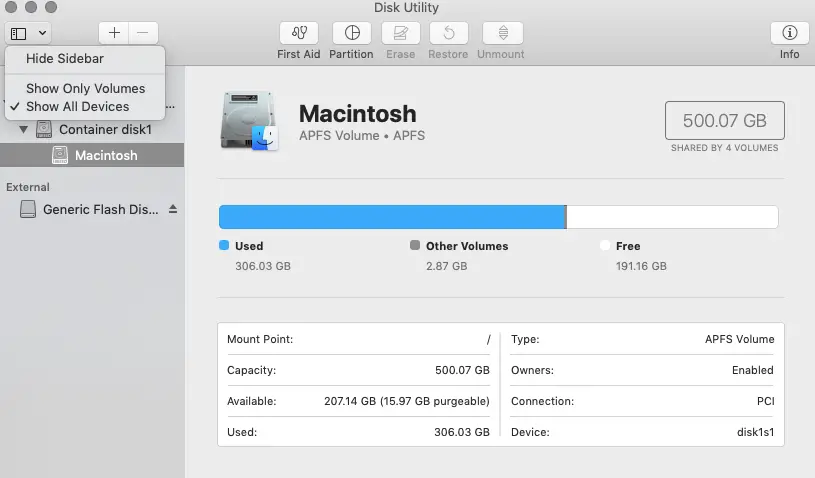
Once you are ready, you will see a list of internal drives on the left hand side. Your Disk Utility may look different if you are using an older version of macOS, but it still offers the ability to resize a volume.
If you are using a recent version of MacOS, you'll find that macOS now uses a notion of disk containers. To see everything that's going on, you'll need to click the icon to the top left, it should show you 'Show Only Volumes' or 'Show All devices'. Select Show All Devices. The screenshot below shows this action.
Header

On the hard drive that your macOS partition exists on, click on the top drive, not any subsequent partitions listed below it. Click on the 'partition' button (it looks like a pie chart in modern versions of the utility).
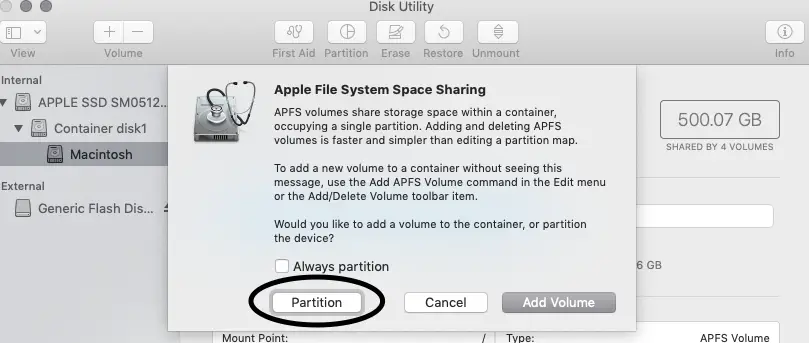
Header
In newer versions of macOS, they prefer you to use these 'container volumes'. That's fine for macOS, but you want a partition to put Linux on. If you see the above dialogue box appear, make sure you click 'Partition'.
Next, you'll see the partition pie chart. You will see you can move the slider around the pie to resize your partition(s). Pull the size slider back for the Mac OS partition to release the free space on the disk. Make a blank partition until you have enough space for your new Linux system. Make it as much space as you are willing to, I gave my Linux partition 100 GB.
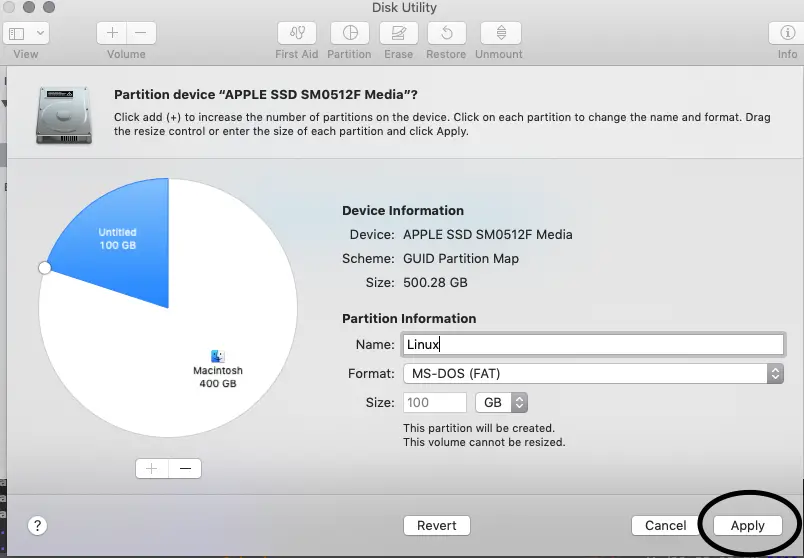
It's essential that you choose to format the partition as MS-DOS (FAT) format. I gave it the name 'Linux' so that it's easy to tell what it is. Once you've done that, click Apply.
Header
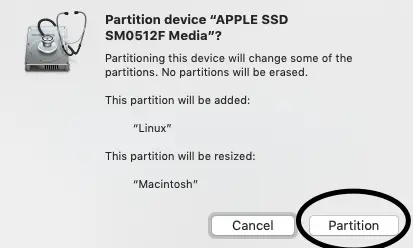
You'll see the box to the left. Apply the changes by clicking the Partition button and let the resize operation complete. If you have an SSD, this should be relatively quick (a few minutes). For older hard drives, this is going to take some time!

NOTE: I also recommend also making a swap partition, although this isn't completely necessary. To do this, simply follow the steps you did above but make a smaller partition, eg 8GB.
Header
The below screenshots show the creation of a SWAP partition and the final 'picture' of what your macOS disk should look like.
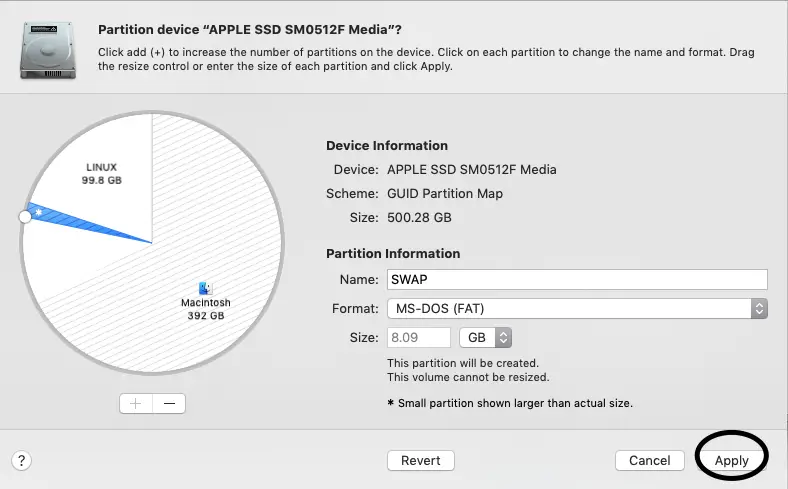
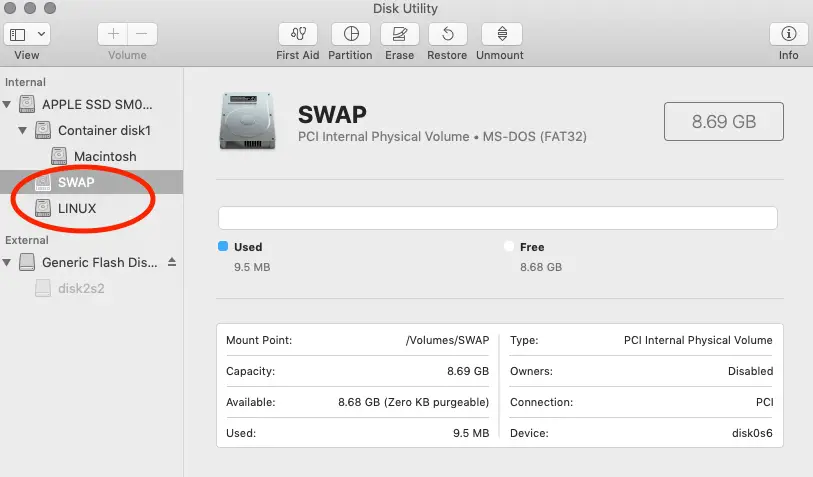
Woo-hoo! This is the fun part! Now we get to install the operating system that your Macintosh has been longing for.
Header
Switch your Macintosh off completely. Connect your Ethernet to Thunderbolt adapter (or USB Ethernet Adapter) and your USB drive we made earlier. If you don't have one of those ethernet adapters, life is going to be tricky for you, you are going to have to download the wireless drivers and install them manually to get things working. If you don't have one of the adapters, ask a friend for one, or buy one cheap from Ebay or such like. It will save your sanity.
Turn on your computer and hold down the option/alt key. You'll see a menu pop up which you can see your Macintosh HD as well as the USB stick. It will be named EFI Boot or something similar. Use the cursor keys or mouse to select that and hit return. PS: Make sure you revert to using your laptop's keyboard and mouse for the time being (your bluetooth keyboard, and probably your mouse won't work until paired).

Shortly after, you'll see the Ubuntu installer start up. Follow through the steps as usual. You'll get to a screen that says 'Updates and other software'. Make sure you tick the box that says Install third-party software for graphics and Wi-Fi.
Header
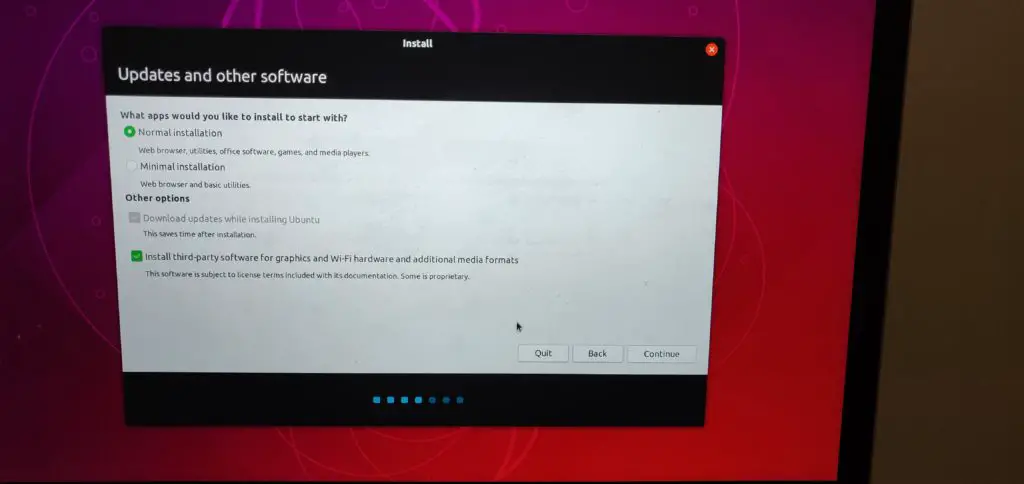
The next step, and arguably the most important step in the entire process is about installing Linux on the partitions you previously configured in the Disk Utility. You'll see a dialogue saying 'Installation type'. Make sure that you choose the option 'Something else'. If you select the other options, these will delete your installation of macOS and make you have a bad day (TM).

Header
In the next dialogue, you'll see the partition table (and probably some empty partitions too). If you created a swap partition as per my example, you'll see two FAT32 partitions. One will be the small 8GB SWAP partition, the other 100GB (in my case) is the main Linux partition.

You'll probably see three FAT32 partitions. One of them will be near the start of the disk and won't resemble the capacity of the partitions you created. This is the EFI boot partition. It's tiny (209.7 MB). Make sure you leave this partition well and truly alone, otherwise you'll possibly not be able to boot your mac!
If you didn't create a swap partition, don't worry, you can still do so by locating the empty partition you made and create 2 partitions out of it. Simply make a big partition and a small partition (roughly 8-16 GB in size). The big partition should be the remainder of the free space. The big partition should be ext4 in type, and should be formatted with the mount point of "/". The small partition should be formatted as swap.
It's time to set up the partitions to use Linux. To do that, I selected my first (smaller) partition, the one that's 8.7GB. I'm going to use that as the Swap partition. Select that partition by clicking on the entry for it in the list of partitions. In my case, that's /dev/sda3. It must be of type fat32.
Header
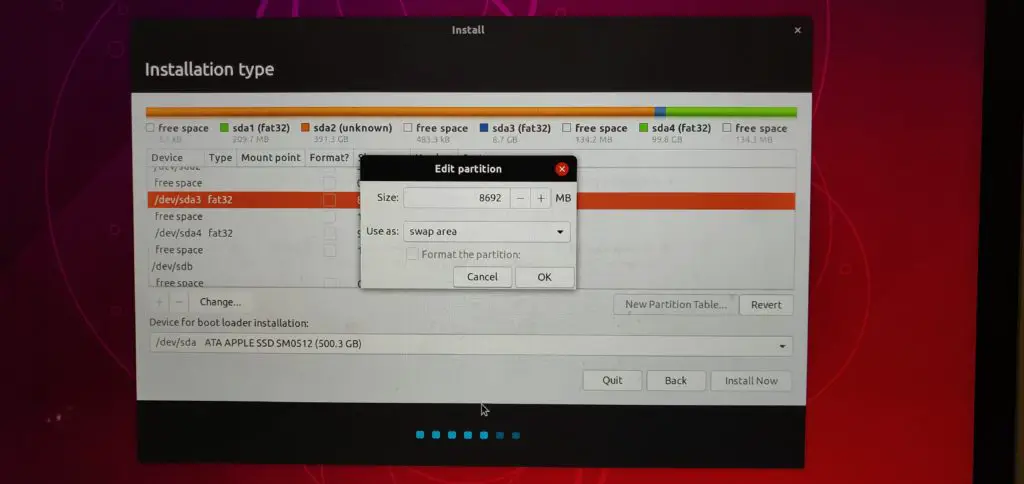
Once you click on it, click the button that says 'Change'. A dialogue saying 'Edit partition' will appear. Leave the size as it is, but click on the drop down which will probably say 'do not use'. Select 'swap area' from this list. Press OK.
Next, you want to allocate the large partition to be the main Linux partition (it's called /). Click on the large partition created in Disk Utility (in my case, /dev/sda4). It also has a type of fat32.
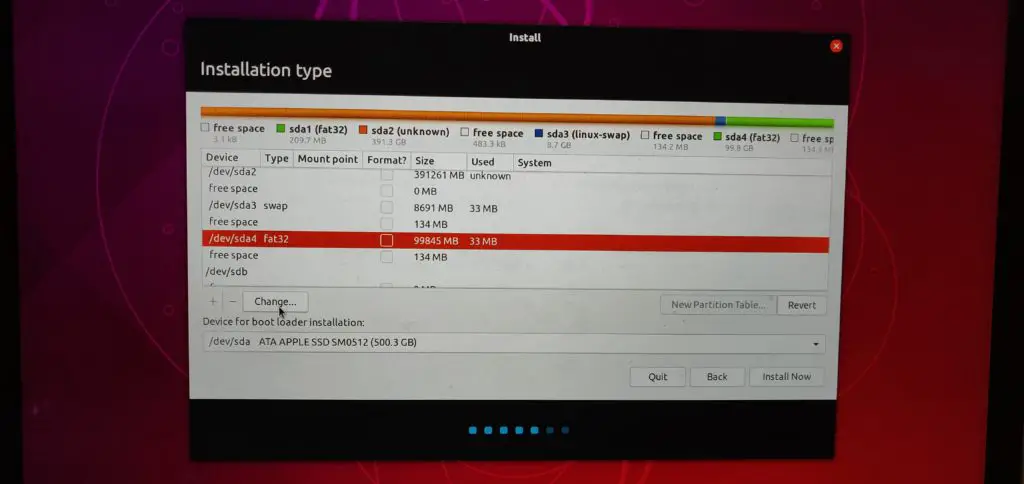
Clicking the 'Change' button will bring up the now familiar Edit Partition dialogue box. Again, leave the size as is, and from the 'Use as' drop-down, select ext4.
Header
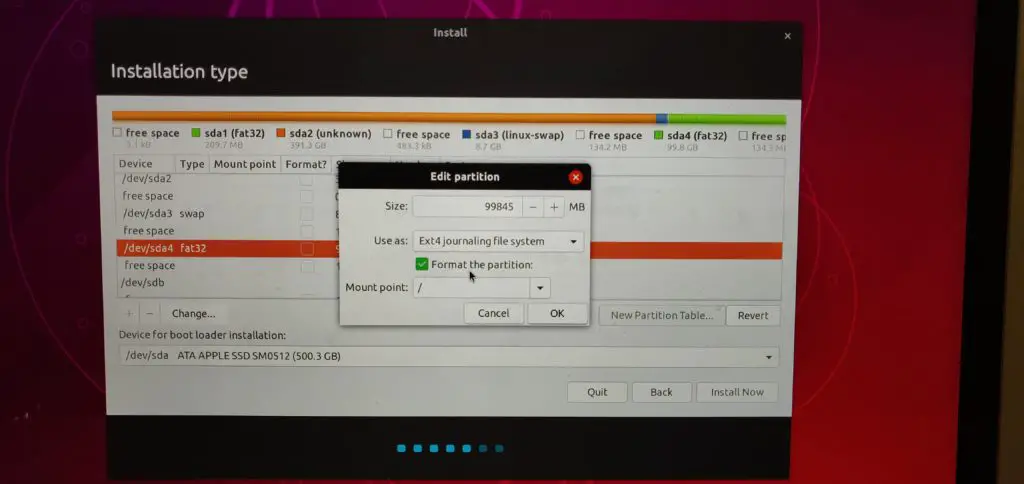
Click on 'Format this partition' if it isn't already ticked. By default, the mount point will be / - leave that as is. Click OK.
If you've done everything right, you'll now have two partitions. One which is small, of type swap and the other, the larger of the two, will be formatted as Linux ext4. These partitions will lie in amongst the other 'unknown' partitions (these are your macOS partitions).

Header
Once you are happy, click the Install Now button. You'll see a dialogue box asking you to confirm the changes are to be written to disk. This is your last chance before Ubuntu goes off and does it's thing to your disk. Again, I can't stress how important it is that you've taken that Time Machine backup with your mac before you do this. Anyway, I'm sure you've backed everything up... right? :) So click on 'Continue' and let the good times roll! Everything else should be pretty standard as per the normal Ubuntu installation.

Header


Header
Once the install has finished, the installer will tell you to remove the installation medium. Remove the USB stick and it enter to restart the computer. Once you hear the tell-tale Apple chime, hold down the alt/option key. Once again, you'll see your MacOS hard drive, as well as the newly installed Linux system. It'll probably be called 'EFI Boot'. Make sure you select that.
That's it! With any luck, Ubuntu should start up in a few moments and you're able to use your snazzy mac hardware with a better operating system! However, you may note that you probably won't have a few things that work out of the box. Most of these will be be covered off on the next step.
If, like me, you notice that the mac starts running hot and the CPU fans are burning away then have a look at the output of the CPU history in the resources view of the System Monitor app (or using top at the terminal), you’ll probably find that a ‘kworker’ process is chewing up CPU. This is a well known bug, so to fix this, run the following commands at the terminal:
$sudo -s
grep . -r /sys/firmware/acpi/interrupts/
You’ll see a list of probably 70 or so lines relating to the firmware that works with ACPI (Advanced Configuration and Power Interface). Most of these are doing their thing quite happily, but you’ll find one (or maybe even two) of them that has a number like gpe16 has a large number beside it. It’ll look like this:
/sys/firmware/acpi/interrupts/gpe16: 225420 STS enabled unmaskedWhen you think you’ve found it, you can simply disable it, but first, just back up the file, just in case you make the wrong change. Note I am using gpe16 as that’s the one I found the problem with, yours is probably different:
cp /sys/firmware/acpi/interrupts/gpe16 /root/gpe16.backup
echo "disable" > /sys/firmware/acpi/interrupts/gpe16
If after a few seconds (say 30-60), the CPU fans stop whirring, and system monitor/top starts showing normal usage statistics, then you know it's the right one. If it isn’t the right one simply echo “enable”, rather than disable.
Header
To make the change permanent, do the following tasks, again at the terminal, changing the value ’16’ to the value you used:
# crontab -e

  --Add the below line to the crontab, so it will be executed every startup/reboot:

@reboot echo "disable" > /sys/firmware/acpi/interrupts/gpe16

  -- Save/exit. Then, to make it work also after wakeup from suspend:

# touch /etc/pm/sleep.d/30_disable_gpe16
# chmod +x /etc/pm/sleep.d/30_disable_gpe16
# vim /etc/pm/sleep.d/30_disable_gpe16

  -- Add this stuff:

#!/bin/bash
case "$1" in
    thawresume)
        echo disable > /sys/firmware/acpi/interrupts/gpe16 2>/dev/null
        ;;
    *)
        ;;
esac
exit $?
Sponsored Link:
Tech Tip: Windows business applications including Office 365 can be accessed from PCs/Macs/Android/iOS/Linux devices with virtual desktop hosting and other cloud servers and services with full support from Apps4rent.com
Okay cokey. Now here's the thing. Apple can be real pains in the asses some times (read, all the time, at least these days). It is quite likely that you have what's called CoreStorage, if you have anything OS X 10.10 or newer. This provides an encrypted, journaled file system; even if you haven't installed FileVault (if you have, turn that off!).
To give full read/write access to your Mac OS X partition from Linux, you will need to revert it back to standard HFS+. To do this, you can pretty much enter one simple non-destructive command.
Header
First up, at the terminal, issue the command diskutil cs list. You will see something like the below. If you know LVM in Linux, this is pretty much the same thing. Your main Mac OS X partition (Logical Volume) should be in Apple_HFS format.
Header
As long as the 'Revertible' flag is set to Yes, you are good to go. Simply enter the following command:diskutil coreStorage revert
The long string of stuff is that big long alphanumeric string of text highlighted in the red box, you want to use copy and paste it to make sure you don't make a mistake!
The conversion took ages for me, however your mileage may vary, depending upon how much data is on your drive, and how fast your drive is. If you type diskutil cs list again, you'll see how much % of the conversion has been accomplished. Don't reboot your machine until that's over and done with, but after then, you can safely mount your OS X partition with full read/write access.
First, make sure that you have hfsprogs installed. Example installation command:
sudo apt-get install hfsprogsNext, mount or remount the HFS+ drive; commands need to be as follows:
sudo mount -t hfsplus -o force,rw /dev/sdXY /media/mntpointor
sudo mount -t hfsplus -o remount,force,rw /dev/sdXY /mount/point
If you want it to mount each time you start up your tux-ified Macintosh, you'll need to add the entry to the fstab (sudo vi /etc/fstab):/dev/sdXY /media/mntpoint hfsplus force,rw,gid=1000,umask=0002 0 0
Where your user gid is 1000 (use the id command to find out your gid)
You’ll need the FaceTime HD module for your kernel. It’s a bit of a pain in the butt to get going, but it does go once you’ve set it up. Full documentation is here: https://github.com/patjak/bcwc_pcie/wiki/Get-Started#get-started-on-ubuntu
Here are the steps I followed to get everything working on Ubuntu. You need to be running a fairly recent version of Ubuntu (16.04 onwards should be fine), so 18.10 will be no worries. You’ll need to run all the following commands from the Terminal.$ indicates running the command as a normal user
Header
$ indicates running the command as a normal user# indicates as root (use the sudo command), eg: $sudo apt-get install …
# apt-get install linux-headers-`uname -r` git kmod libssl-dev checkinstall curl xzcat cpio$ git clone https://github.com/patjak/bcwc_pcie.git$ cd bcwc_pcie/firmwaremakesudo make installCopying firmware into '/usr/lib/firmware/facetimehd'$ cd ..$ make# checkinstall# depmod# modprobe facetimehdI had a problem with the driver at this point, where /dev/video was not there, which was easily fixed by performing the following steps:
In some scenarios, you’ll have to unload bdc_pci before inserting the kernel module, or /dev/video (or /dev/video0) won’t be created. Do this with modprobe -r bdc_pci. If you’ve already done a modprobe facetimehd, also do a modprobe -r facetimehd, before re-running modprobe facetimehd. This fixed the issue for me.
If you want the driver to be enabled on startup, extra steps may be required. On Ubuntu, the following should work:
$sudo echo facetimehd >> /etc/modules
sudo gedit /lib/systemd/system-sleep/99facetimehd or if /lib/systemd/system-sleep does not exist: sudo gedit /usr/lib/systemd/system-sleep/99facetimehd
Header
Paste this in the empty file:
#!/bin/sh
case $1/$2 in
  pre/*)
    echo "Going to $2..."
    modprobe -r facetimehd
    ;;
  post/*)
    echo "Waking up from $2..."
    modprobe -r bdc_pci
    modprobe facetimehd
    ;;
esac
And save.
Make it executable: sudo chmod a+x /lib/systemd/system-sleep/99facetimehd or sudo chmod a+x /usr/lib/systemd/system-sleep/99facetimehd
When you perform a system update in Ubuntu, it often updates the Kernel too. When you update the kernel, the modules need to be upgraded to work with that Kernel version. As you’ve build a custom module, you’ll need to ensure that the module is up to date too. Here’s how to do that:
You will need to verify dkms.conf that the module name facetimehd and version number 0.1 are correct and either update the dkms.conf or adjust the instructions where -m and -v are used.
Header
# apt install debhelper dkms# dpkg -r bcwc-pcie# mkdir /usr/src/facetimehd-0.1$ cd bcwc_pcie# cp -r * /usr/src/facetimehd-0.1/# cd /usr/src/facetimehd-0.1/# rm backup-*tgz bcwc-pcie_*deb# make clean# dkms add -m facetimehd -v 0.1# dkms build -m facetimehd -v 0.1# dkms mkdsc -m facetimehd -v 0.1 --source-only# dkms mkdeb -m facetimehd -v 0.1 --source-only# cp /var/lib/dkms/facetimehd/0.1/deb/facetimehd-dkms_0.1_all.deb /root/# rm -r /var/lib/dkms/facetimehd/# dpkg -i /root/facetimehd-dkms_0.1_all.debIf you have any trouble, please read this guide on making a DKMS package:http://www.xkyle.com/building-linux-packages-for-kernel-drivers/
Hopefully the following section won't bug most of you any more. With recent versions of most Linux distros supporting EFI, this shouldn't be an issue. However, if you are having issues getting your distro to boot, then read on.
EFI stands for Extensible Firmware Interface and is now pretty much commonplace in Macs and PCs across the industry. It replaced the trusty old BIOS system that PCs had used since the 1980s. Installing Linux on a BIOS based machine was trivial, but now with Apple's take on EFI on their customised hardware, it can be a little challenging. No worries, this is the Ultimate Linux Newbie Guide. We got this!
Header
rEFInd is a boot-loader for EFI based machines. Think of it like bootcamp, or GRUB for GRUB :) You'll want to download rEFInd from the rEFInd website:
Now, if you take a look around the rEFInd website, you'll see it looks like the guy that wrote it believes in punishing everyone that wants to use it. It took us about 20 minutes just to find the frigging download link! So the ULNG has taken the time to go through all the pertinent steps to make it shit tons easier for you!
The version of rEFInd that we used is 0.10.0, and we used the zip archive version. Once you download the binary, you are going to need to start the rest of your work from the Terminal, so open up the Terminal from the Utilities folder on your Macintosh and head over to your Downloads folder where you saved rEFInd to.
If the zip archive is not already unzipped, unzip it using the unzip command and head into the newly created refind-bin-0.11.0 folder:
$unzip refind-bin-0.11.0.zip
$cd refind-bin-0.11.0
Header
For the next step, take a note of the full directory where you downloaded the refind tool into. For example /Users/bob/Downloads/refind-bin-0.11.0 (you can also type pwd at the command prompt to tell you which present working directory you are in).
Before we can properly install rEFInd, we will need to take care of a pesky thing that Apple put into their hardware called SIP (System Integrity Protection). There are a couple of ways to do this, but I found the easiest way to do so is to pop your system into recovery mode and issue a command from the terminal there. There is a bit more information on this process over here.
To enter recovery mode on your Macintosh, shut your machine down completely. Give the machine around 30 seconds and then switch back on. Now quickly hold down the Command and R key at the same time until at least you hear the Apple 'chime' sound. Shortly you will enter recovery mode. I recommend plugging in an Ethernet cable to do this, however it is possible to do with WiFi.
Once you are in the Recovery tool, enter the Utilities menu up on the top bar, and click on Terminal.
Issue the following command:
csrutil disable
NOTE: Using macOS from Sierra onwards, the csrutil tool may have been removed. If csrutil is unavailable for whatever reason, don't despair, simply go into the directory that you downloaded refind into and run refind-install. Earlier, you noted down this folder, so just cd to it, for example:
$cd /Users/bob/Downloads/refind-bin-0.11.0/
Once you have done that, install rEFInd:
sudo ./refind-install
(if you are prompted for a password, note that this is your own mac password).
NB: if you have issues and find that rEFInd doesn't operate properly, you can also try the --alldrivers flag (but use this with extreme caution!) $sudo ./refind-install --alldrivers
Header
Once REFind is all installed, reboot the mac and you should be good to go. All going well, you should be seeing the rEFInd menu. Use the cursor key to select your Linux installation and hit that return key. Fingers crossed, your system will start up without much of a hitch!
If you don't see the rEFInd menu on startup, try starting up your mac whilst holding down the Command key (or if that doesn't work, the alt/option key).
---YOU PROBABLY NO LONGER NEED THE BELOW INFORMATION!---
The next bit of text was necessary for versions of rEFInd before 0.10.0. This guide has been updated for version 0.11.0, and so you shouldn't need to do any of this. Isn't that great?! However, if things don't work the way you expect, then you can do this whilst still in the recovery tool, and in the refind folder.
Now it's time to edit the EFI config file, but you will need to mount that hidden EFI partition first. Thankfully, rEFInd has a little tool you can use to mount the partition:
$sudo mountesp
Edit /Volumes/ESP/EFI/refind/refind.conf. Like me, you may find the refind.conf file is in /Volumes/ESP/EFI/BOOT, instead of a folder called refind.
$sudo nano /Volumes/ESP/EFI/refind/refind.conf (or use vi like me, if you are that way inclined. Just not emacs!).
locate the line that says scanfor and edit it to say:
scanfor internal
If no such line exists, add it into the file near the top.
Next, change the config file to load the appropriate Linux file system driver. Check for a line that starts fs0. If no such line exists, add it as below, otherwise edit it:
fs0: load ext4_x64.efi
fs0: map -r
Header
Save the file and quit your editor. That's pretty much it for the rEFInd bit. That is the hardest part over and done with. If you want to be sure it worked, you should power off your machine and power on again. If you see a grey screen with the rEFInd logo, then it has worked. You should be able to chose the Mac OS X logo and hit return to start up OS X again.
I haven't had any issues with the screen backlight, keyboard backlight and the volume control keys since Ubuntu 17.10, however if you do, a package is now available for Debian and Ubuntu called 'pommed', which handles the hotkeys found on the Apple MacBook Pro, MacBook and PowerBook laptops and adjusts the LCD backlight, sound volume, keyboard backlight or ejects the CD-ROM drive accordingly.
Installation is as simple as installing the package through apt-get:sudo apt-get install pommedsudo pommed
This will run pommed as a daemon (run in the background).
If that doesn't work for whatever reason run it in the foreground and check for any errors
sudo pommed -f. On my Late 2013 Macbook Pro Retina 15", pommed did not work for me. Check out Jessie's blog and accompanying script for a more manual solution if you face this problem too.
NB: I did find that my keyboard backlight buttons now work out of the box on Ubuntu 17.10.
The graphics display should generally work out of the box, however there may be 'interesting' graphical issues. Not all of these might be fixable, but give the NVidia drivers a try, and if you still don't have any luck, read the many forums until you get a solution that works for you.
sudo apt-get install nvidia-driver xserver-xorg-video-intel
Note if you are not using xorg, you'll need to make the appropriate changes here. Maybe best to stick with xorg for now!
On newer macs, they use AMD graphics rather than NVidia. They also have their own set of unique problems in some cases. As I don't have a mac with AMD graphics, you'll need to do a little more googling on that.
Header
Your Macbook Pro Retina display is also known outside the Apple world as an HiDPI display (high resolution graphics). Using the nvidia driver ensures that the maximum resolution of your display is achieved, however if you are used to seeing things extra small (therefore more screen real-estate, you can enable HiDPI scaling for GNOME via the following Terminal command and log out and log back into GNOME:
gsettings set org.gnome.desktop.interface scaling-factor 1
Setting it to a value of 2 returns the display to how it was before. You can also edit this setting within the dconf editor (GUI application)
If you are using another window manager such as KDE or are having issues with other apps not playing nicely, have a look at the ArchWiki for hints on HiDPI.
Okay, that about wraps it up for this ditty, I hope it has worked for you. If it hasn't, or you have some feedback to offer, we would love to hear it!
Header
In this commentary article I go into the journey I took from 2001 when I started out using Linux properly and the present day. If you think that you too would like to get into Linux as a career or become less of a novice and more of a power user, then read on, this article is for you. Even if you want to enter into other inter-related careers that depend heavily on Linux, for example DevOps, Cloud and Security, my twenty years experience in Linux might have some pearls of wisdom that you may find helpful.
The year was 2000. I was a student at college. Like most students, I was poor. I had been running Windows 95 and then 98. From a young age, I had grown up with computers and I got into them as my main area of interest pretty quickly. I had grown up with an PC/XT. Later a 486 and by 2000, I had my home-built Pentium II! I remember the day when I got a 512kbps ADSL connection to my home. Broadband! That was a game-changer for me, having had an unreliable 56K modem for the longest time, having access to this new thing called "The Internet". However, in all honesty the biggest change was before this, in 1999...
Header
It was the time when I realised that I was always having to reboot my PC that crashed continuously. I also had to reinstall Windows twice a year so that it wasn't almost unusable; It used to grind to a near halt when it started up. I often asked myself, why does my PC start off fine and then start getting slower and slower after a few months? I figured that it wasn't the hardware that was breaking - it was the software that was substandard. I started working as a technician in a large PC store around this time. Time after time, the customers were coming to me and saying their expensive PC was running slowly too. Everyone assumed that the computer was a dud. People even demanded refunds!
So, if this wasn't just happening to me, but happening to lots of normal people's computers, of all different makes and kinds, then the only one constant was the operating system. This was Microsoft Windows.
I was peeved, because I'd spent my own money on building a computer and buying Microsoft Windows to put on it. Money that I really needed to pay the rent and put food in my belly. I also felt sorry for all the people that I'd end up re-installing Windows on their PC to fix their problem. I knew that most of them would probably be back in the store six or so months later with the same complaint.
Header
Almost by accident, I found Linux. I was in the magazine section of the PC shop I worked in one day in late 1999. I saw a magazine called 'Linux Answers'. On the cover was a copy of Red Hat Linux 6.0. Before long, I had done the unthinkable: I had deleted Windows in a rage of fury because it had completely crashed and wouldn't start up. All of my MP3s, photos and documents, all but gone save for a few backups on CDs I had lying around. Back in those days I had no idea that I would have been able to salvage those files with Linux; I just blithely reformatted my hard disk and went cold-turkey, believing everything that the magazine said, I forced myself into the abyss of the unknown! These were exciting times!
I remember the blue text-mode installer, the glare of the many lines of text flying by when the machine started up for the first time. It looked really un-user friendly. Eventually, the screen flipped into what I'd later know to be called 'runlevel 5' and I could see a graphical login screen. Little did I know it, but that flashing cursor was the beginning to a whole new world of computing for me.
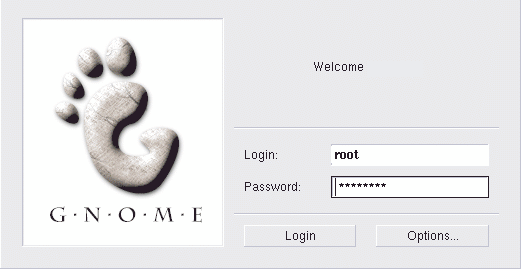
Header

For the most part, the journey I undertook was without issue. I remember having some hardware issues with my 3D graphics card, which I managed to fix after a good deal of twiddling. I already knew my way about computers and I still messed up a good number of times, but it was fun. I could tinker with literally anything; like a car enthusiast under the hood of their car, you could tweak anything to make it work just the way you wanted it to. The performance and reliability far outperformed that of its Microsoft counterpart. I was hooked.
Header
As I say, I was a computer kid. I had started my 'real' computer days in 1990, with MS-DOS 3.2. I grew up with un-user friendly commands that you'd type in. No mouse, no graphical 'Windows' like thing to use. But I wanted to play my games, so I had to learn to use MS-DOS! Despite computers being substantially harder to use in 1999 than they are today, whilst I was ready for Linux in 1999, most of the average computer users were not.
Header
A few years went by and because I'd forced myself to use Linux, despite it being a harder choice, it was what landed me my first 'proper' job. Up until now, I'd been studying and working part-time at the PC store. When I finished college, I sought out my first proper job. I joined up with my local 'LUG' (Linux Users Group) and as luck would have it, it was there I heard about getting a job in Linux.

Before long, I had found a job in a town a few miles away from my home city of Edinburgh, just by talking to the people at the 'LUG'. They were really helpful at building connections and helping me find work. I went to work for an Internet Service Provider in the early 2000s was crazy fun but also pretty wild sometimes. We'd make servers out of any old hardware we could. I cut my teeth compiling Slackware Linux kernels and make Apache 1.0 web servers. We hosted thousands of websites and before I knew it, I'd outgrown my role in terms of skills and interest. I was well on my way to being a knowledgeable Linux admin.
Header
The next job came along quickly. They wanted me as a consultant. I'd zoom around in my car from client to client, fixing up their computers and putting Linux on them whenever I could. I learned I could make backup servers, routers, firewalls, web servers, you name it; I was ripping out proprietary software at clients left right and centre, giving them software freedom with Linux. We charged the same rate for proprietary solutions as we did for open source Linux based ones. The trick was, because we didn't have any software costs to cover, and only a little more time to learn the solutions, the profit margin was far higher than when we had to deal with software licensing costs. The customers were happier too, because they had more reliable solutions. Win win.
Later on I decided to go to University (more on that later). I went back to the PC store I had worked at when I was at college. I still couldn't believe that all this time had passed, Windows XP was the norm now, and yet people were still having the exact same issues as I had seen in years gone by. I started giving free hour long lessons to anyone that wanted to come along on a Sunday so that they could find out about what Linux was and how to set it up, but that only had 20 or so students a week.
Now that I was a reasonably advanced user of Linux. Linux had been good to me. I felt that in-keeping with the philosophy of all things open source, it was time to pay it forward. I was still seeing far too many people suffer with slow, cumbersome, proprietary systems. I wished that I could tell them all about this computer revolution. I wanted to help bring Linux to as many people as I could, not just techies like me, so I decided to write a website to fit the bill that I couldn't find on the web anywhere else.
The year was 2001, I got a web design friend to help me with the graphics design and layout, whilst I went to work on writing the copy. I wrote ten chapters (which are now condensed to seven, given that Linux is far easier to use today). If you've read through the chapters of the Ultimate Linux Newbie Guide then you'll know that I started out with the pure intent on encouraging people with little in the way of 'geeky' computer savvy. I wanted to make it as completely open to everyone as possible, so that they could get into using Linux with the absolute minimum of things standing in their way to discourage or impede their journey into Linux and open source software.
Header
Liberty at stake: Linux to the masses!
Let me just get this out of the way first: I am no hippie. I wear a suit to work and I pay my taxes like everyone else. However, I believed strongly (and still do) that when you use a computer, you should be able to use it in the way you want to. You shouldn't need to be bound to licenses that impede your freedom. You should be able to trust the software you use isn't siphoning off your information to the highest bidder or wreaking havoc with your privacy. You should be able to have access to the use of a computer, no matter your background or financial wealth. Having a 10 year old computer should not be a limitation of you being able to use it. You shouldn't be limited to educate yourself about the inner workings of your computer system and software because a profiteering company locks it up for you not to see. I shouldn't have to pay exorbitant fees for software that doesn't match its price tag. Software that is often defunct in a year or two because the vendor crippled it that way.
Header
I spent time in the guide to extol the virtues of the fact that Linux and Open Source software means software freedom. Free as in free speech, not as in free beer (as Richard Stallman would put it). I spent many nights putting love into the guide and writing it all by hand in HTML (yes, in those days we didn't have CMS's!). I had a bit of spare time back then, and an understanding girlfriend! There were no ads on the website then, but as the years went on, I felt that in order to keep the site relevant and make my precious little spare time worthwile, I should put ads on the site. It was with a heavy heart I but I felt that a modicum of money from ads was reasonable for quality original content. When I say a modicum, I really mean a pittence, but when I see that little bit of money in my PayPal once every now and again, it reminds me that people use this site and get value from it. It keeps me motivated to keep going.

I realised I wanted more money than these initial roles were paying, and I knew that the bigger companies were paying 'the big bucks' for Linux people by 2002. I realised that no matter how good I became at Linux, if I didn't get myself a university degree, I'd probably not get a highly paid job. I quit work and went back to school. These days, I'd reckon that a University degree isn't necessary, if you can demonstrate capability. I'm a hiring manager these days and all I want to see is if you can walk the walk. Personally, I make a test server with a random scenario. The interviewee will SSH into the server and try to complete the scenario. If they can do that and they have the right personality, they are as good as hired!
Header
I underwent other training over the years, Cisco Networking, Red Hat Cloud technologies, LPI and so forth, however I feel that nothing beats experience and interest. If you've got your own lab at home and you play with it regularly, this is the best way to learn. Break things and break them again until you make it work! For me, these were the days when I learned the most. I learned about the inner-workings of the Internet and networking: DNS, DHCP, TCP/IP, Firewalling and Routing etc. I did this by setting up open source, Linux based services such as the BIND DNS server, DHCPd and using various other tools like ipchains (now iptables).
I got familiar with the nuances of the kernel and how the more lesser known aspects of a Linux system worked. I started up a 'shells' system for people to log into and play with Linux online. They would SSH into my server and they had their own account to play with. I'd leave emails for my users and we all had a great time. This was well before bitcoin mining etc took over. If I hosted shells these days, the server would be hacked in a second!
Having worked in a web hosting/ISP company some time back, I decided to set up a small web hosting business of myself on the side. Linux was now turning a small buck for me. Finally, I'd also found Debian Linux around this time. Back then on Red Hat systems (pre YUM), you had to download packages manually and they would often have tens or more 'dependencies'. It was a huge pain in he ass installing software. I went to Debian and I found APT. It solved all my pains by automatically resolving dependencies. I never looked back.
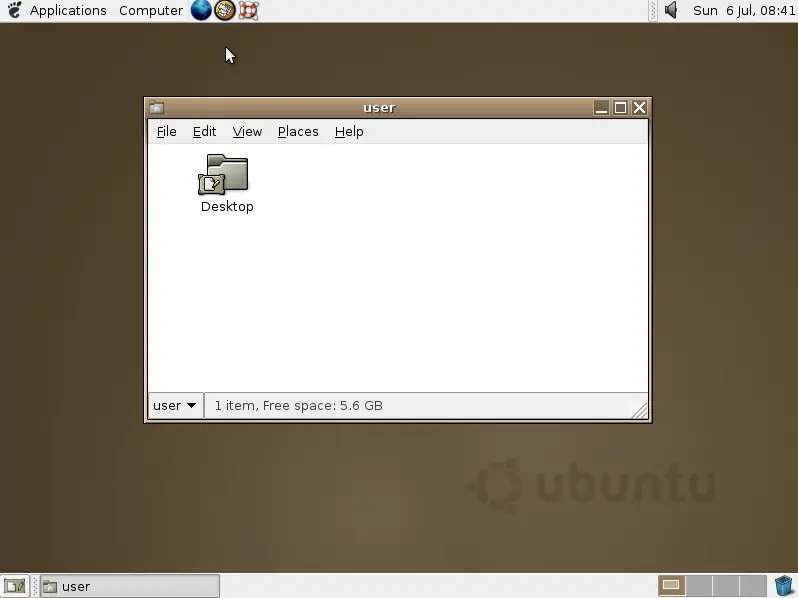
Header
On the 20th October 2004, Canonical LTD released the first version of Ubuntu Linux (4.10), which was built upon Debian. Back in those days, you could order a free CD copy from their website. I ordered a ton of them, keeping a couple for myself, but giving the rest away to anyone who was interested in using Linux.
Ubuntu was not the first Linux operating system designed for desktop users who were interested in jumping ship from Windows, but even back in 2004, I knew that Ubuntu was going to be a game changer for bringing Linux to the masses. In 2005 I re-wrote much of the Ultimate Linux Newbie Guide to cater for this new distribution and show why Linux was easier than ever to get going with.
This was an important part in the continued success of Linux for me personally, and also for my career. After university had finished, I could have gone on to work in jobs that required me to use Windows. I could have lost focus and gone back to Windows at home. However, Ubuntu breathed a new lease of life into me after four years of banging on about it, it could have been easy to get bored and go onto the next thing. However, I had seen the effects Ubuntu was having on the Linux community, and more importantly onto the everyday computer user.
Ubuntu gave me that pep to carry on. I got a job with General Electric and whilst they had locked down Windows PCs, I refused to roll over and I snuck Linux in wherever I could! I left there and went to work for Amazon and promptly installed Ubuntu over my work laptop's Windows partition. After all, I was working on data centres of Linux servers, what possible need would I have for a less flexible operating system?
Header
After I left Amazon, I went to work for a mobile software firm and became a CIO for that company. Some of us already used Linux. For those that didn't, in admin jobs or HR positions, I gradually showed them that they could get what they want without the price tag and without the nastiness of proprietary solutions. I vividly remember sitting down with the HR manager one day and asking him for his requirements for the new HR platform they wanted. They were all about ready to spend hundreds of thousands of pounds on an expensive system. I quickly looked into open source offerings and found that OrangeHRM, a completely free open source HR system fit their needs exactly. They asked "but what do we do if we need technical support?". There was a one thousand pound annual support contract if they wanted. The software worked, they got updates every year at no cost other than the internal IT team's time, and they saved hundreds of thousands of pounds.
Later, I spent time with the COO about their need to move off the simple email system they had and go to a groupware solution that gave them proper calendaring functionality. They wanted to go to Microsoft Exchange. I countered that with Zimbra. Money talked, the solution worked, and in the end the company conceded that there was no benefit in using Exchange over Zimbra. Strike two for Open Source!
Finally, I went around the developer teams and asked them if they wanted to evaluate using Ubuntu on their desktops. To my delight, many of them decided that it was better than their Windows tools and made the swap.
Header
Although Ubuntu has had it's up and downs (remember 2010's Unity desktop?), it is still more or less the distribution of choice for so many people; novices and nerds alike. Fortunately my investment in choosing Ubuntu for the ULNG had paid off. I made video howtos and wrote lots of original tutorials over the years and today, The Ultimate Linux Newbie Guide still remains one of the most popular guides on the net for introducing people to Linux. If you know someone who want a new lease of life from an ageing or slow computer, or if you just want to get the most out a computer then please share this site with everyone you can in the hope that they can get into a new world of computer freedom!

In 2008-09, the financial crisis hit the UK and by 2010 things weren't looking so great in the UK. So I decided to sell the house, car and all my possessions and do something a bit crazy. Without ever having been there, or without even having a job to go to, I emigrated to New Zealand. Since then I've worked in a few roles. One as an Infrastructure Manager in a University, one as a National Services Manager in an IT company and most importantly, working for two companies who embraced open source and sell their solutions closely around the open source ecosystem. All of my roles since 2001 have involved Linux in some way or another, even in a management capacity, I would be building solutions for customers or staff to help them get the most from their IT needs.
I guess this is the part you've been reading this for :)
If you want a job in Linux, like everything worthwhile in the world you've got to be prepared to put in some time an effort. As we approach the third decade of the 21st century, Linux and open source thrives more than ever in so many places.
Header
I could say that you should start off by getting certifications like the CompTIA Linux+, or the LIP certifications, maybe one from RedHat, but in the end of the day, like I said earlier, I don't think any of that really helped me. I learn by doing. I broke a lot of things, but I learned by mistakes. Fortunately, I made most of those mistakes in my home lab!
I started out my career as a Linux Systems Administrator, and even today, this is a great place to start out. These roles are also called a Systems Engineer or a Systems Analyst in some cases. If they involve Linux in some way, they are probably similar in duties.
If you have more specific areas in mind then make sure you skill up on those areas. For example, if you want to become a developer, make sure you become fluent in DevOps (or even DevSecOps if you want to be at the cutting edge!). Here are a list of skills that you want to familiarise yourself with before going to that first interview. At the very least, know what they are. At best, study them, and more importantly, learn them by playing with them at home, in your own time, ideally on an old PC or laptop you don't use much any more:
I have linked some of the above points to articles on the Ultimate Linux Newbie Guide to get you the basics on what each of those things are.
Don't forget that whilst having lots of relevant tech skills is really important, so too is your ability to write a decent cover letter and CV. Relax into an interview and let your personality shine through more than your skills. They can test your skills if they want to.
As I mentioned earlier, going to my local Linux Users group really helped. It gave me the confidence to meet people and ask for help when I was young and inexperienced. It gave me links to people who were looking to hire. Remember that networking takes time though. You are building relationships and trust, you can't build that in a day. Make friends, listen to others and ask for help when the time is right.
Header
Ultimately it doesn't matter what you end up doing for a first job. If your role involves using open source software, you are going to find yourself far more useful (and happier in your role), if you get invested in Linux. And when I say invested, I mean be passionate. If you just want to do this for the dollars, then I suggest that you should become a salesperson instead. My lifelong desire to evangelise Linux and open source, my drive to learn new things, tinker and pass on my knowledge to others has driven me to where I am. Working with Linux is exciting. Everyone that works in my team today always hates it when I give them some work to do that involves working on Windows. Many of them came from a background of working with Windows to begin with, they just found that working in an environment that promotes an ecosystem of openness and 'paying it forward' really works.
A big part of the culture in my team is centred around the meritocracy of open source. Everyone helps everyone else out and of course everyone has fun whilst we do it.
So there you have it. That's why I got into Linux, and that's why I still am in it. It continues to challenge me, it continues to pay for a comfortable lifestyle and most importantly, it still allows me to enjoy a positive working life.
I wish you all the very best on you road to success!

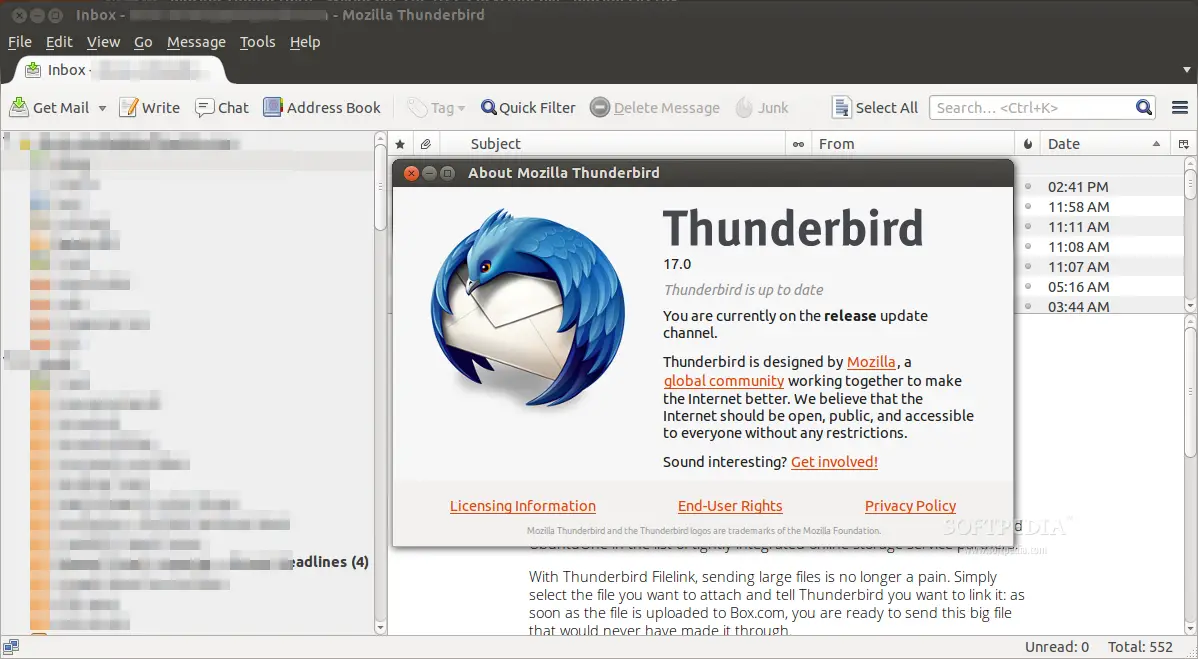